
Prerequisites
Familiarity with Python, JavaScript, HTML, CSS and some basic Linux commands. Although I would try to explain everything as much as I can, if you have some difficulty in understanding any concept please refer to the official documentation of Django, React, Docker, or any other documentation as necessary.
You would need to have Python, Node, Postgres and Docker installed on your system. Python and Node come with their default package managers i.e. pip and npm respectively. I would use these package managers for this article, but feel free to use any other package manager which works for you. For this article, I used Python 3.7.4, Node 12.16.2, Postgres 12.3 and Docker 19.03.12. Docker was installed as the Docker Desktop version which comes pre-packaged with docker-compose, version 1.26.2 in my case.
I used VS Code as my editor as this is a free editor with many features and a built-in terminal which comes very handy for our use case. Again feel free to use an editor of your choice.
For this project, as you would also see, later on, we would be creating REST APIs. To test the APIs we create, you would need to install Postman. You can get it from here.
What are we going to build?
Backend – Django, Django REST framework, PostgresSQL
We are going to create a simple machine learning application with Django REST framework, which predicts the species of a sample flower based on measurements of its features i.e. the sepal and petal dimensions – length and width. We have already covered this is in great detail in a previous article. Please familiarize your self with that article. We would use the same Django application here and make some modifications as required. In the previous article, the Django application was connected with a SQLite database. For this article, however, we would use Postgres as our database, as Postgres is better suited for production builds. Django comes packaged with a great admin dashboard. With the admin dashboard, we can register users to our application, who can then interact with our machine learning application to make predictions. Our Django application thus would serve the purpose of our backend and admin tasks.
Frontend – React
Once a user has been created, they would be able to login to a portal – the frontend, and interact with our machine learning model running on the backend through REST APIs. The user would be able to perform two things:
- Make predictions.
- The user would be able to provide sample iris flower data, and then press a button to make predictions. Once the user hits enter on the button, the user-defined iris data would be sent to the backend through a POST API request. The backend would process this data and make predictions based on the trained machine learning model integrated into the backend. The predicted iris flower species would be then instantly sent back to the user on the frontend.
- Change their password on the frontend as this password would be set up initially by an admin through the admin dashboard with a default password.
Production build of our application – Docker
The Docker part is optional. If you are interested only in knowing how to integrate Django and React together to create a simple but robust machine learning app, you may skip this section in the article.
The reason we would use docker is not only because this is pretty much the standard for productionising applications, but also, as you would see, that it allows to seamlessly integrate all our developed work in a single docker workflow which is platform-independent and allows making deployments much easier with simple docker commands, in contrast to running individual applications with multiple commands. We would also add Nginx to our docker workflow which would allow us to serve both our Django and React applications running within Docker containers.
Creating our backend
Create a local Python environment and install the necessary packages
Ensure you have Python 3.7 + installed in your system. Check the official Python download section if possible.
Create an empty project folder called 'DockerDjangoReactProject'. Open a terminal, navigate to this folder, type 'code .',
D:\Projects\DockerDjangoReactProject> code .
 and hit enter. This would open VS Code with this folder set as the project/work folder.
 We would first create a local python environment to store all python packages required for our backend app within this environment. There are a few different ways to create a Python environment. Here we would use the 'virtualenv' method. First, ensure you have the 'virtualenv' package installed in your base Python install. If not, install it by performing 'pip install virtualenv'.
D:\Projects\DockerDjangoReactProject> pip install virtualenv
Note: if you are on a Mac or Ubuntu/Linux server which has both Python2 and Python3 installed then you would need to perform something like below.
D:\Projects\DockerDjangoReactProject> python3 -m pip install virtualenv
Next, create your local python environment with 'virtualenv' as below. Again, you may need to prefix the below with 'python3 -m' as required.
D:\Projects\DockerDjangoReactProject> virtualenv localPythonEnv
Activate your python environment as below with 'localPythonEnv\Scripts\activate'. Note that I am using windows, and the equivalent command on Linux and Mac is 'source localPythonEnv/bin/activate'. Once the environment has been activated you do not need to prefix any python command with 'python3 -m'.
D:\Projects\DockerDjangoReactProject> localPythonEnv\Scripts\activate
(localPythonEnv) D:\Projects\DockerDjangoReactProject>
Create a requirements.txt file within our project folder, which contains the below information about all Python packages we need for our project. You may omit the version numbers from the below to get the latest packages instead:
Django==3.1
djangorestframework==3.11.1
django-rest-auth==0.9.5
django-cors-headers==3.5.0
psycopg2-binary==2.8.5
pandas==1.1.1
scikit-learn==0.23.2
joblib==0.16.0
gunicorn==20.0.4
From within the project folder, perform the below command to install all of these packages in our local Python environment.
(localPythonEnv) D:\Projects\DockerDjangoReactProject> pip install -r requirements.txt
Create a new Django project and mainapp
Create a new folder called backend within our DockerDjangoReactProject folder.
(localPythonEnv) D:\Projects\DockerDjangoReactProject> mkdir backend
(localPythonEnv) D:\Projects\DockerDjangoReactProject>cd backend
From within the backend folder create a new Django project by running the below command. We would call our Django project mainapp.
(localPythonEnv) D:\Projects\DockerDjangoReactProject\backend> django-admin startproject mainapp
By default, when Django creates a project it then creates an app within the project folder with the same name as the project.
D:\PROJECTS\DOCKERDJANGOREACTPROJECT\BACKEND
└───mainapp
     └───mainapp
That is why we are calling our app mainapp from the beginning so that when we go inside the project folder which has other apps as well, we know which the main app is. Now rename the outer mainapp folder to just 'django_app'.So finally our folder structure within the backend folder should look like below:
D:\PROJECTS\DOCKERDJANGOREACTPROJECT\BACKEND
└───django_app
    │   manage.py
    │
    └───mainapp
            asgi.py
            settings.py
            urls.py
            wsgi.py
            __init__.py
Create a new Django prediction app (not the default mainapp as before)
Navigate to the django_app folder from the command line
(localPythonEnv) D:\Projects\DockerDjangoReactProject\backend>cd django_app
and create a new Django app by performing the below.
(localPythonEnv) D:\Projects\DockerDjangoReactProject\backend\django_app>django-admin startapp prediction
You would see that a new app has been created side by side the 'mainapp'.
D:\PROJECTS\DOCKERDJANGOREACTPROJECT\BACKEND
└───django_app
    │   manage.py
    │
    ├───mainapp
    │       asgi.py
    │       settings.py
    │       urls.py
    │       wsgi.py
    │       __init__.py
    │
    └───prediction
            admin.py
            apps.py
            models.py
            tests.py
            views.py
            __init__.py
The 'mainapp' is, as the name suggests, the main app which would serve our Django application. However, all other functionality would be performed by other custom apps we create, such as the prediction app in our case. We would add another app called 'users' later on. Add our newly created app to project settings
Open the settings.py file in the mainapp folder. Add our new app 'prediction' in the installed apps section at the bottom.
INSTALLED_APPS = [
    'django.contrib.admin',
    'django.contrib.auth',
    'django.contrib.contenttypes',
    'django.contrib.sessions',
    'django.contrib.messages',
    'django.contrib.staticfiles',
    'prediction',
]
Connect our local PostgresSQL database to our django_app
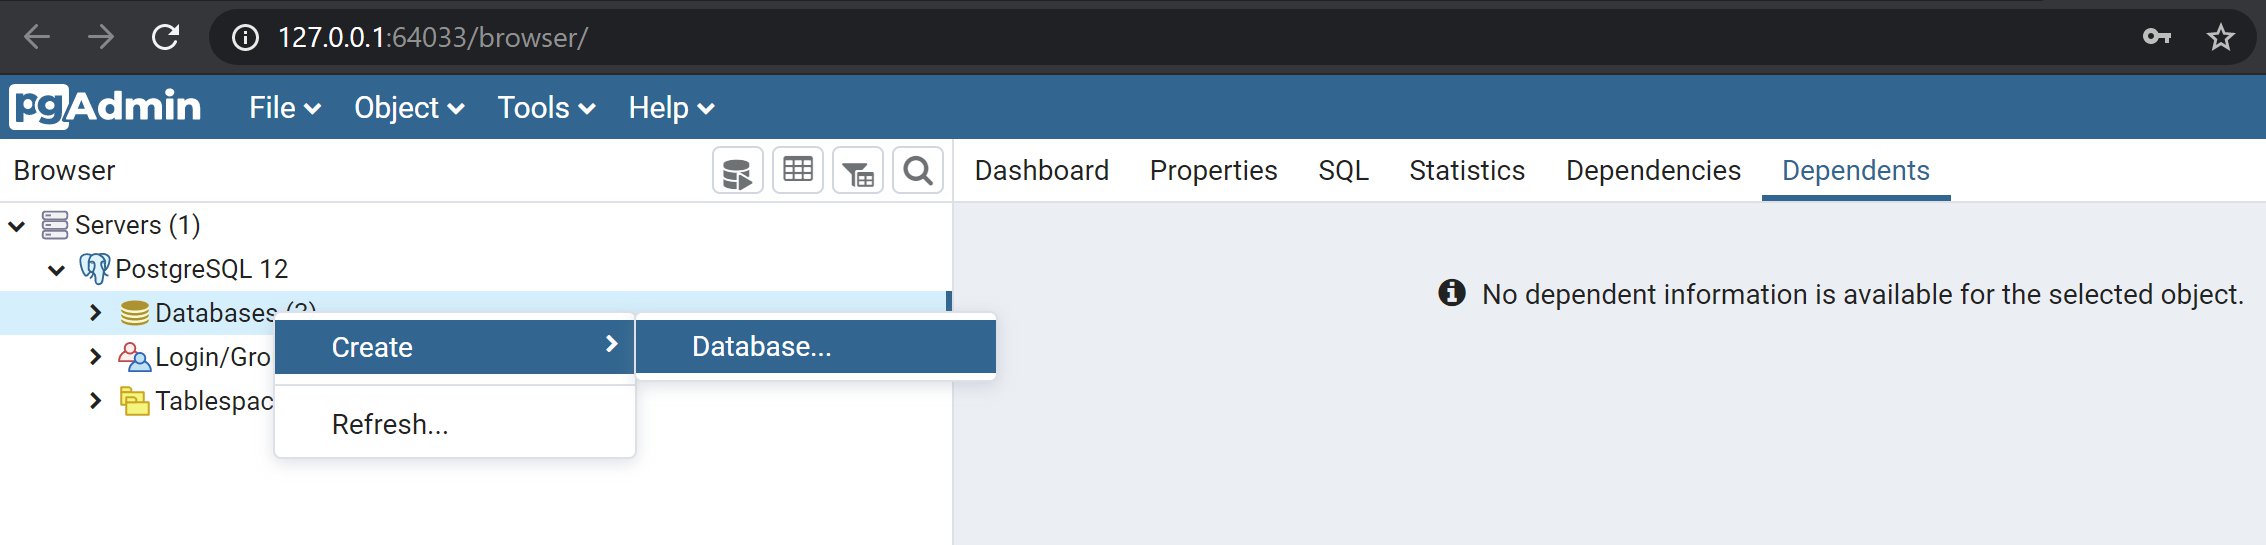
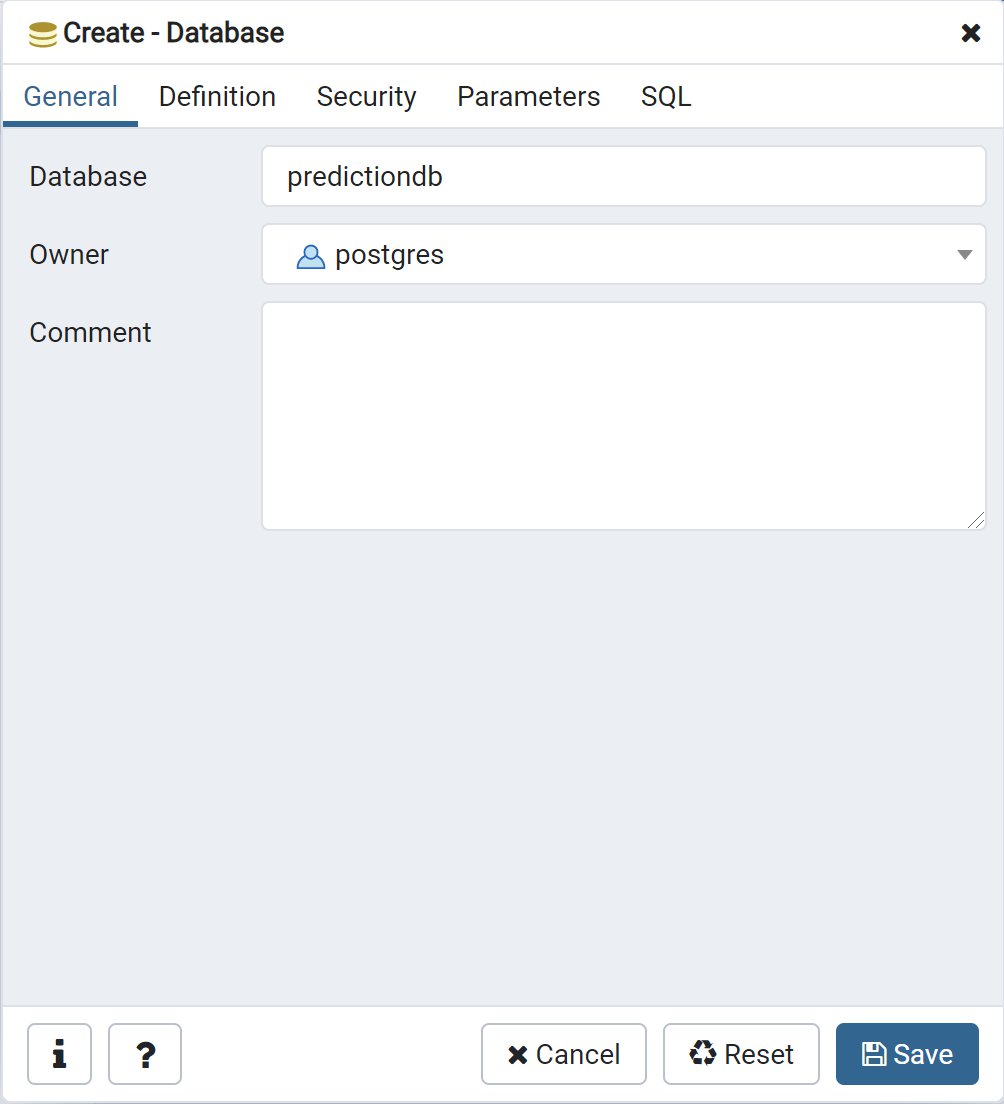
Ensure that you have PostgreSQL 12+ installed. Check the official PostgreSQL download section if possible. I used the pgAdmin which comes with official windows download, to create a new empty database called 'predictiondb'. Note that the first time pgAdmin opens up in your browser you would need to specify a default user and password. You may add 'postgres_user' as the user and 'postgres_password' as the password.
Create a file called local_settings.py in our mainapp folder.
D:\PROJECTS\DOCKERDJANGOREACTPROJECT\BACKEND\DJANGO_APP
│   manage.py
│
├───mainapp
│       asgi.py
│       settings.py
│       urls.py
│       wsgi.py
│       __init__.py
│       local_settings.py
│
└───prediction
This would be used to override some of the settings.py file settings. Open the settings.py file and add the following at the very end.
#########################################
    ##  IMPORT LOCAL SETTINGS ##
#########################################

try:
    from .local_settings import *
except ImportError:
    pass
Now we would provide our PostgreSQL connection settings in the local_settings.py file. Open the local_settings.py file and add the following information:
DATABASES = {
    'default': {
        'ENGINE': 'django.db.backends.postgresql_psycopg2',
        'NAME': 'predictiondb',
        'USER': 'postgres_user',
        'PASSWORD': 'postgres_password',
        'HOST': '127.0.0.1',
        'PORT': '5432',
    }
}
As you could see in the above settings, the 'NAME' attribute is the name of your database, while the 'USER' and 'PASSWORD' would need to be the same you would have used while setting up pgAdmin or PostgreSQL on your system. Migrate django_app schema
At this point, we need to migrate our existing schema to a database. This is because normally within Django, we create data models to interact with databases. Although at this point we have just added only one app, prediction, and not defined any data model, if you go to the INSTALLED_APPS section in the settings.py file, you would see that a number of default apps already exist. Some of these pre-installed apps already have their models (or schemas defined). So that our django_app schema/models are consistent with the database we need to perform a migration first before going further.
Ensure that you are in the django_app folder and the local Python environment is activated. Perform python manage.py migrate.
(localPythonEnv) D:\Projects\DockerDjangoReactProject\backend\django_app>python manage.py migrate
If your local database can correctly connect to your django_app then you should see messages such as below in your terminal.
Operations to perform:
  Apply all migrations: admin, auth, contenttypes, sessions
Running migrations:
  Applying contenttypes.0001_initial... OK
  Applying auth.0001_initial... OK
  Applying admin.0001_initial... OK
  Applying admin.0002_logentry_remove_auto_add... OK
  Applying admin.0003_logentry_add_action_flag_choices... OK
  Applying contenttypes.0002_remove_content_type_name... OK
  Applying auth.0002_alter_permission_name_max_length... OK
  Applying auth.0003_alter_user_email_max_length... OK
  Applying auth.0004_alter_user_username_opts... OK
  Applying auth.0005_alter_user_last_login_null... OK
  Applying auth.0006_require_contenttypes_0002... OK
  Applying auth.0007_alter_validators_add_error_messages... OK
  Applying auth.0008_alter_user_username_max_length... OK
  Applying auth.0009_alter_user_last_name_max_length... OK
  Applying auth.0010_alter_group_name_max_length... OK
  Applying auth.0011_update_proxy_permissions... OK
  Applying auth.0012_alter_user_first_name_max_length... OK
  Applying sessions.0001_initial... OK
Create a Super User
Next, we are going to create a superuser/admin for our project. This is so that the superuser can log in to an admin dashboard, monitor the project and add users as we would see later on. Run the command 'python manage.py createsuperuser'. This would ask you for user details and password. Provide them and press enter every time.
(localPythonEnv) D:\Projects\DockerDjangoReactProject\backend\django_app>python manage.py createsuperuser
Once the superuser has been created, the terminal would display 'Superuser created successfully. ' in the end. Note that this superuser information would be stored in the PostgreSQL database we created earlier. This is why we needed to perform the migration before-hand so that our django_app data model for the users is in-sync with a users table within the PostgreSQL server.Check Django is running successfully.
From the django_app folder run the command 'python manage.py runserver'.
(localPythonEnv) D:\Projects\DockerDjangoReactProject\backend\django_app>python manage.py runserver
If you followed the above steps correctly, you would see a message similar to the following in the command line.
System check identified no issues (0 silenced).
September 03, 2020 - 18:19:47
Django version 3.1, using settings 'mainapp.settings'
Starting development server at http://127.0.0.1:8000/
Quit the server with CTRL-BREAK.
Open your web browser and go to the url 'http://127.0.0.1:8000/'. You should see the following in your browser:
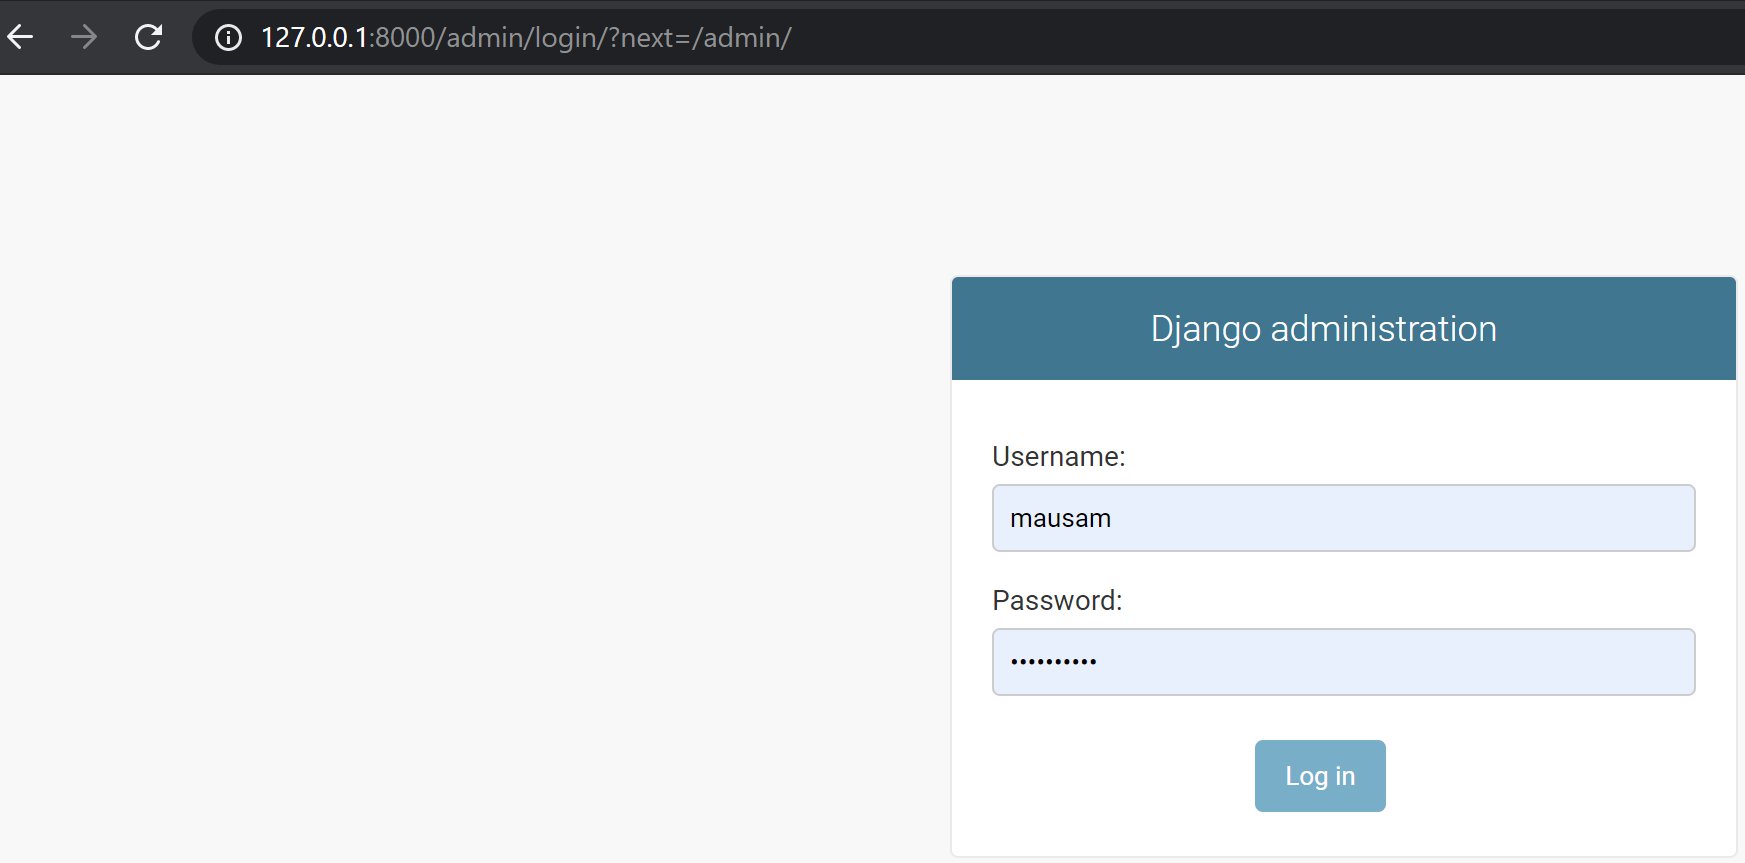
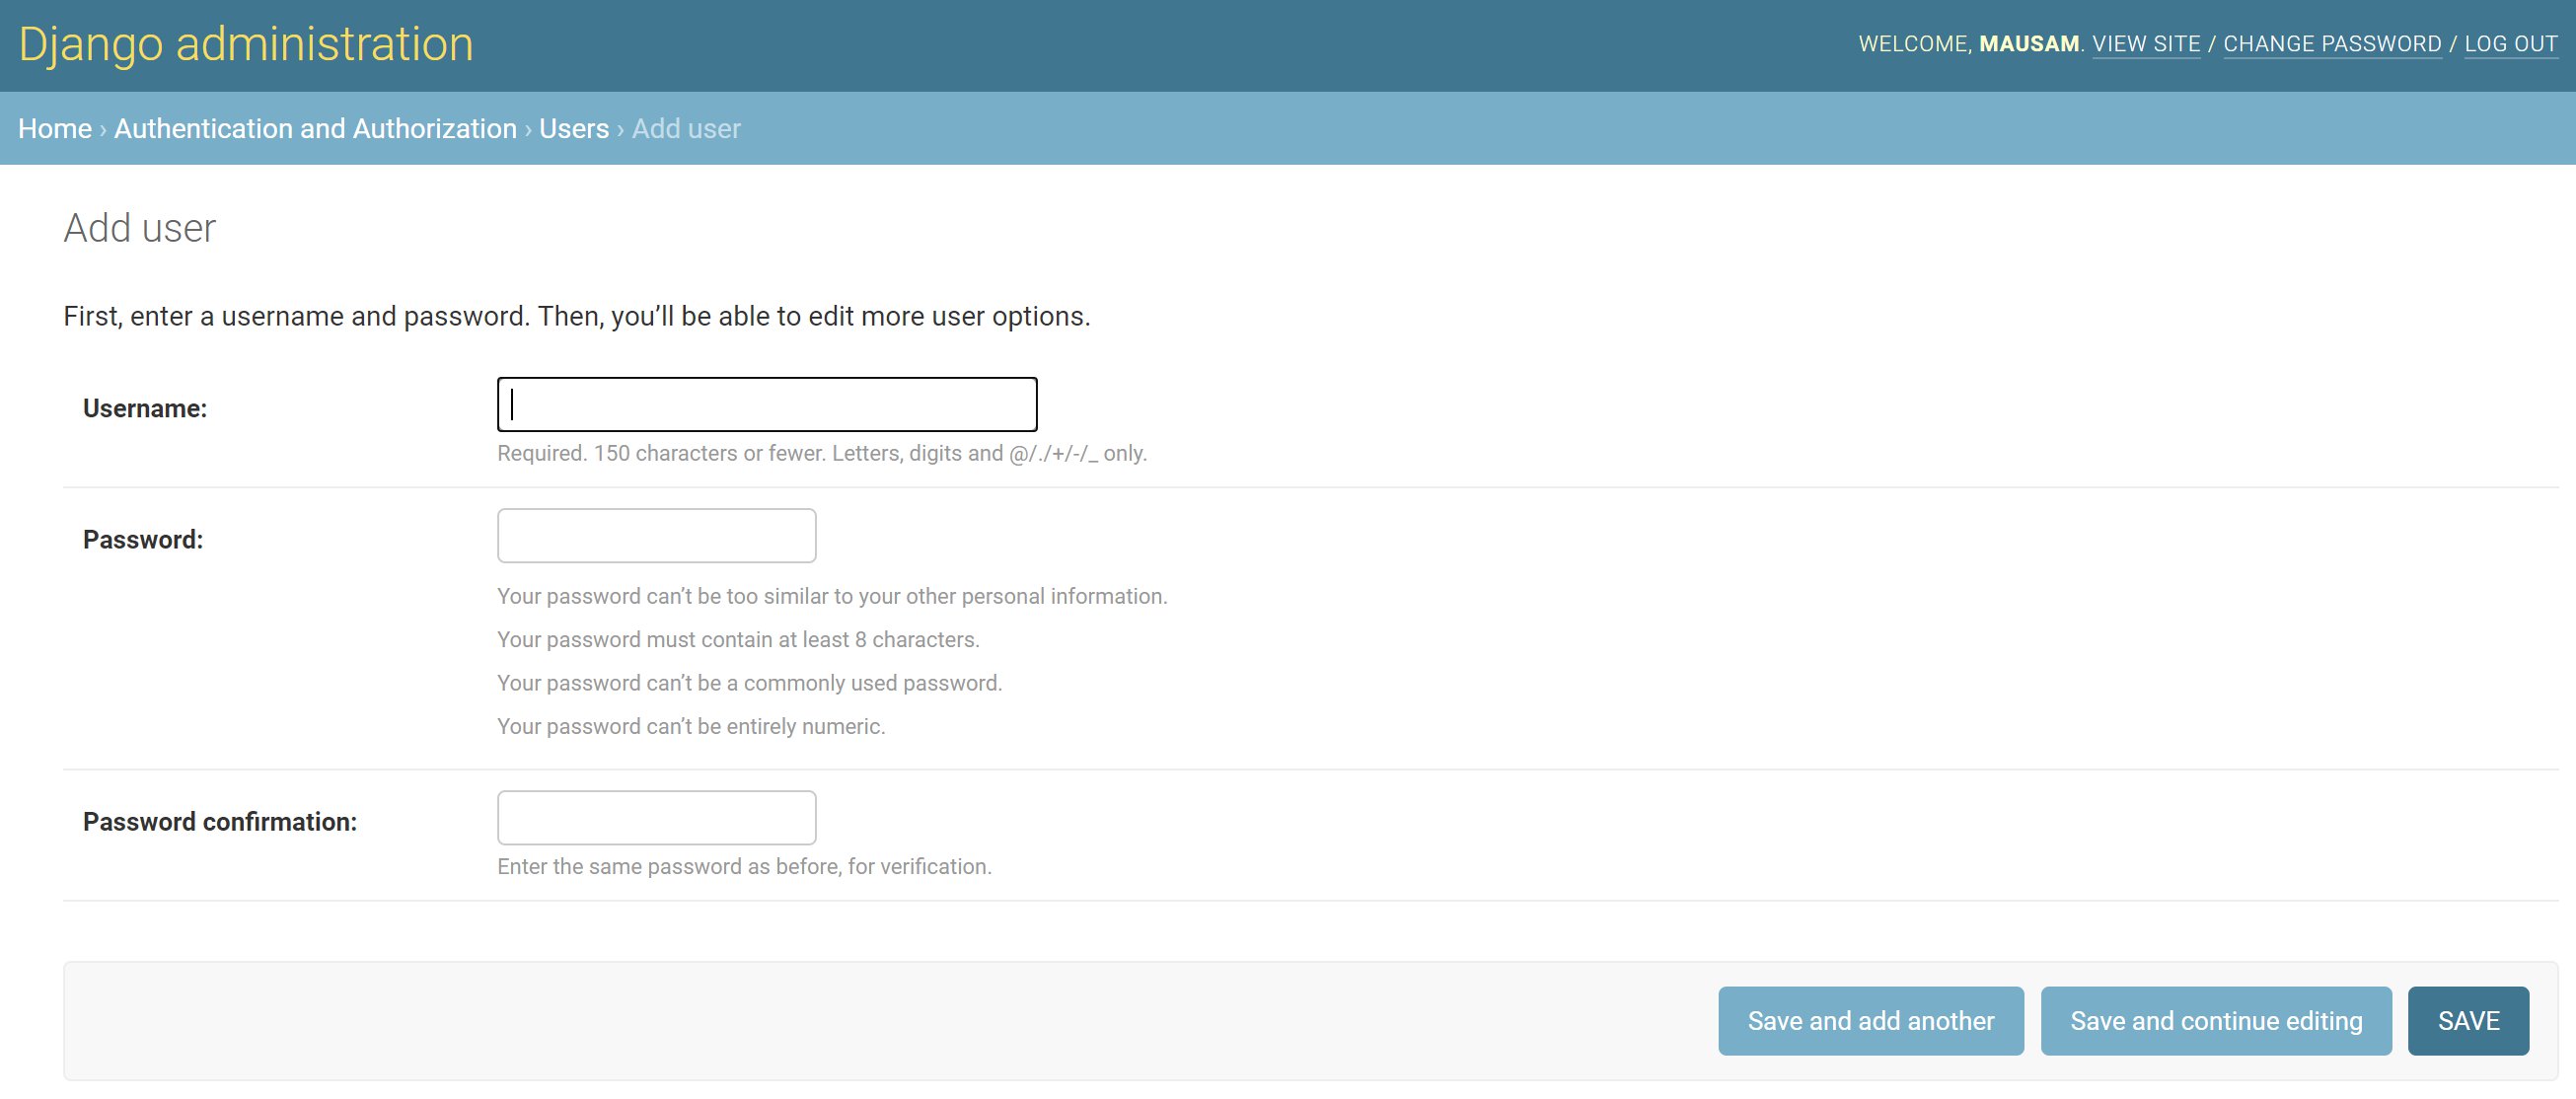
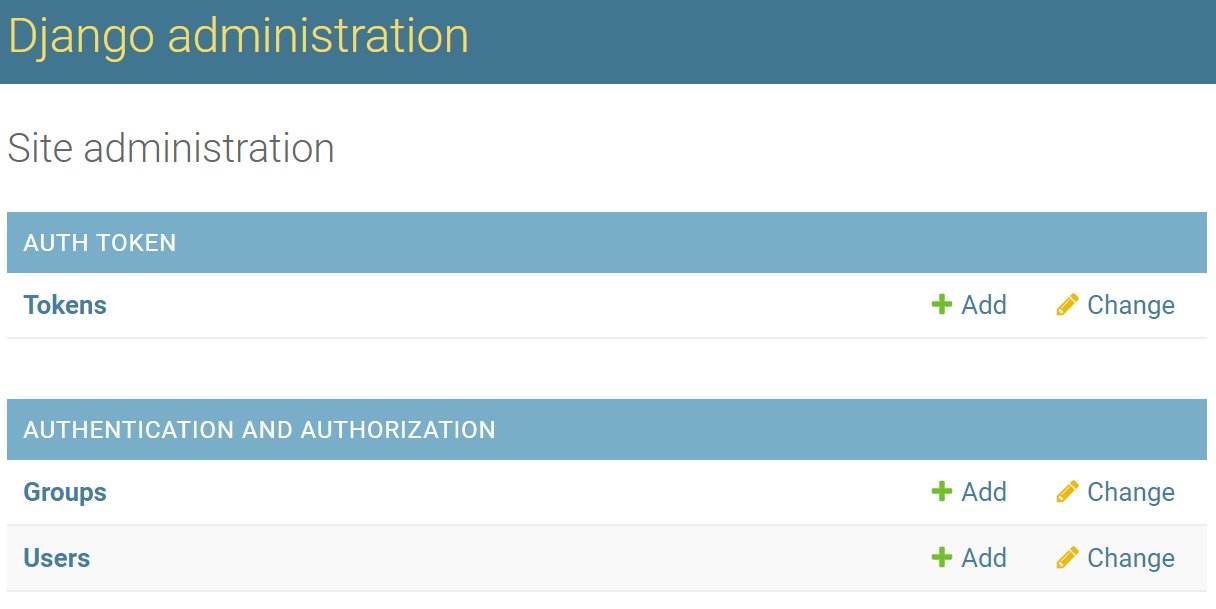
If you go to the http://127.0.0.1:8000/admin/ route, you would see an admin panel as shown below. You can log in to the admin view with the superuser name and password you created earlier. That superuser is the admin for our Django application.
Upon logging in you would be able to see the below.
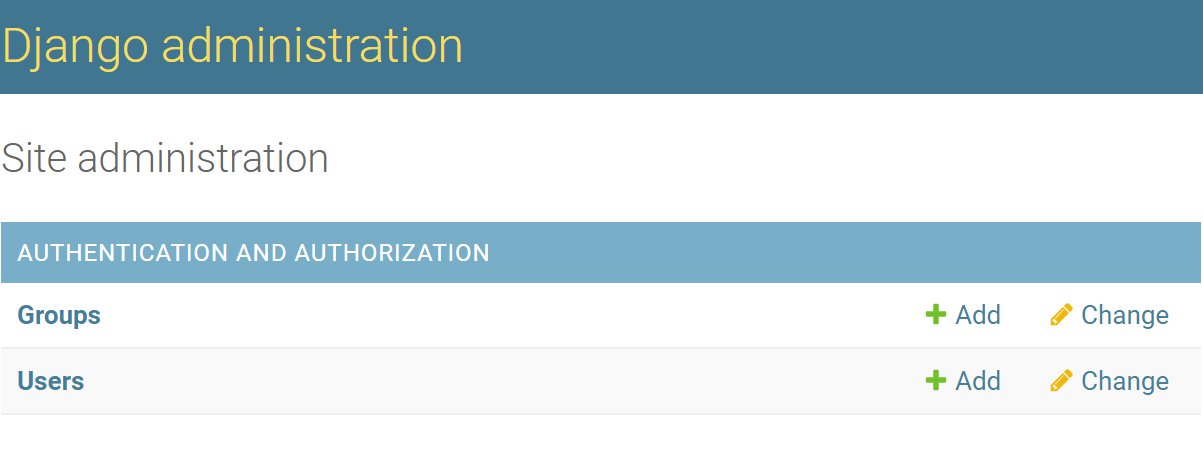
Click on the + Add Users. You would see that as the admin of the django_app you can add users very easily.
Press Ctrl+C on your terminal and close the django_app running server.
Create our prediction view
We already created our prediction machine learning model in one of our previous posts. You may refer to the article to see how the machine learning model was created. Create a folder called 'mlmodel' in the prediction app folder. Copy the file 'IRISRandomForestClassifier.joblib' which we created in our previous post to this 'mlmodel' folder. For your convenience, the file is stored here on github.
D:\PROJECTS\DOCKERDJANGOREACTPROJECT\BACKEND\DJANGO_APP\PREDICTION
│   admin.py
│   apps.py
│   models.py
│   tests.py
│   views.py
│   __init__.py
│
└───mlmodel
        IRISRandomForestClassifier.joblib
Edit the apps.py file in the prediction app folder so that it looks like below:
from django.apps import AppConfig
import pandas as pd
from joblib import load
import os

class PredictionConfig(AppConfig):
    name = 'prediction'
    BASE_DIR = os.path.dirname(os.path.dirname(os.path.abspath(__file__)))
    MLMODEL_FOLDER = os.path.join(BASE_DIR, 'prediction/mlmodel/')
    MLMODEL_FILE = os.path.join(MLMODEL_FOLDER, "IRISRandomForestClassifier.joblib")
    mlmodel = load(MLMODEL_FILE)
The reason we are loading the ml model in our apps.py file is that in this manner the classifier is loaded only once, when a session connection is made to our Django application, reducing overhead. We are loading the trained and saved classifier back into memory with the 'joblib' load method as suggested by the official scikit-learn docs. Next, we are going to create an API view in our prediction app. Since we are going to create REST APIs with the help of the Django Rest Framework which we installed earlier through the requirements.py file, be sure to add 'rest_framework' as an app in the settings.py file.
# Application definition

INSTALLED_APPS = [
    'django.contrib.admin',
    'django.contrib.auth',
    'django.contrib.contenttypes',
    'django.contrib.sessions',
    'django.contrib.messages',
    'django.contrib.staticfiles',
    'prediction',
    'rest_framework',
]
Now, edit the views.py file in our prediction app folder such that it looks like below:
from rest_framework import status
from rest_framework.decorators import api_view
from rest_framework.response import Response
from rest_framework.views import APIView
from prediction.apps import PredictionConfig
import pandas as pd

# Create your views here.
# Class based view to predict based on IRIS model
class IRIS_Model_Predict(APIView):
    def post(self, request, format=None):
        data = request.data
        keys = []
        values = []
        for key in data:
            keys.append(key)
            values.append(data[key])
        X = pd.Series(values).to_numpy().reshape(1, -1)
        loaded_mlmodel = PredictionConfig.mlmodel
        y_pred = loaded_mlmodel.predict(X)
        y_pred = pd.Series(y_pred)
        target_map = {0: 'setosa', 1: 'versicolor', 2: 'virginica'}
        y_pred = y_pred.map(target_map).to_numpy()
        response_dict = {"Predicted Iris Species": y_pred[0]}
        return Response(response_dict, status=200)
So we have created a class-based view 'IRIS_Model_Predict' which inherits from the default APIView of django rest_framework. Basically this view takes JSON input data from a URL request(which we would define below), processes the data and makes prediction from the loaded machine learning model defined in the apps.py file.Create URLs
Next, we need to define the routes for our backend application. One of the routes, the admin route, you have just seen above which takes you to the admin view. Open the urls.py file in the mainapp folder. Make changes so that the urls.py file looks like below.
from django.contrib import admin
from django.urls import path, include

urlpatterns = [
    path('admin/', admin.site.urls),
    path('api/', include('prediction.urls')),
]
So basically we are saying that any route starting with /api/ (such as http://www.example.com/api/...) should take us to prediction.urls file which would contain the remainder of the route. To define the remainder of the route, create a urls.py file in the prediction app folder. The file should contain the below.
from django.urls import path
import prediction.views as views

urlpatterns = [
    path('predict/', views.IRIS_Model_Predict.as_view(), name = 'api_predict'),
]
This is saying that we are adding 'predict' to the URL path /api/ so that if we make api URL requests such as http://www.our-final-app.com/api/predict/ we would be taken to the IRIS_Model_Predict view, from which we should get a predicted response back for a sample iris flower data sent along with the request. Test our prediction API
Restart our django_app server by performing 'python manage.py runserver' as before.
Open Postman to make a new POST request. Since our django_app is running on the local server we would be making an API request to either http://127.0.0.1:8000/api/predict/ or http://localhost:8000/api/predict/. We would be sending the below sample iris flower data as JSON to make a prediction.
{
	"sepal length (cm)": 6.5,
	"sepal width (cm)":3,
	"petal length (cm)":2,
	"petal width (cm)":1
}
Make the request from Postman as below. The JSON sample flower data should be sent in the Body->raw->JSON format.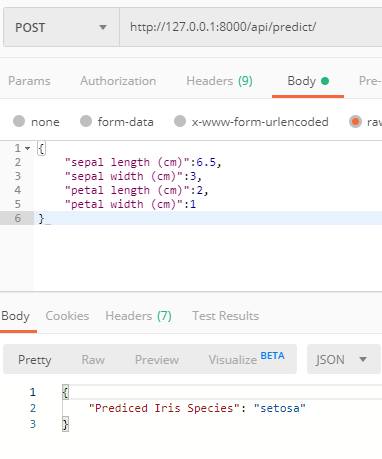
You would see that the loaded machine learning model predicted the flower species for the sample as "setosa".
This means that our prediction API is working correctly.
Add authentication to our REST APIs
Although our prediction API is working correctly, in a real-world situation we would want to restrict access to API requests made to our application to registered users only. Therefore we want to add functionality, where registered users can be authenticated. The way this would work in our case is as below:
- New users are added by the admin through the admin view with default passwords.
- New user then is able to login to our app and choose a password of their choice.
- The user then makes a REST API login request with their username and password.
- The login view in our app then generates a token and sends this token back to the user.
- The user then uses this token to authenticate themselves for the prediction API. Only authenticated users are able to make a prediction with the IRIS_Model_Predict view created earlier and non-authenticated users are sent an error response.
To create the login view as described above, and to return tokens upon login we would use a package called django-rest-auth which we already installed with the requirements.py file before.
In our installed apps in settings.py add 'rest_framework.authtoken' and 'rest_auth' as applications as shown below:
# Application definition

INSTALLED_APPS = [
    'django.contrib.admin',
    'django.contrib.auth',
    'django.contrib.contenttypes',
    'django.contrib.sessions',
    'django.contrib.messages',
    'django.contrib.staticfiles',
    'prediction',
    'rest_framework',
    'rest_framework.authtoken',
    'rest_auth',
]
We then need to migrate our app schemas for the newly added apps to the database with 'python manage.py migrate'.
(localPythonEnv) D:\Projects\DockerDjangoReactProject\backend\django_app>python manage.py migrate
This would create a new table called 'authtoken_token' in our database. You can see this from pgAdmin.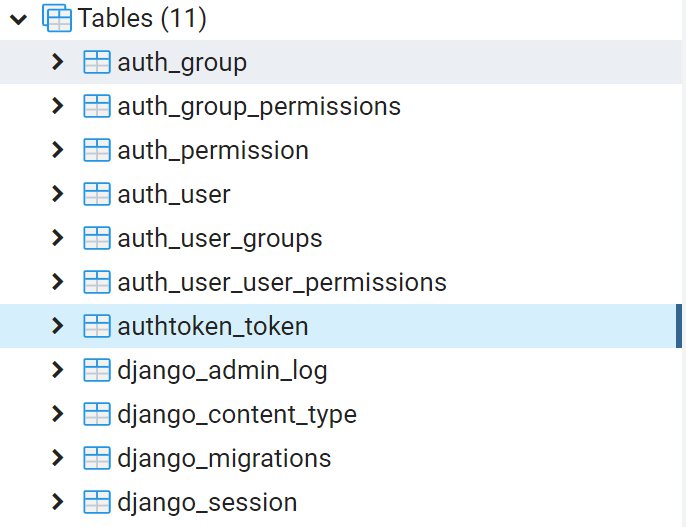
You could also see the same table in the Django admin view. This table would store the tokens created for all the users and delete them whenever a user logs out.
Now we need to create an app called 'users' within our django_app which can handle user login/logout through REST APIs, return a token upon login and expire a token upon logout. Luckily all of this would be very easy to handle because we already installed the django-rest-auth. However, we need to create our 'users' app first. Stop the django_app server if it is running and run the below command:
(localPythonEnv) D:\Projects\DockerDjangoReactProject\backend\django_app>django-admin startapp users
Like before add 'users' as an installed app in the INSTALLED_APPS section in the mainapp.settings.py file. Note that we have re-arranged the list below so the prediction and users are both at the bottom.
# Application definition

INSTALLED_APPS = [
    'django.contrib.admin',
    'django.contrib.auth',
    'django.contrib.contenttypes',
    'django.contrib.sessions',
    'django.contrib.messages',
    'django.contrib.staticfiles',

    'rest_framework',
    'rest_framework.authtoken',
    'rest_auth',

    'prediction',
    'users',
]
Open the views.py file in the users folder.
└───users
        admin.py
        apps.py
        models.py
        tests.py
        views.py
        __init__.py
Modify the file to look like below.
from rest_auth.views import (LoginView, LogoutView)
from rest_framework.authentication import TokenAuthentication
from rest_framework.permissions import IsAuthenticated

# Create your views here.
class APILogoutView(LogoutView):
    authentication_classes = [TokenAuthentication]
    permission_classes = [IsAuthenticated]

class APILoginView(LoginView):
    pass
So essentially we are just going to use the LoginView from rest_auth as it is and for logout, we ensure that only the user who is logged in is able to log themselves out by authenticating with the token they received while logging in. This is what the authentication and permission classes in the APILogoutView do. Now we need to do one more thing before testing our API login and logout views. We need to actually define the API URL requests to perform the login and logout (views). Just like before add the line 'path('api/auth/', include('users.urls'))' to the urls.py file in the 'mainapp'. Note that we would need to add this line above the previous 'path('api/', include('prediction.urls'))' line. This is so that Django doesn't get confused and sent everything starting with 'api' to the prediction app. So, the urls.py file in the 'mainapp' should look like below.
from django.contrib import admin
from django.urls import path, include

urlpatterns = [
    path('admin/', admin.site.urls),
    path('api/auth/', include('users.urls')),
    path('api/', include('prediction.urls')),
]
Just like before, create a urls.py file in the users app and put the below code in the urls.py file.
from django.urls import path, include

from users.views import APILoginView, APILogoutView
urlpatterns = [
    path('login/', APILoginView.as_view(), name='api_login'),
    path('logout/', APILogoutView.as_view(), name='api_logout'),
]
Now with the URLs and views created, we should be able to test our API login and logout views through Postman. If everything was set up correctly we should be able to get a token back from the server once we log in. Restart the django_app server and open Postman. Now make a post request to 'http://127.0.0.1:8000/api/auth/login/' with the superuser login details you created as the request data as shown below. Note: in the screenshots below and onwards I would be using 'sample_user' as the user for demo.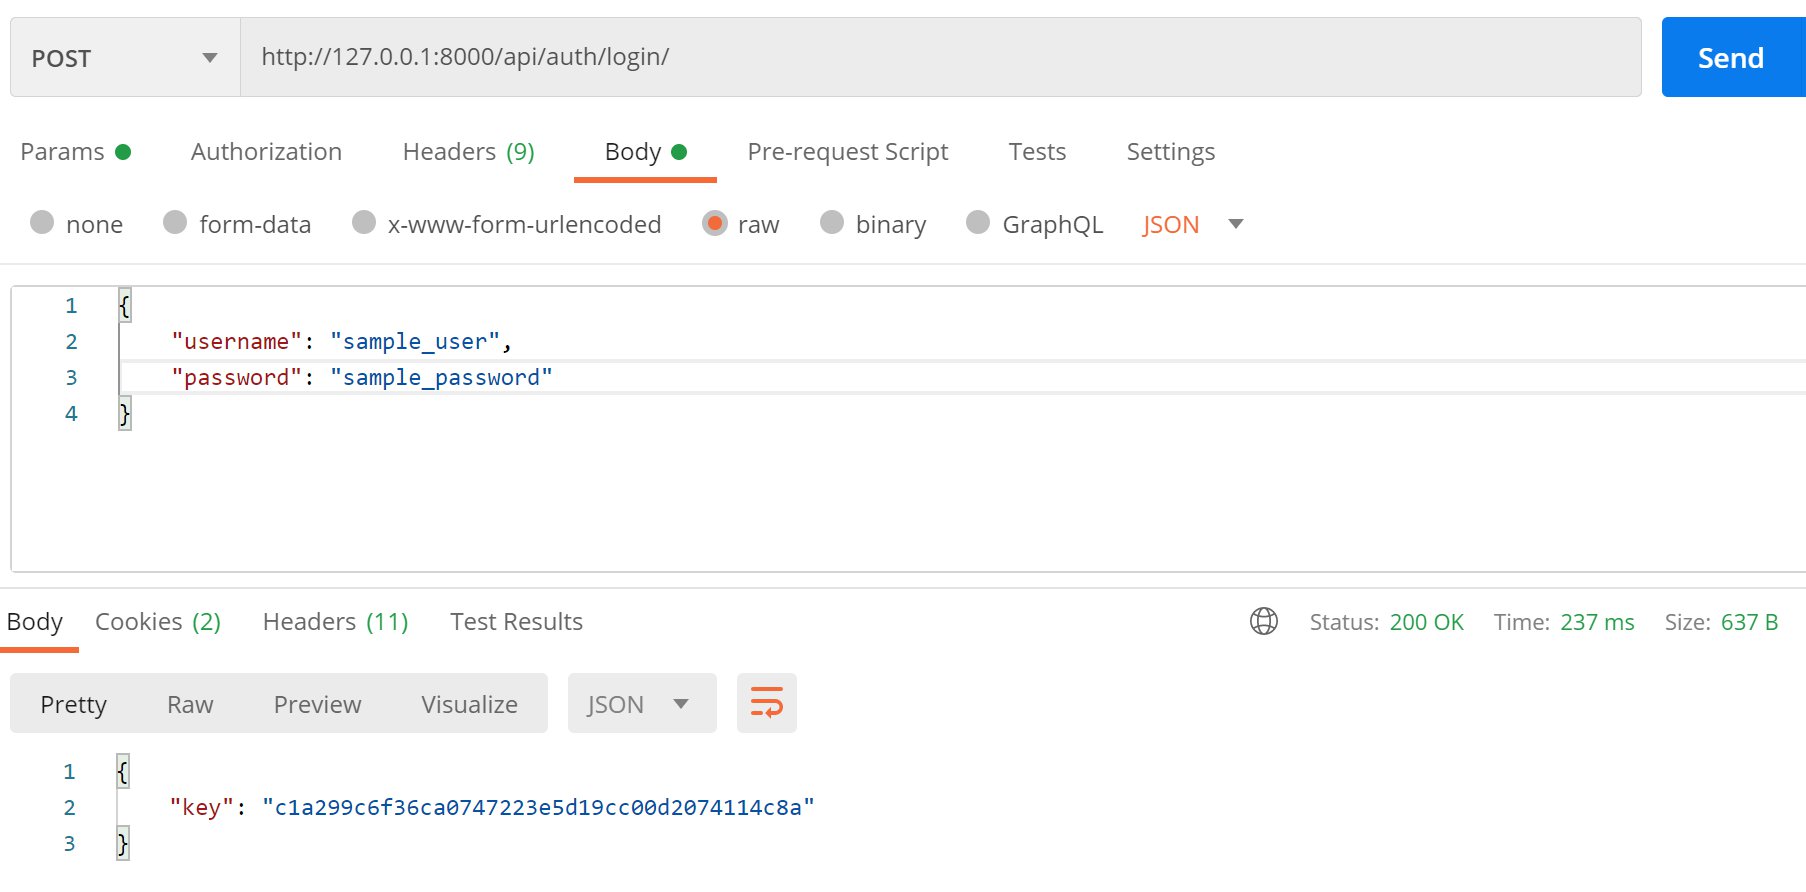
You should be able to get a token as the response as shown above. If you go to the admin portal, you would be able to see the token for the user.

This means that our login API is working correctly. Now we need to check the logout API. Open a new tab in Postman and add a post request to 'http://127.0.0.1:8000/api/auth/logout/'. In the headers tab, add a new key called 'Authorization' with the value as Token followed by the token you received earlier.
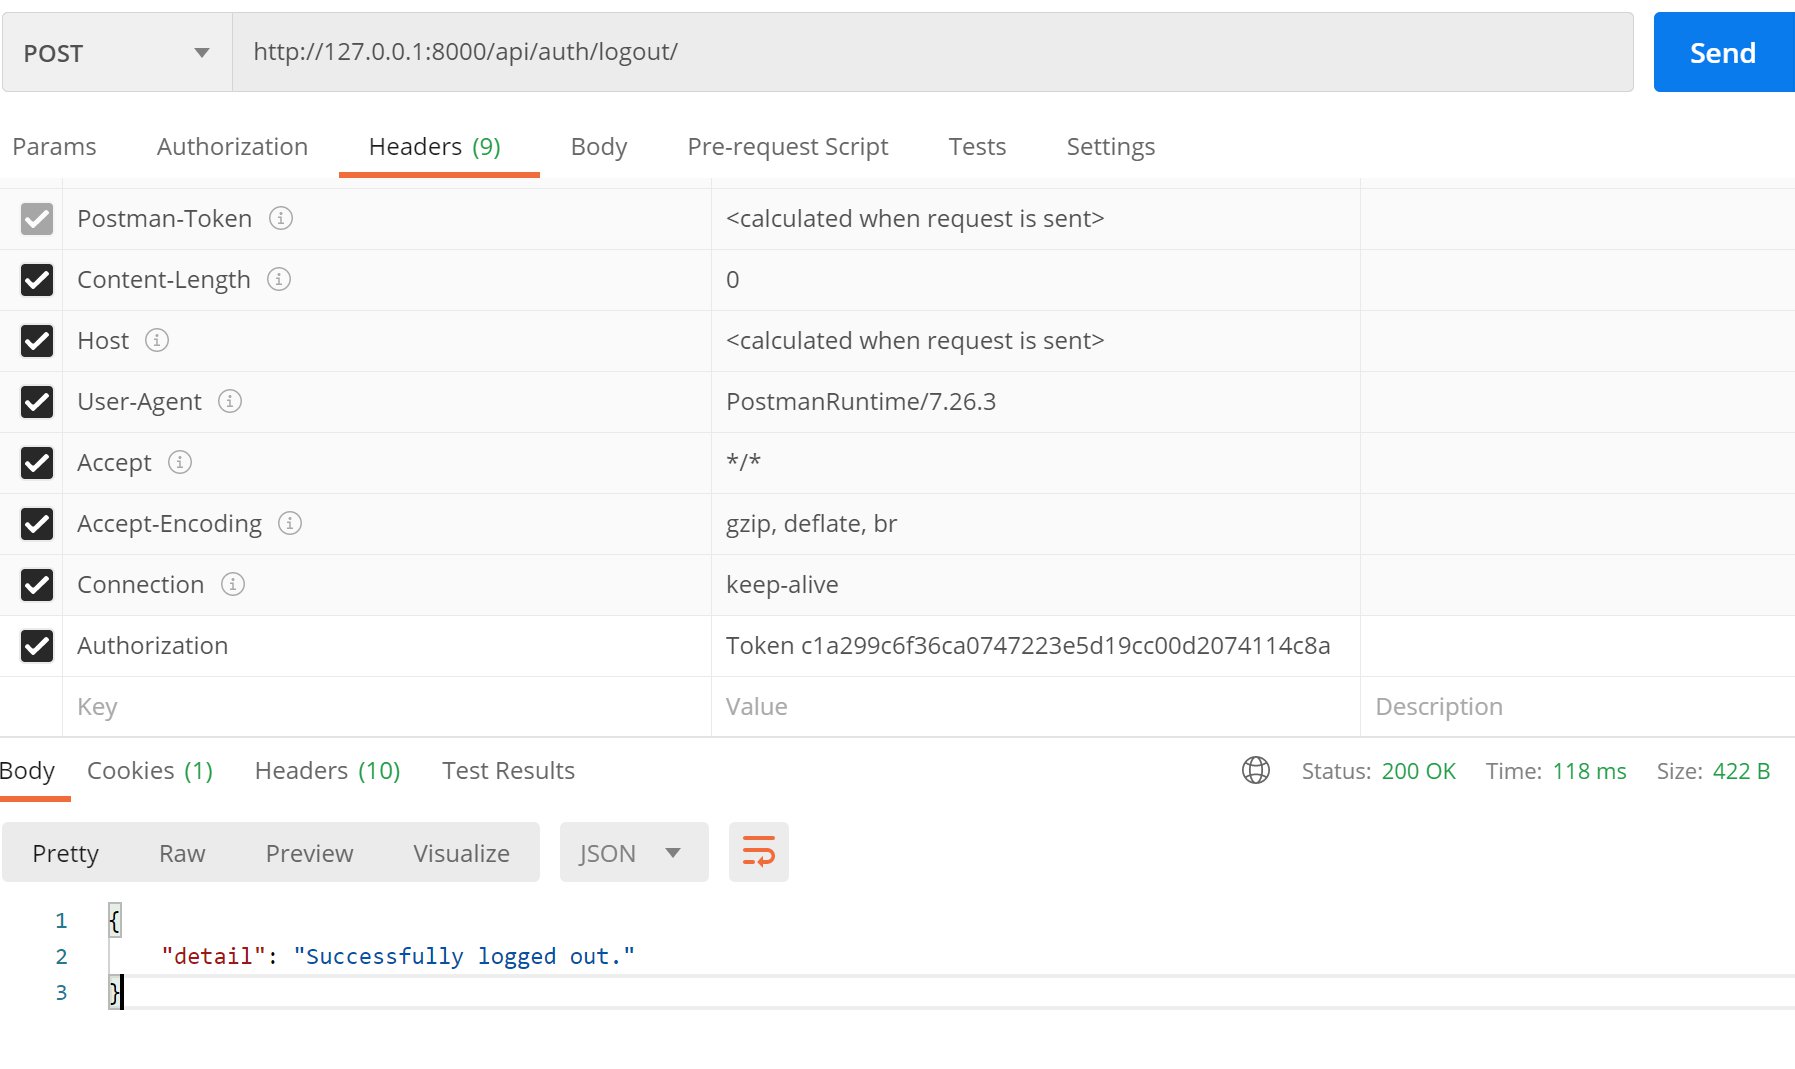
Hit send and you should see a message.
{
    "detail": "Successfully logged out."
}
If you now go to your admin panel and refresh, you would see that the token has been removed from the server.Now we need to add this authentication functionality to our REST API prediction view so that only registered users can perform the prediction. This is really simple. Just add the below lines to our IRIS_Model_Predict view.
authentication_classes = [TokenAuthentication]
permission_classes = [IsAuthenticated]
So, the views.py in our prediction app would look like below.
from rest_framework import status
from rest_framework.decorators import api_view
from rest_framework.response import Response
from rest_framework.views import APIView

from rest_framework.authentication import TokenAuthentication
from rest_framework.permissions import IsAuthenticated

from prediction.apps import PredictionConfig
import pandas as pd

# Create your views here.
# Class based view to predict based on IRIS model
class IRIS_Model_Predict(APIView):
    authentication_classes = [TokenAuthentication]
    permission_classes = [IsAuthenticated]

    def post(self, request, format=None):
        data = request.data
        keys = []
        values = []
        for key in data:
            keys.append(key)
            values.append(data[key])
        X = pd.Series(values).to_numpy().reshape(1, -1)
        loaded_mlmodel = PredictionConfig.mlmodel
        y_pred = loaded_mlmodel.predict(X)
        y_pred = pd.Series(y_pred)
        target_map = {0: 'setosa', 1: 'versicolor', 2: 'virginica'}
        y_pred = y_pred.map(target_map).to_numpy()
        response_dict = {"Predicted Iris Species": y_pred[0]}
        return Response(response_dict, status=200)
If you now perform a post request to 'http://127.0.0.1:8000/api/predict/' like before you would get an error.
{
    "detail": "Authentication credentials were not provided."
}
This is because you now need to first log in, receive a token and then send that token for authentication along with the prediction API request. Since, you have logged out, log in with Postman again and provide the newly received Token as an Authorization header along with the JSON iris flower data for making the request.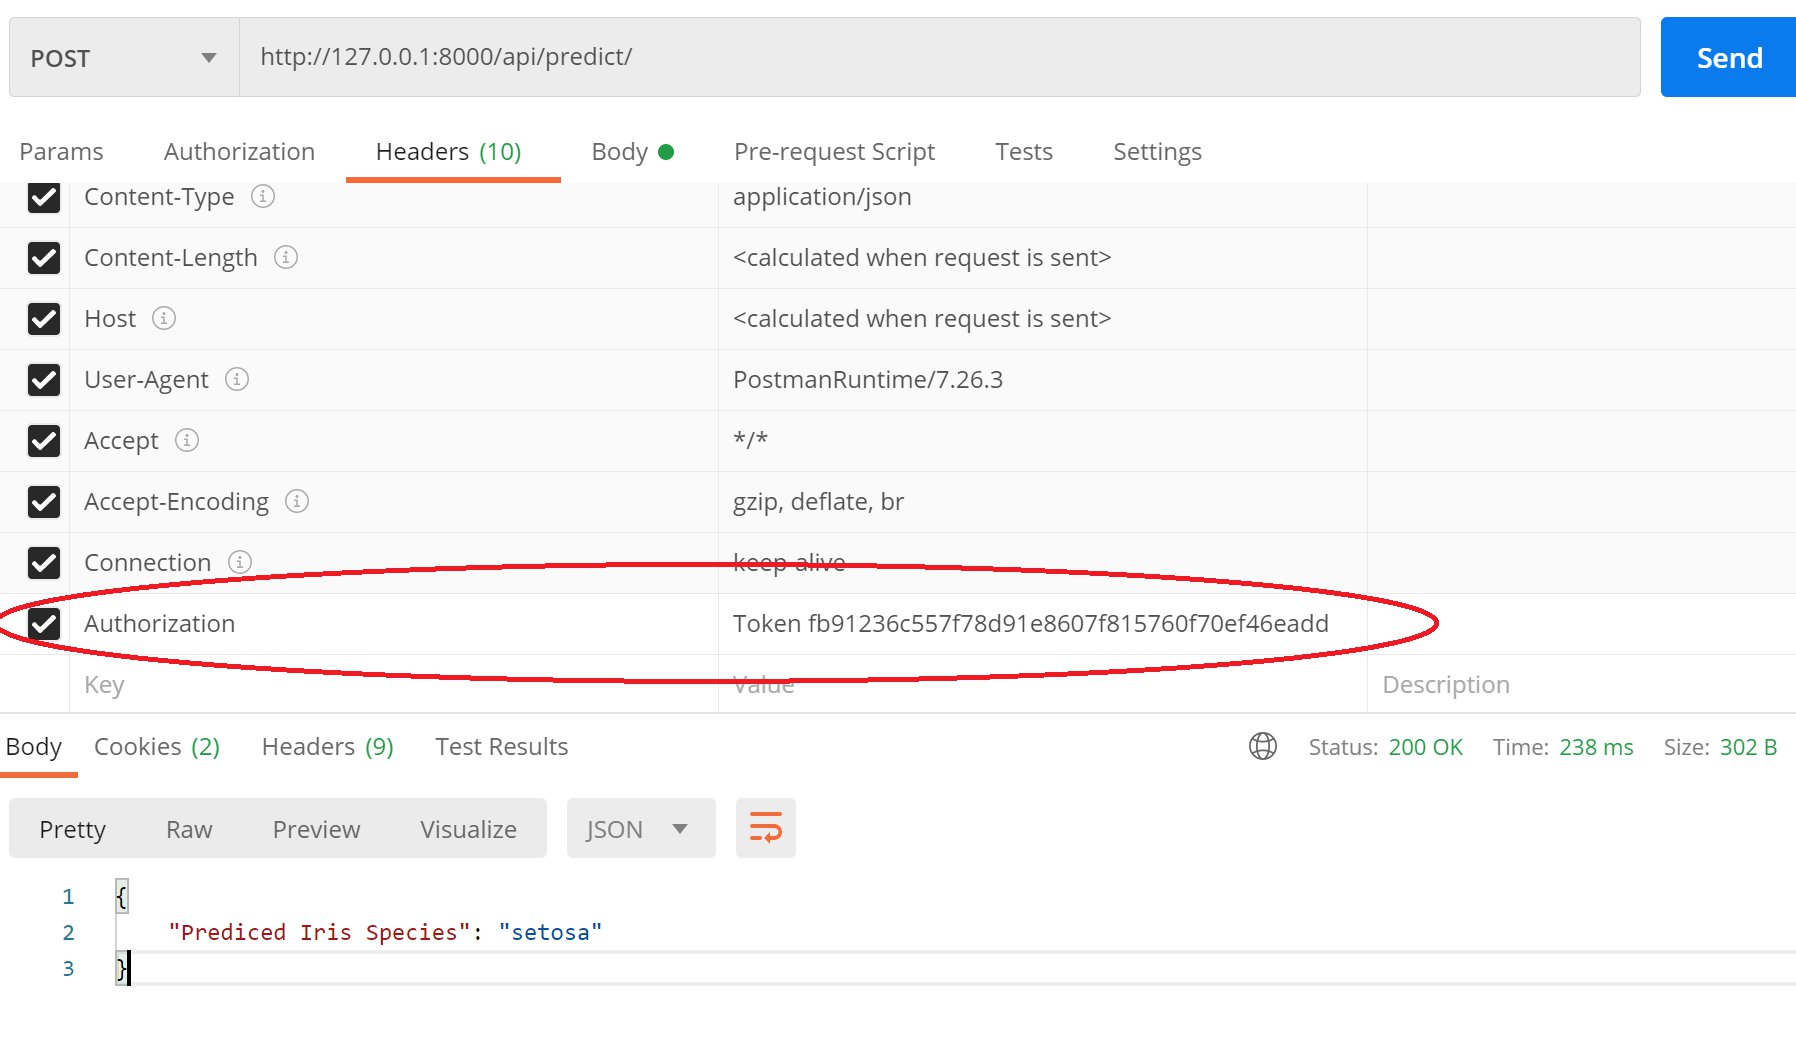
So we have added authentication to our prediction REST API. Now before we go to the front-end, we need to do a few more things. First, we need to add a password update feature using REST APIs. Secondly, we need to enable Cross-Origin Resource Sharing (CORS) so that our front-end can make a request to our back-end while running on the same physical server.
Create a password update REST API
In the users.views.py file import 'PasswordChangeView' from 'rest_auth.views' and create the 'APIPasswordUpdateView' class as below. We only need to add the 'TokenAuthentication' as an authentication method this time. The users.views.py file would look like below.
from rest_auth.views import (LoginView, LogoutView, PasswordChangeView)
from rest_framework.authentication import TokenAuthentication
from rest_framework.permissions import IsAuthenticated

# Create your views here.
class APILogoutView(LogoutView):
    authentication_classes = [TokenAuthentication]
    permission_classes = [IsAuthenticated]

class APILoginView(LoginView):
    pass

class APIPasswordUpdateView(PasswordChangeView):
    authentication_classes = [TokenAuthentication]
Now we need to define the URL route for the API. Open the users.urls.py file and change it as below.
from django.urls import path, include

from users.views import APILoginView, APILogoutView, APIPasswordUpdateView
urlpatterns = [
    path('login/', APILoginView.as_view(), name='api_login'),
    path('logout/', APILogoutView.as_view(), name='api_logout'),
    path('update_password/', APIPasswordUpdateView.as_view(), name='api_update_password'),
]
Now we can test this with Postman as shown below. Do not forget to provide our authentication token in the Authorization header as before. And in the body, we need to provide our new password two times with the fields 'new_password1' and 'new_password2'.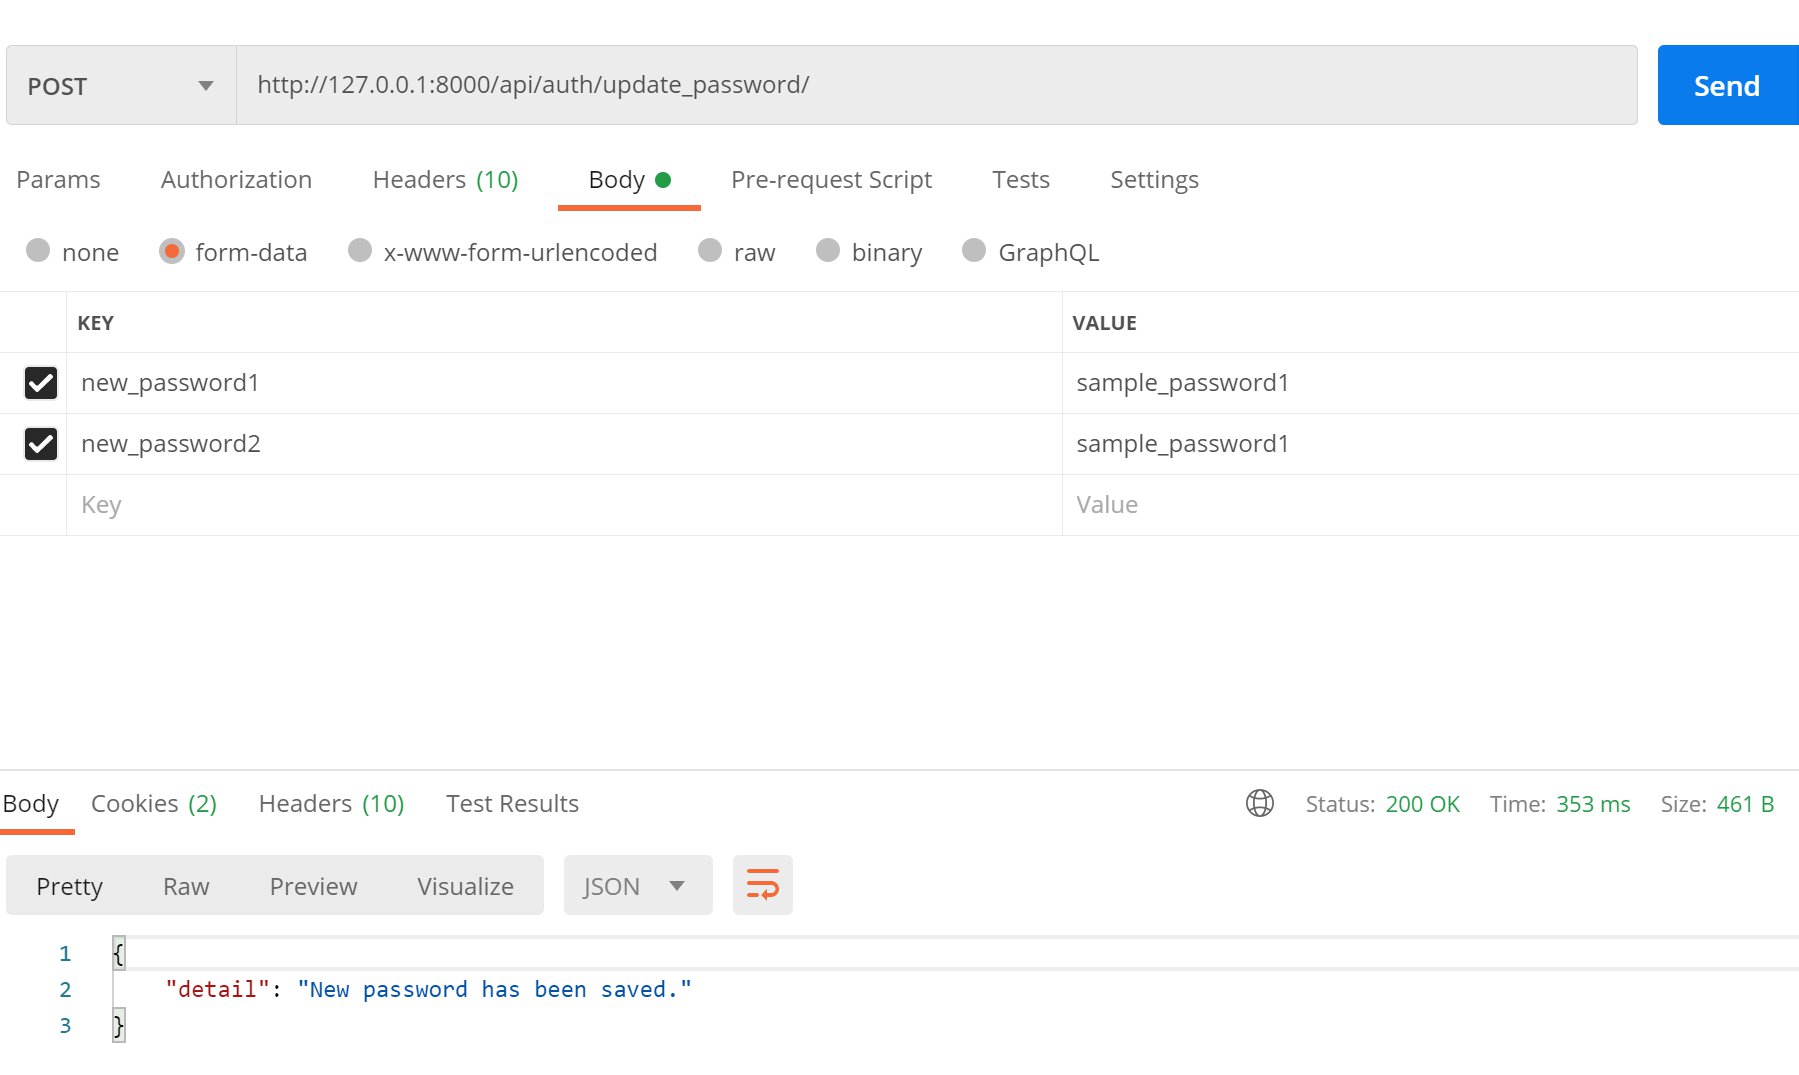
Note that this time we are using the form-data fields in Postman to send the data, rather than the JSON format used before. If everything works you would see the message.
{
    "detail": "New password has been saved."
}
Add CORS to our Django Application
If we don't add CORS then we won't be able to make REST API calls to our Django Application from the React frontend running on our local machine and also when we set up Docker for our production environment. To add CORS, we need to install a package called 'django-cors-headers' which we have already installed with our requirements.txt file before. We need to add 'corsheaders' as an installed app in the mainapp.settings.py file (below rest_auth).
INSTALLED_APPS = [
    ...

    'rest_framework',
    'rest_framework.authtoken',
    'rest_auth',
    'corsheaders',

    ...
]
Just below the installed apps section, you would need to modify the MIDDLEWARE as below, i.e. we have to the cors middleware at the very top:
MIDDLEWARE = [
    ...
    'corsheaders.middleware.CorsMiddleware',
    'django.middleware.security.SecurityMiddleware',
    ...
]
Open the local_settings.py file and add the below at the bottom.
#################################################################
    ##  (CORS) Cross-Origin Resource Sharing Settings ##
#################################################################
CORS_ORIGIN_ALLOW_ALL = True
That's it, we have set up CORS for our Django application. You may change the settings for more advanced options by referring to the official developer page. But for now, we should be good to go.Now onwards to our front-end React application 🍺!!
Creating our frontend
Create an app with create-react-app
Ensure that you have Node installed on your system. If not, download it from the official site and install it. Create a new folder called frontend within our DockerDjangoReactProject folder. From the terminal cd into the frontend folder. We are going to create a new project/app called react_app. Enter the below code, 'npx create-react-app react_app', from the terminal.
D:\Projects\DockerDjangoReactProject\frontend>npx create-react-app react_app
The above would take some minutes to complete, as node would download a number of packages to create the app which we are calling react_app. Therefore I would advise that you take a small break until the process finishes. If you face issues with npx, you may use yarn instead to create our frontend app. To use yarn, install yarn, and perform the below.
D:\Projects\DockerDjangoReactProject\frontend>yarn create react-app react_app
When the react_app has been created, cd into the react_app folder and perform 'npm start'.
D:\Projects\DockerDjangoReactProject\frontend>cd react_app
D:\Projects\DockerDjangoReactProject\frontend\react_app>npm start
This would start the development server at http://127.0.0.1:3000. You can open the server index page at this URL and you would see something like below in your browser.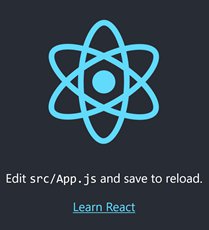
If you want to learn some basic concepts of React, then you may refer to this article which I had previously written. But in this current article, we would only discuss what is required.
Create a template login view
We can take a similar approach to our django_app in the react_app, where we first create the views and then define the URLs which would take us to these views. First, we would create our Login view. Create a new folder inside our src folder called 'components'. Create a new file called 'Login.js' inside the 'components' folder. I would be using a package called Material UI to create my components. This is because Material UI already contains some very well designed components and we could use them directly. Install material UI as below.
D:\Projects\DockerDjangoReactProject\frontend\react_app>npm install @material-ui/core @material-ui/icons @material-ui/lab
Note that whatever packages we are installing would need to be installed from within the react_app folder. Once installed you could see these packages in the 'package.json' file. You may also use yarn if npm was creating some issues for you.
D:\Projects\DockerDjangoReactProject\frontend\react_app>yarn add @material-ui/core @material-ui/icons @material-ui/lab
Once material UI has installed go the website of Material UI, on the left-hand side-bar you would find the templates sub-section under the 'Getting Started' section. On the templates page, you would find the link to the source code of a sign-in template.
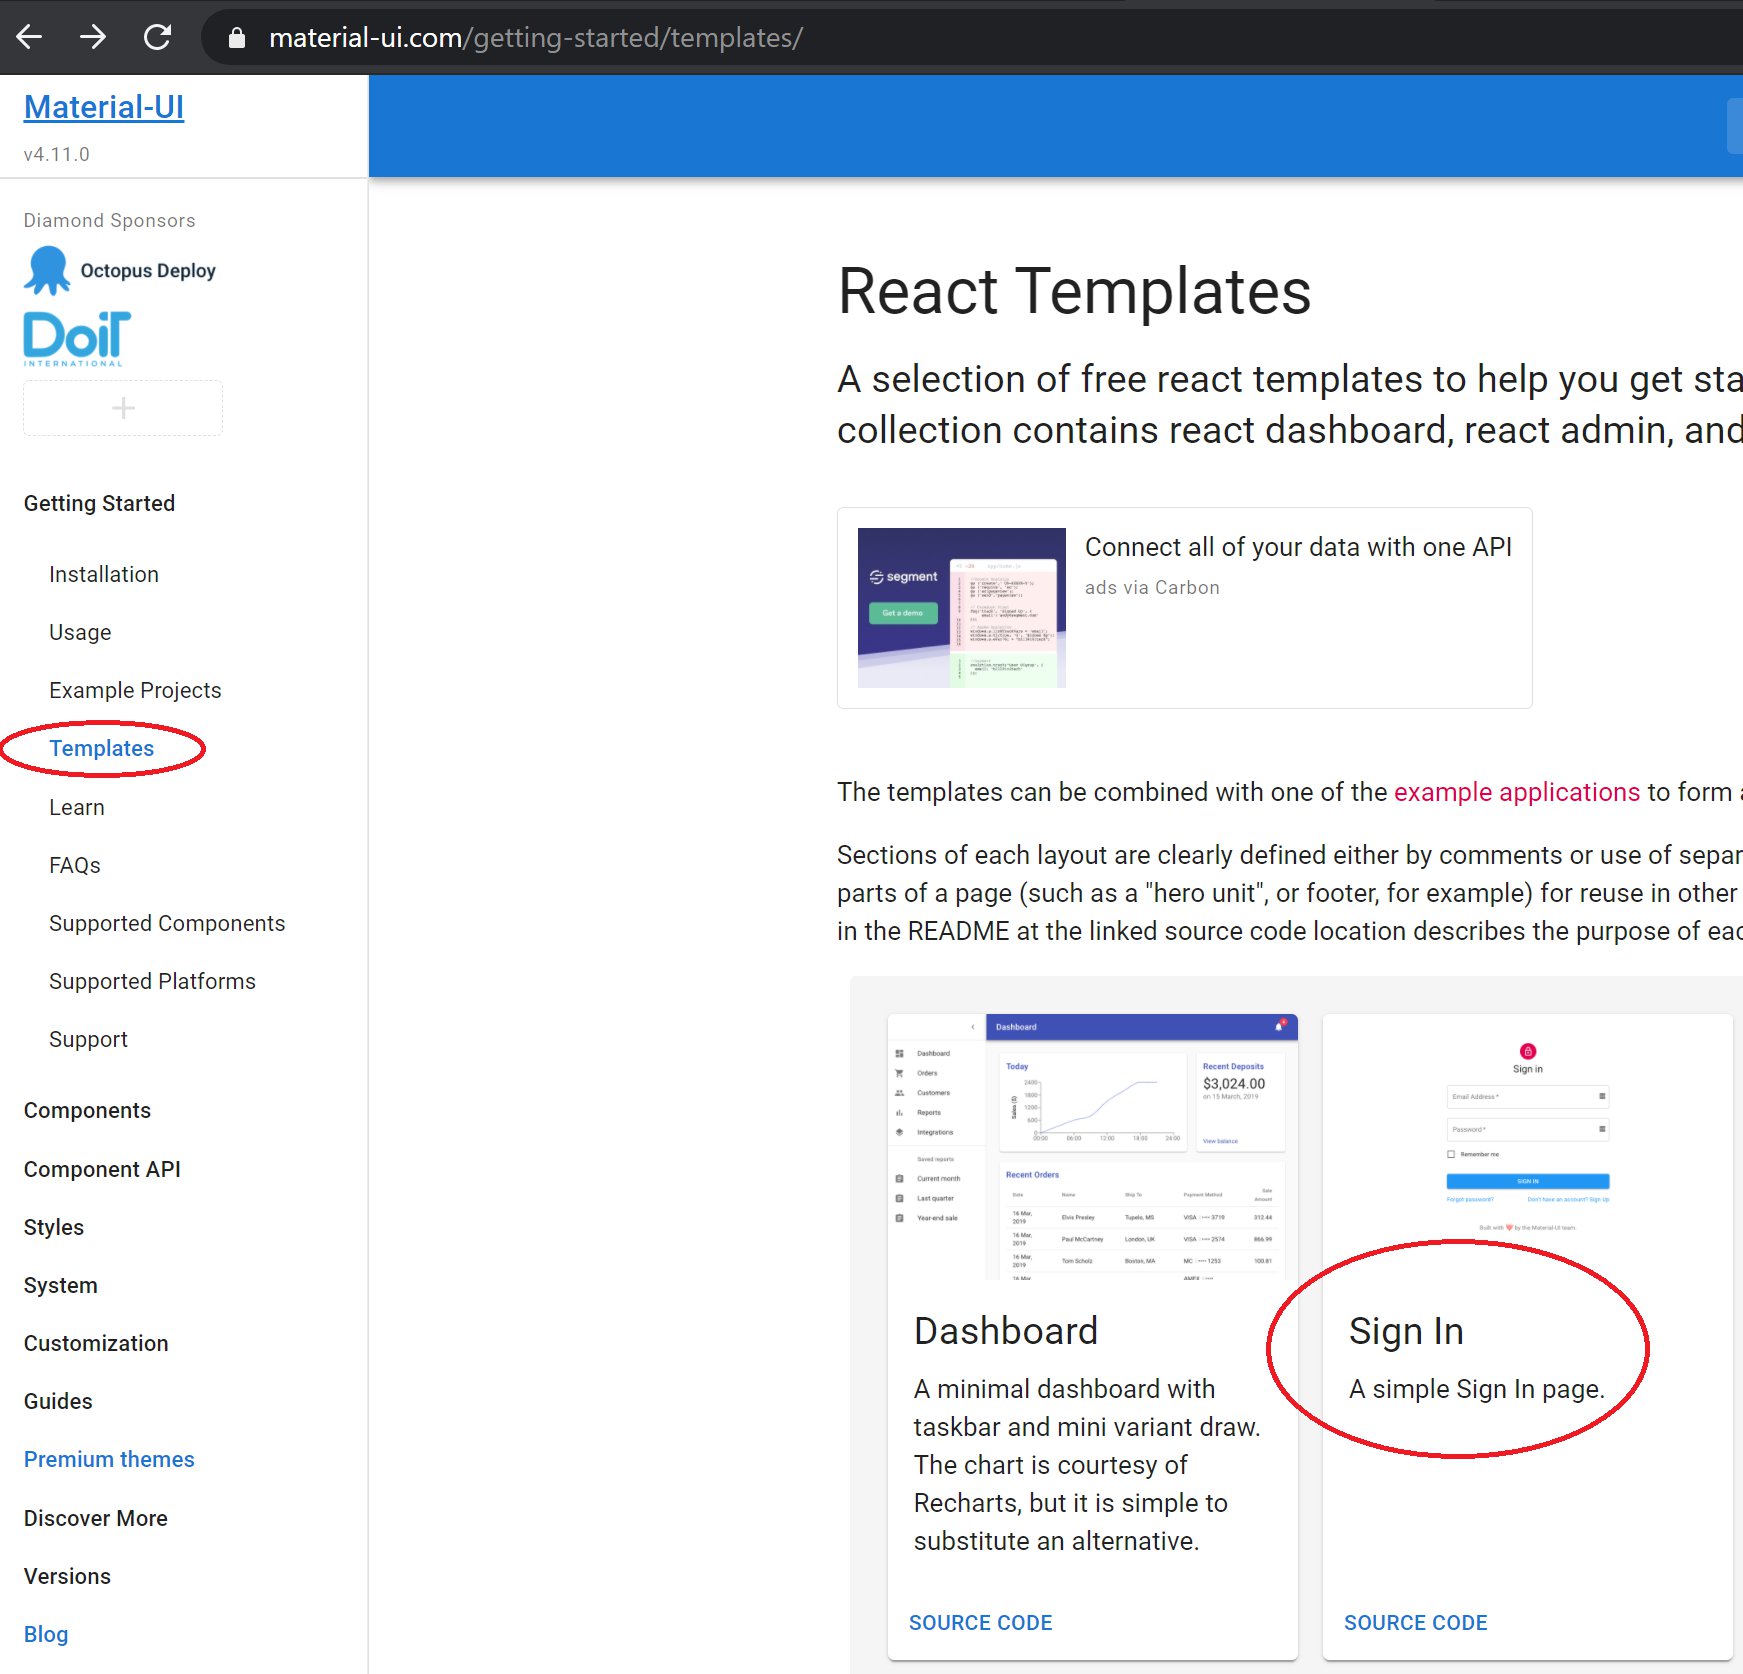
Copy the code and paste it into the Login.js file we just created. We would make further modifications to our template page. But first, we need to create the routes/URLs to take us to this login page so that we can view this in our browser. We would need to install a package called 'react-router-dom', install it by doing either of the below.
D:\Projects\DockerDjangoReactProject\frontend\react_app>npm install react-router-dom
D:\Projects\DockerDjangoReactProject\frontend\react_app>yarn add react-router-dom
Create a new file called 'Urls.js' in the 'src' folder at the same level at the App.js file. The Urls.js file should contain the below.
import React from "react";
import { BrowserRouter, Route, Switch } from "react-router-dom";

import Login from "./components/Login";

function Urls(props) {

    return (
        <div>
            <BrowserRouter>
                <Switch>
                    <Route exact path="/login/"> <Login {...props} /></Route>
                </Switch>
            </BrowserRouter>
        </div>
    )
};

export default Urls;
So basically what this is saying that if the browser route has the exact path 'login' in that case the Urls.js should return the Login view from the 'Login.js' file.
To see this in action open the App.js file in the src folder and make the below modifications.
import React from 'react';
import Urls from './Urls';


function App() {
  return (
    <div className="App">
         <Urls/>
    </div>
  );
}

export default App;
Also, remove all unnecessary files in the src folder which were previously used by App.js or index.js -- App.css, logo.svg, index.css. Remove the line 'import './index.css';' from index.js.
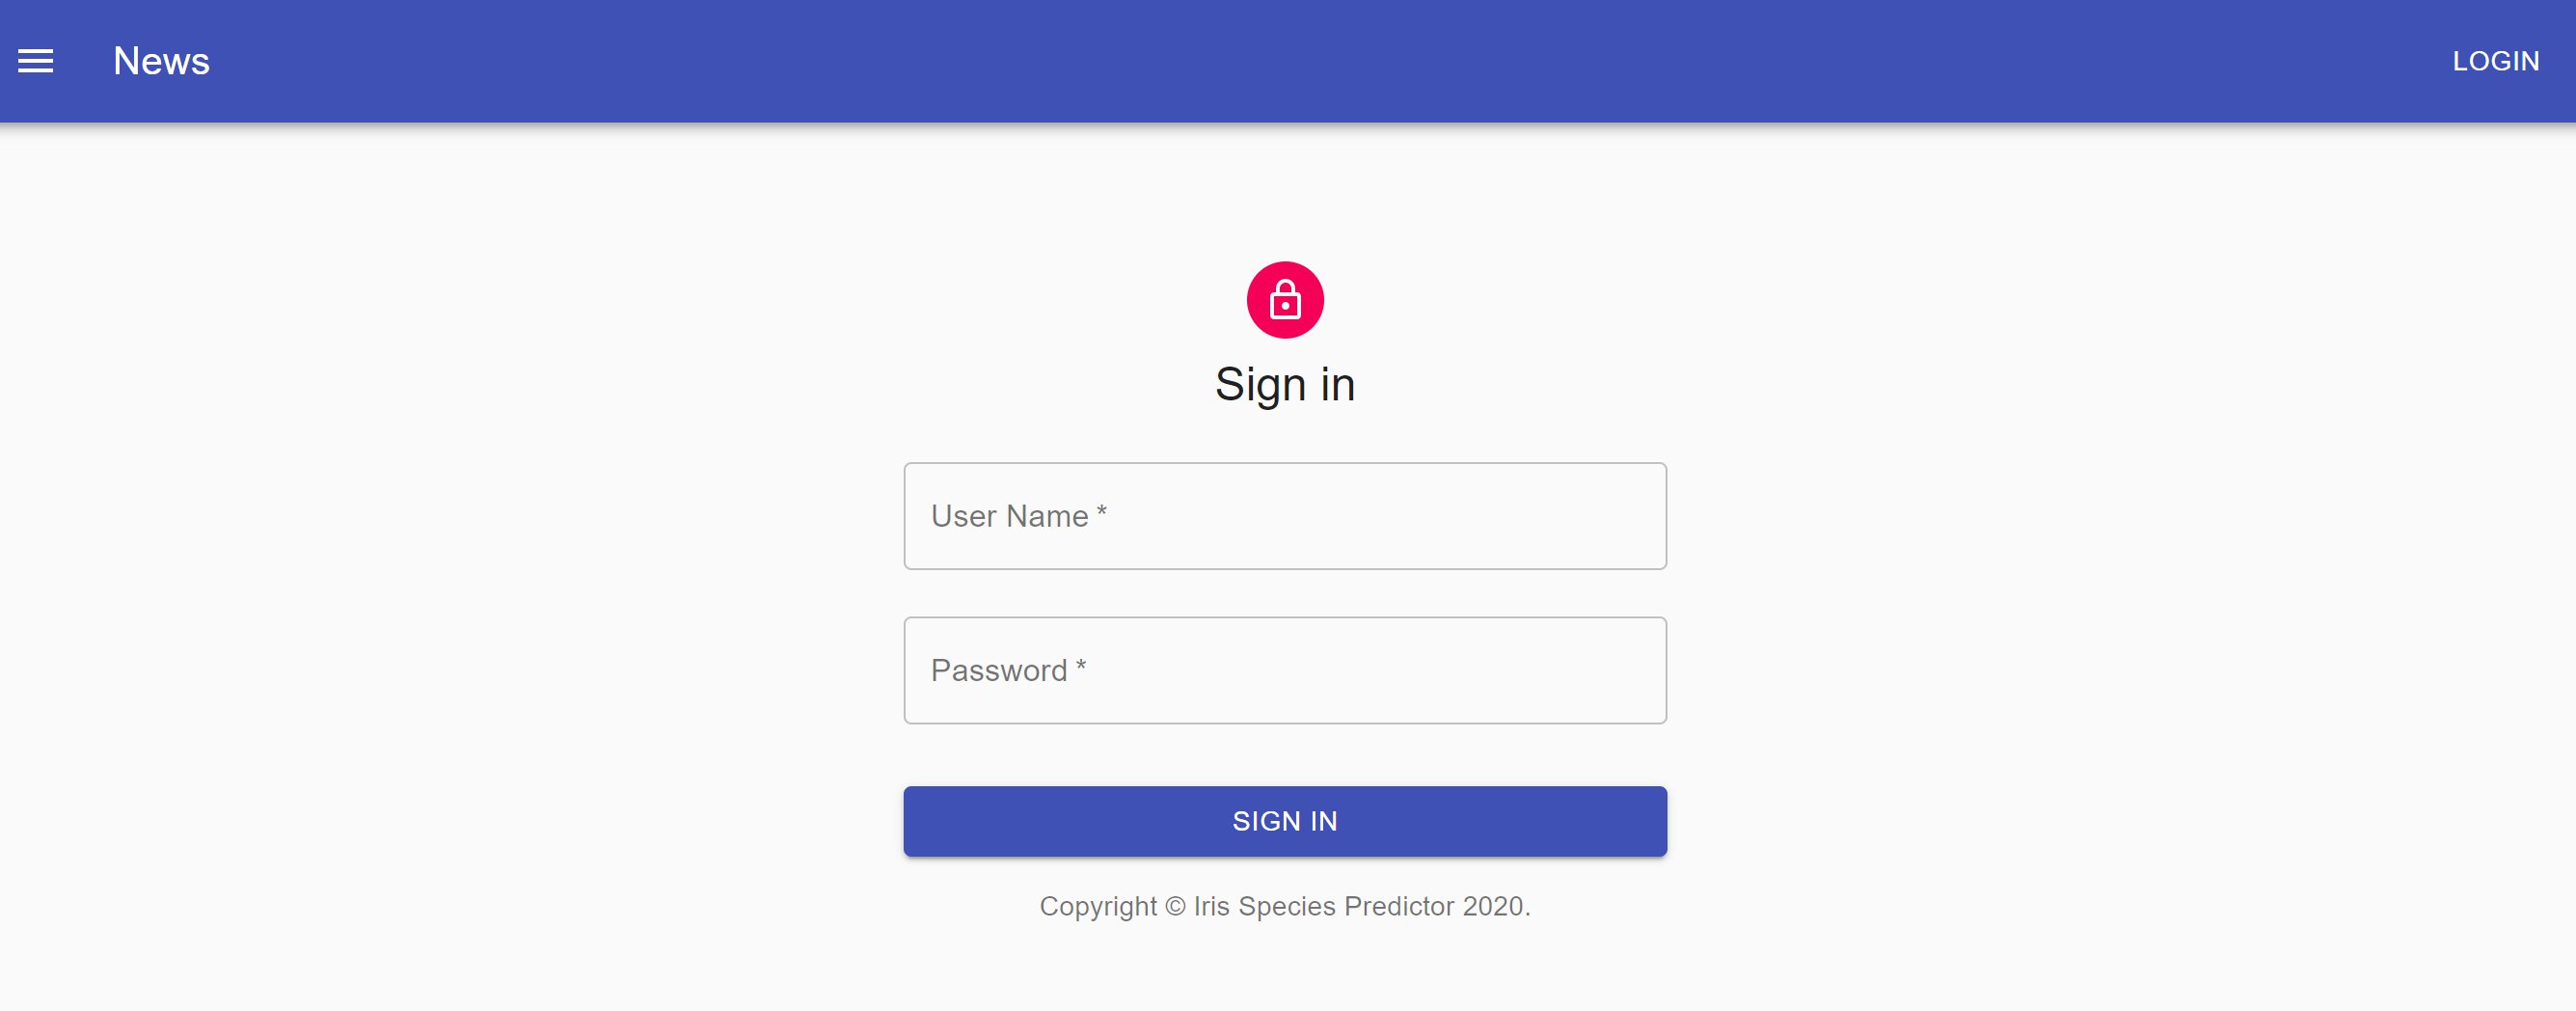
Now if you got to 'http://localhost:3000/login' from your browser you would see the login page is displayed.
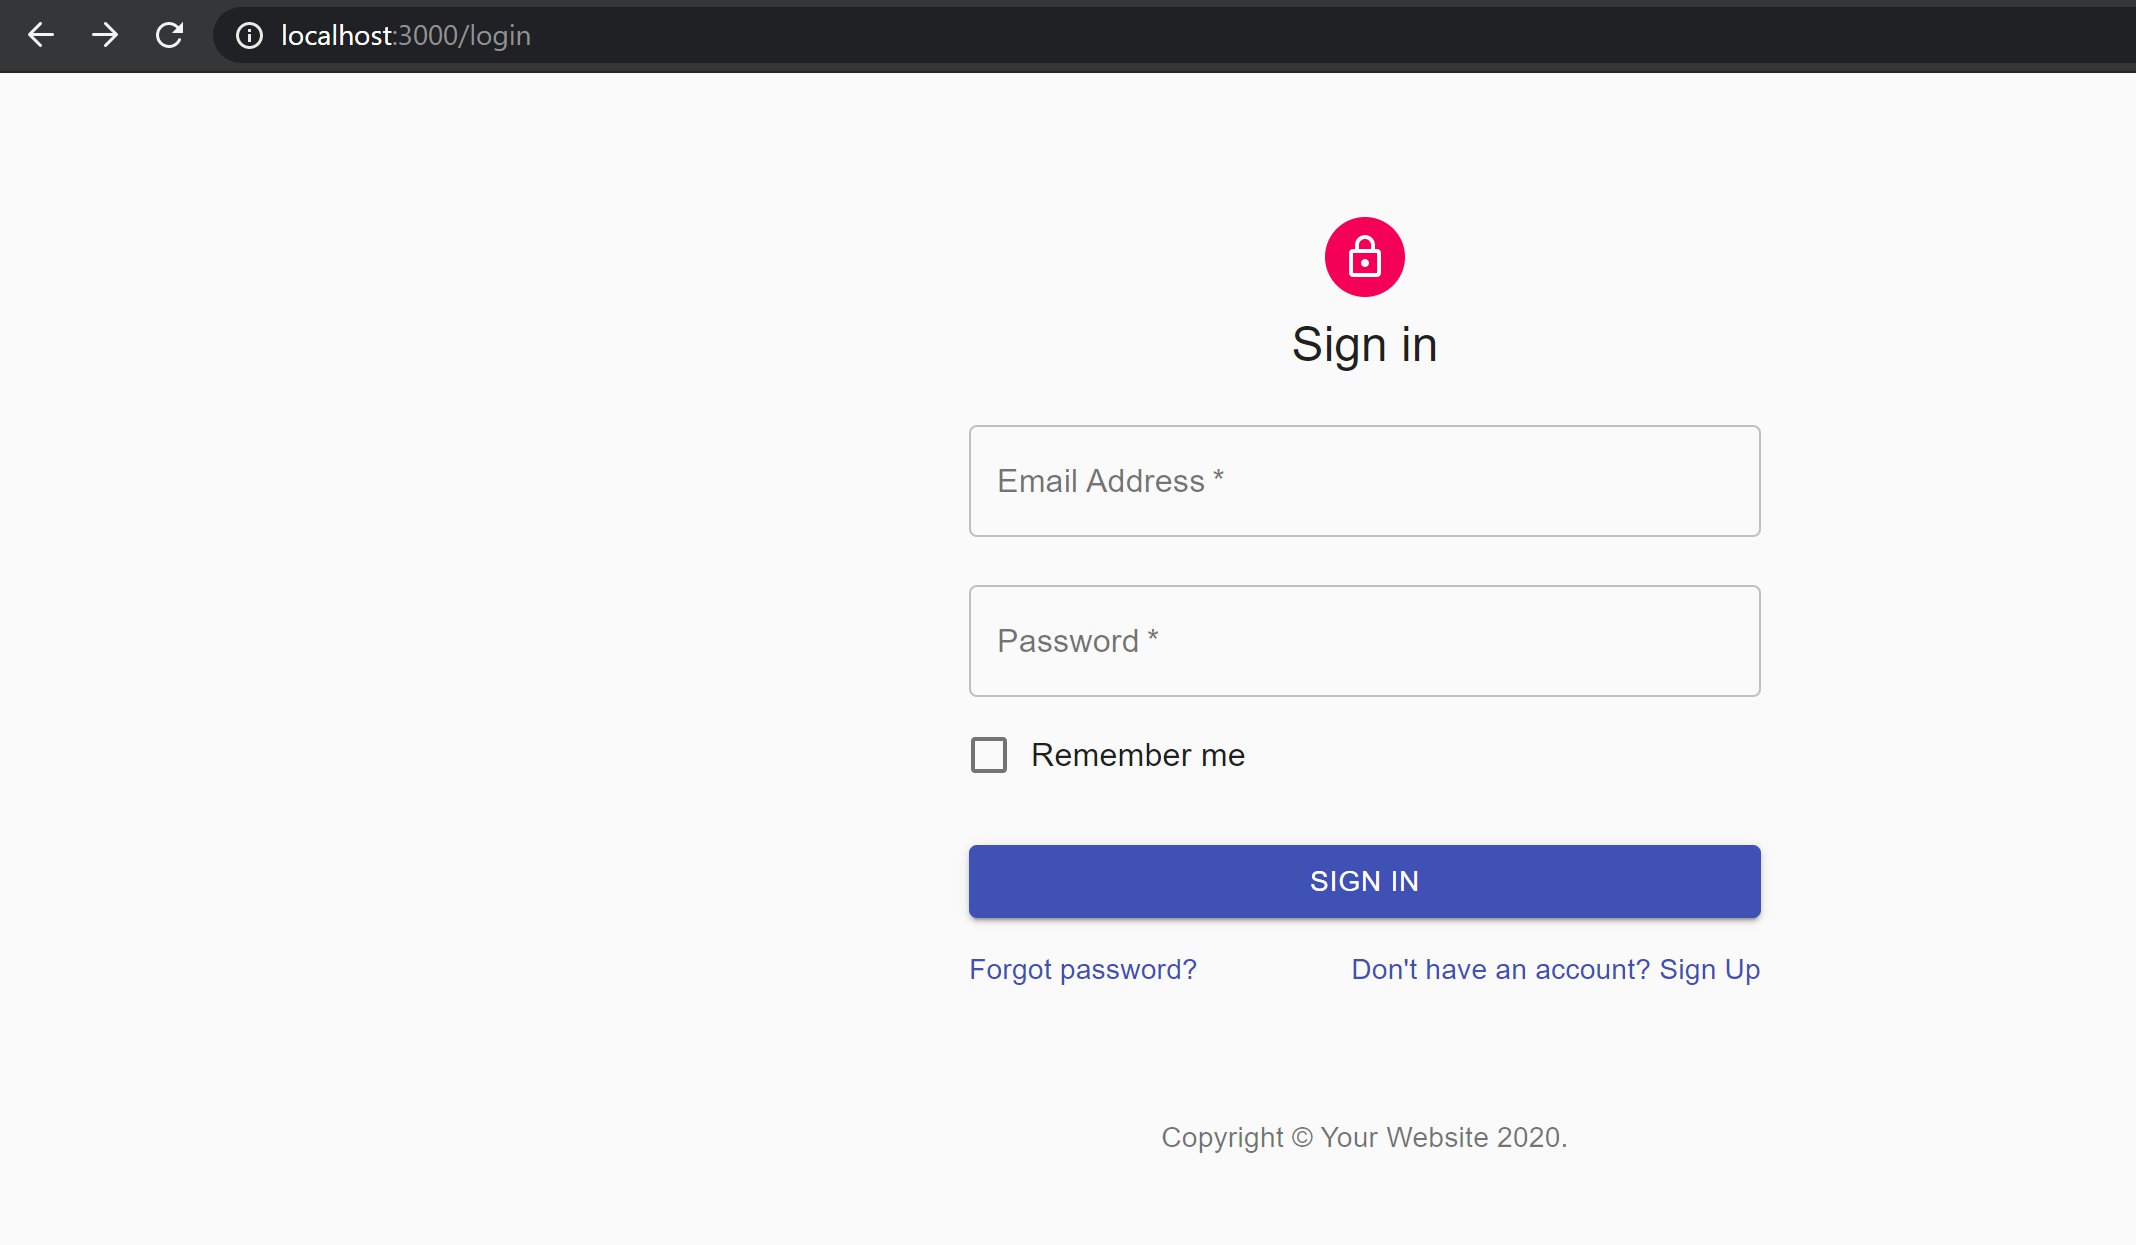
This means that our basic route/URL and view setup is working in the React frontend. We need to remove the 'Remember me', 'Forgot password?' and 'Don't have an account? Sign Up' components from the Login view. In the Login.js file, remove the following.
.....
         <FormControlLabel
            control={<Checkbox value="remember" color="primary" />}
            label="Remember me"
          />
.....
          <Grid container>
            <Grid item xs>
              <Link href="#" variant="body2">
                Forgot password?
              </Link>
            </Grid>
            <Grid item>
              <Link href="#" variant="body2">
                {"Don't have an account? Sign Up"}
              </Link>
            </Grid>
          </Grid>
.....
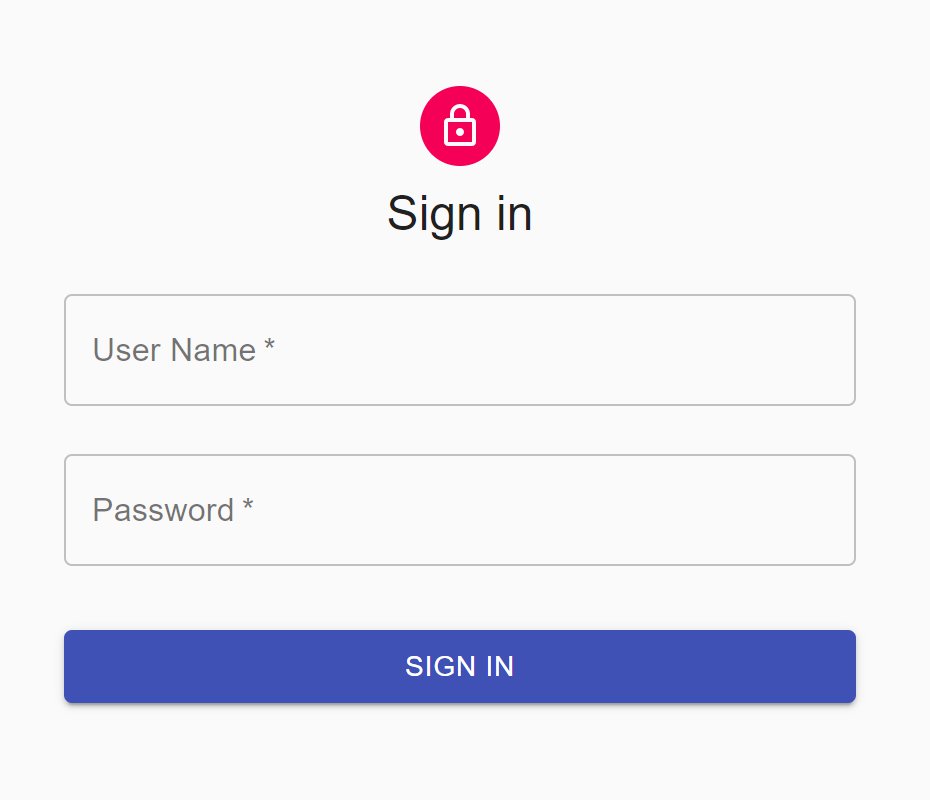
We also need a user name field instead of an email field. Also, change the name of the default export function to Login from the previous 'SignIn' and remove the Copyright function at the top and the reference to it inside the Login function. The Login.js file should look like below.
....
export default function Login() {
  .....

  return (
    <Container component="main" maxWidth="xs">
     .....
        <form className={classes.form} noValidate>
          <TextField
            variant="outlined"
            margin="normal"
            required
            fullWidth
            id="username"
            label="User Name"
            name="username"
            autoComplete="username"
            autoFocus
          />
     ....
        </form>
     ......
    </Container>
  );
}
So the browser login page would look like below.
Create a basic home view with layout
Before going any further let us also add a home view. This is so that once a user has logged in, he is redirected to a home page. At this point, if you go to the home page at http://127.0.0.1:3000/ you would just see a blank page. This is because we modified our App.js before to only add a view for a single URL route - the login route. Go the material UI website -> Components -> App Bar and copy the code for the 'Simple App Bar'. Inside our components folder create a file called 'TopBar.js' and paste the copied code inside it. Now create a file called Footer.js inside the components folder with the below content.
import React from 'react';
import Typography from '@material-ui/core/Typography';
import Link from '@material-ui/core/Link';


function Footer() {
    return (
      <Typography variant="body2" color="textSecondary" align="center">
        {'Copyright © '}
        <Link color="inherit" href="https://material-ui.com/">
          Iris Species Predictor
        </Link>{' '}
        {new Date().getFullYear()}
        {'.'}
      </Typography>
    );
  }
export default Footer
Now create another file inside the components folder called ' Layout.js'. The Layout.js should contain the below code.
import React from 'react';
import TopBar from "./TopBar"
import Footer from "./Footer"
import CssBaseline from '@material-ui/core/CssBaseline';


function Layout(props) {
    return (
        <React.Fragment>
            <CssBaseline />
            <TopBar {...props} />
            <div>
                {props.children}
            </div>
            <Footer />
        </React.Fragment>
    )
}

export default Layout
We would use the Layout.js page to layout our home page. Note that for our simple application using a layout is simply an over-kill. However, I still wanted to demonstrate it as it is considered a good design principle to design different pages of a website using a layout. So basically the way the layout would work is that we would pass an individual component representing the body of a web page as props to the Layout function and the Layout would add a TopBar at the top of that page and a footer at the bottom. As simple as that !! The interesting bit in the Layout function is the 'props.children'. This is what would retrieve the content of the page passed as props to the Layout function and display it in between the TopBar and the Footer.
Now create a simple Home page which would just display the text Home Page at the moment. The Home.js file inside components should look like below.
import React from 'react'
import CssBaseline from '@material-ui/core/CssBaseline';

function Home() {
    return (
        <React.Fragment>
            <CssBaseline />

            <div>
                <h1>Home Page</h1>
            </div>

        </React.Fragment>
    )
}

export default Home
Now we need to create the URL route for our home page just as we did for the login page. Modify the Urls.js file in the src folder as below.
......

import Login from "./components/Login";
import Home from "./components/Home";

function Urls(props) {

          ....
                <Switch>
                    <Route exact path="/login/"> <Login {...props} /></Route>
                    <Route exact path="/"> <Home {...props}/></Route>
                </Switch>
          .....
};

.....
If you go to the home URL in your browser you would see the text
Home Page
displayed but you wouldn't see the TopBar and the Footer. To use the layout as discussed above, i.e. see both TopBar and the Footer, modify the App.js file as below.
import React from 'react';
import Urls from './Urls';
import Layout from './components/Layout';


function App() {
  return (
    <div className="App">
      <Layout>
         <Urls/>
      </Layout>
    </div>
  );
}

export default App;
After making the above change in App.js, if you go to the home page you would see the below. Note that in the above the Urls component is passed to the Layout component which renders anything returned by the Urls component with the props.children as discussed before.

If you again go the login page you would see that the Login page has the TopBar and Footer applied as well.
Cool ! this is what we wanted. As you could see that our layout is working correctly.
Change the News text in the TopBar.js component to be 'Iris Species Predictor'. Also, remove the menu icon button on the left as we want our app to be as simple as possible.

Create a simple settings file
We are going to define a settings.js file just as we have in the 'mainapp' in our django_app. The file just defines some basic settings variables – API_SERVER and the SESSION_DURATION. The API_SERVER defines the URL at which our django_app backend is running. This URL would be different for the development and production environments, as in production we would be hosting our app on a cloud server. Therefore instead of changing it within the actual code, we are defining a settings file, where we can change the values really easily. The other environment variable SESSION_DUARTION defines the time after which the user is automatically logged out from the browser. The setting.js file should be created in the src folder with the below content.
let API_SERVER_VAL = '';

switch (process.env.NODE_ENV) {
    case 'development':
        API_SERVER_VAL = 'http://localhost:8000';
        break;
    case 'production':
        API_SERVER_VAL = process.env.REACT_APP_API_SERVER;
        break;
    default:
        API_SERVER_VAL = 'http://localhost:8000';
        break;
}

export const API_SERVER = API_SERVER_VAL;

export const SESSION_DURATION = 5*3600*1000;
Create a Redux store for authentication
At this point, we have added a basic route and template view for user login. To add real login functionality we would need to make an API call to our backend to authenticate. Also, we would need to store the API token after successful login in the browser, so that, once a user has logged in, they can use this API key for making further requests to our backend. We are going to use Redux to accomplish this. For all of these, we would need to install the following packages. Just like before perform either of the below.
D:\Projects\DockerDjangoReactProject\frontend\react_app>npm install redux react-redux redux-thunk axios
D:\Projects\DockerDjangoReactProject\frontend\react_app>yarn add redux react-redux redux-thunk axios
Redux in React can be a bit tricky at first. I won't go in much detail but simply describe the basic philosophy here. Normally in React, components have State. Class-based components, by definition, have state associated with them. It is also possible to define the state for functional components with React Hooks like useState(). Therefore, components have individual states. If we wanted to pass the state of one component to another component then we could do that with props. These props can get really complicated if we have a number of components dependent on the same state variables. Therefore we wanted to have something like a global state. There are many ways of achieving this in React such as React Context. However, generally by design Context was designed to simplify passing props. Redux is another, but more widely accepted way of creating a global state for an application. In Redux we have the concept of Store which is further represented by three basic concepts:
- Actions
- Reducers
- Store
You may go through the official guide to understand these in detail, but in essence, the philosophy of Redux in React is really simple:
Whenever an Action is dispatched, the Reducer makes changes to the state objects in the Store. The Store is the object that brings the actions, reducers and the state objects together.
Let's begin by creating the store for our application. Create a folder called 'store' in our src folder. In the store-folder create a file called 'authActionTypes.js' with the below content. This defines the action types.
export const AUTH_START = 'AUTH_START';
export const AUTH_SUCCESS = 'AUTH_SUCCESS';
export const AUTH_FAIL = 'AUTH_FAIL';
export const AUTH_LOGOUT = 'AUTH_LOGOUT';
Create another file in the store-folder called 'authActions.js' with the below content. If you read the comments below, what these auth actions do, are quite self-explanatory. Also please note that in some of the functions below, we are using 'axios' to make rest API calls to our backend. Further the 'localStorage' stores information in the browser namely the retrieved token and expiration time. You might ask why we are using the localStorage of the browser when we already are going to use to a Redux store, to store global variables. This is because the Redux store would only be available per tab or per session in the browser. Once a user closes the app on one of the tabs, the store would not exist. That is this store would only exist in the memory. That is why we are using localStorage so that once a user has logged in, they are not required to login to the app on every tab. There are some other ways to accomplish this such as redux-persist, but for simplicity, we are just going to use the localStorage. The other reason is that we don't only want the global state but also some of the dispatch(action)s of the Redux store to be available globally.
import axios from 'axios';
import * as actionTypes from './authActionTypes';
import * as settings from '../settings';

const SESSION_DURATION = settings.SESSION_DURATION

// ########################################################
// ########################################################
// Contains Auth Action Functions. These perform two kinds of things:
// 1) Return Action Objects
    // a) Simply Return an Action Object
    // b) Perform some action and then return an Action Objet
// 2) Return A Dispatch(Action) combination
    // a)Perform an action then return a Dispatch(Action) combination.
        // This Dispatch(Action) could be used by some other function to dispatch action to the store
// ########################################################
// ########################################################


// ########################################################
// ########################################################
// Auth Action Functions returning Action Objects
// ########################################################
// ########################################################

export const authStart = () => {
    return {
        type: actionTypes.AUTH_START
    }
}

export const authSuccess = (token) => {
    return {
        type: actionTypes.AUTH_SUCCESS,
        token: token
    }
}

export const authFail = error => {
    return {
        type: actionTypes.AUTH_FAIL,
        error: error
    }
}

export const authLogout = () => {
    const token = localStorage.getItem('token');
    if (token === undefined){
        localStorage.removeItem('expirationDate');
    } else {
        axios.post(`${settings.API_SERVER}/api/auth/logout/`, {
        }, {headers: {'Authorization': `Token ${token}`}} ).then(res => {console.log(res)}).catch(err => {console.log(err)});
        localStorage.removeItem('token');
        localStorage.removeItem('expirationDate');
    }

    return {
        type: actionTypes.AUTH_LOGOUT
    };
}

// ########################################################
// ########################################################
// Auth Action Functions returning A Dispatch(Action) combination after performing some action
// ########################################################
// ########################################################

// This sets a timer, which would automatically logout the user after a specified time
export const authCheckTimeout = expirationTime => {
    return dispatch => {
        setTimeout(() => {
            dispatch(authLogout());
        }, expirationTime)
    }
}

export const authLogin = (username, password) => {
    return dispatch => {
        dispatch(authStart());
        axios.post(`${settings.API_SERVER}/api/auth/login/`, {
            username: username,
            password: password
        })
        .then(res => {
            const token = res.data.key;
            const expirationDate = new Date(new Date().getTime() + SESSION_DURATION );
            localStorage.setItem('token', token);
            localStorage.setItem('expirationDate', expirationDate);
            dispatch(authSuccess(token));
            dispatch(authCheckTimeout(SESSION_DURATION));
        })
        .catch(err => {
            dispatch(authFail(err))
        });
    }
}


export const authCheckState = () => {
    return dispatch => {
        const token = localStorage.getItem('token');
        if (token === undefined) {
            dispatch(authLogout());
        } else {
            const expirationDate = new Date(localStorage.getItem('expirationDate'));
            if ( expirationDate <= new Date() ) {
                dispatch(authLogout());
            } else {
                dispatch(authSuccess(token));
                dispatch(authCheckTimeout( expirationDate.getTime() - new Date().getTime()) );
            }
        }
    }
}
So we have defined the action types, action functions and some functions which return a dispatch(action) combination. Now we want to define the reducer. The reducer is what actually defines our application global state and the methods to change these states. The official documentation defines a reducer as below.
The reducer is a pure function that takes the previous state and an action, and returns the next state.
(previousState, action) => nextState
As you would see below the reducer is a fairly simple definition of our initial state and the methods to change these state whenever an action is dispatched to the store. An example of an action dispatched to a store could be:
// Dispatch some actions
store.dispatch(actions.authLogin(username, password)
Now let us define our reducer which would change the global state variables depending upon the action dispatched. Create a file called 'authReducer.js' in our store-folder with the below content.
import * as actionTypes from './authActionTypes';

// ########################################################
// Initial State
// ########################################################

export const initialState = {
    error: null,
    loading: false,
    token: null
}

// ########################################################
// A simple function to update the state with new values
// ########################################################

const updateObject = (oldObject, updatedProperties) => {
    return {
        ...oldObject,
        ...updatedProperties
    }
}

// ########################################################
// Different Reducer Functions which change the store state
// ########################################################
const authStartReducer = (state, action) => {
    return updateObject(state, {
        error: null,
        loading: true
    });
}

const authSuccessReducer = (state, action) => {
    return updateObject(state, {
        error: null,
        loading: false,
        token: action.token
    });
}

const authFailReducer = (state, action) => {
    return updateObject(state, {
        error: action.error,
        loading: false
    });
}

const authLogoutReducer = (state, action) => {
    return updateObject(state, {
        token: null
    });
}

// ########################################################
// The Main Reducer
// ########################################################

const Reducer = (state=initialState, action) => {
    switch (action.type) {
        case actionTypes.AUTH_START: return authStartReducer(state, action);
        case actionTypes.AUTH_SUCCESS: return authSuccessReducer(state, action);
        case actionTypes.AUTH_FAIL: return authFailReducer(state, action);
        case actionTypes.AUTH_LOGOUT: return authLogoutReducer(state, action);
        default:
            return state;
    }
}

export default Reducer
Hereby we have created our Redux store. Our application src should look like below.
D:\PROJECTS\DOCKERDJANGOREACTPROJECT\FRONTEND\REACT_APP\SRC
│   App.js
│   App.test.js
│   index.js
│   serviceWorker.js
│   setupTests.js
│   Urls.js
│   settings.js
│
├───components
│       Login.js
│       TopBar.js
│       Layout.js
│       Footer.js
│       Home.js
│
└───store
        authActionTypes.js
        authActions.js
        authReducer.js
Connect the Redux store to our application
With all our important pieces setup, we are ready to implement the login functionality! We now need to tell our application to use the above redux store. The entry point of our application is the index.js page. Open the index.js file and modify it so that it looks like below.
import React from 'react';
import ReactDOM from 'react-dom';
import App from './App';
import * as serviceWorker from './serviceWorker';

import { combineReducers, createStore, compose, applyMiddleware } from 'redux';
import { Provider } from 'react-redux';
import thunk from 'redux-thunk';
import authReducer from './store/authReducer';

const reducer = combineReducers({ auth: authReducer }); // Using Combine Reducers here although only one reducer is present.
// Official explaination here: https://react-redux.js.org/using-react-redux/connect-mapstate#mapstatetoprops-will-not-run-if-the-store-state-is-the-same
const composeEnhanced = window.__REDUX_DEVTOOLS_EXTENSION_COMPOSE__ || compose // The first one is to make the chrome dev extension work
const store = createStore(reducer, composeEnhanced(applyMiddleware(thunk))); // We are using thunk, because it allows delaying the dispatch actions
// Thunk wraps the dispatch actions into custom functions which are available with the mapDispatchToProps


ReactDOM.render(
  <React.StrictMode>
    <Provider store={store}>
      <App />
    </Provider>
  </React.StrictMode>,
  document.getElementById('root')
);

serviceWorker.unregister();
As you could see, we import the authReducer we created before and then create the redux store. This redux store is then made available to all components of our application (including the main App component!) by wrapping the App component with the Provider wrapper in the entry-point index.js file.
From here on our individual components can access this global store with the connect higher-order wrapper and two custom functions – mapStateToProps and mapDispatchToProps. Example of the App component is shown first. Modify the App.js file as below. Below, in our App component, when the App is first loaded, we want to dispatch the authCheckState() function (i.e. – check whether a token already exists in the browser and the token has not expired. If so we would want to dispatch the 'authSuccess' action to the store, which would basically update the Redux state to reflect the user is authenticated. If not, the Redux state would be changed to reflect that the user is logged out). Also, three custom objects are derived from the Redux store – isAuthenticated, token and the logout function – which are then passed down as props to all other components.
import React from 'react';
import Urls from './Urls';
import Layout from './components/Layout';
import {connect} from 'react-redux';
import * as actions from './store/authActions';


function App(props) {

  // Similar to componentDidMount and componentDidUpdate:
  React.useEffect(() => {
    props.setAuthenticatedIfRequired();
  }, []);

  return (
    <div className="App">
      <Layout {...props}>
         <Urls {...props}/>
      </Layout>
    </div>
  );
}

//This means that one or more of the redux states in the store are available as props
const mapStateToProps = (state) => {
  return {
    isAuthenticated: state.auth.token !== null && typeof state.auth.token !== 'undefined',
    token: state.auth.token
  }
}

//This means that one or more of the redux actions in the form of dispatch(action) combinations are available as props
const mapDispatchToProps = (dispatch) => {
  return {
    setAuthenticatedIfRequired: () => dispatch(actions.authCheckState()),
    logout: () => dispatch(actions.authLogout())
  }
}

export default connect(mapStateToProps, mapDispatchToProps)(App);
Add login functionality with the Redux store
Next, we would connect the Login component with the Redux store to use some further Redux store objects which were not passed down from the App component as props. Modify the Login.js file as below. I am showing just the changes which are required.
.....

import { connect } from 'react-redux';
import * as actions from '../store/authActions';

......

function Login(props) {
  ....
  const [username, setuserName] = React.useState(null);
  const [password, setPassword] = React.useState(null);

  const handleFormFieldChange = (event) => {
    switch (event.target.id) {
      case 'username': setuserName(event.target.value); break;
      case 'password': setPassword(event.target.value); break;
      default: return null;
    }

  };

  const handleSubmit = (e) => {
    e.preventDefault();
    props.onAuth(username, password);
  }

  return (
    <Container component="main" maxWidth="xs">
      .....
        <form className={classes.form} noValidate onSubmit={handleSubmit}>
          <TextField
           ........
            onChange={handleFormFieldChange}
          />
          <TextField
           .........
            onChange={handleFormFieldChange}
          />
      ......
    </Container>
  );
}

const mapDispatchToProps = dispatch => {
  return {
      onAuth: (username, password) => dispatch(actions.authLogin(username, password))
  }
}

export default connect(null, mapDispatchToProps)(Login);
Note that in the above we don't need a mapStateToProps as we don't need any other Redux store state variable. Hence instead of the 'mapStateToProps' function, we are just passing null to the connect wrapper at the bottom. We do, however, need the dispatch authLogin function so we are using the 'mapDispatchToProps' function. Further in the Login functional component, we define state with the 'useState' hook. The component states username and password are updated with the onChange={handleFormFieldChange} clause and the 'handleSubmit' arrow function is invoked when the user submits the form.
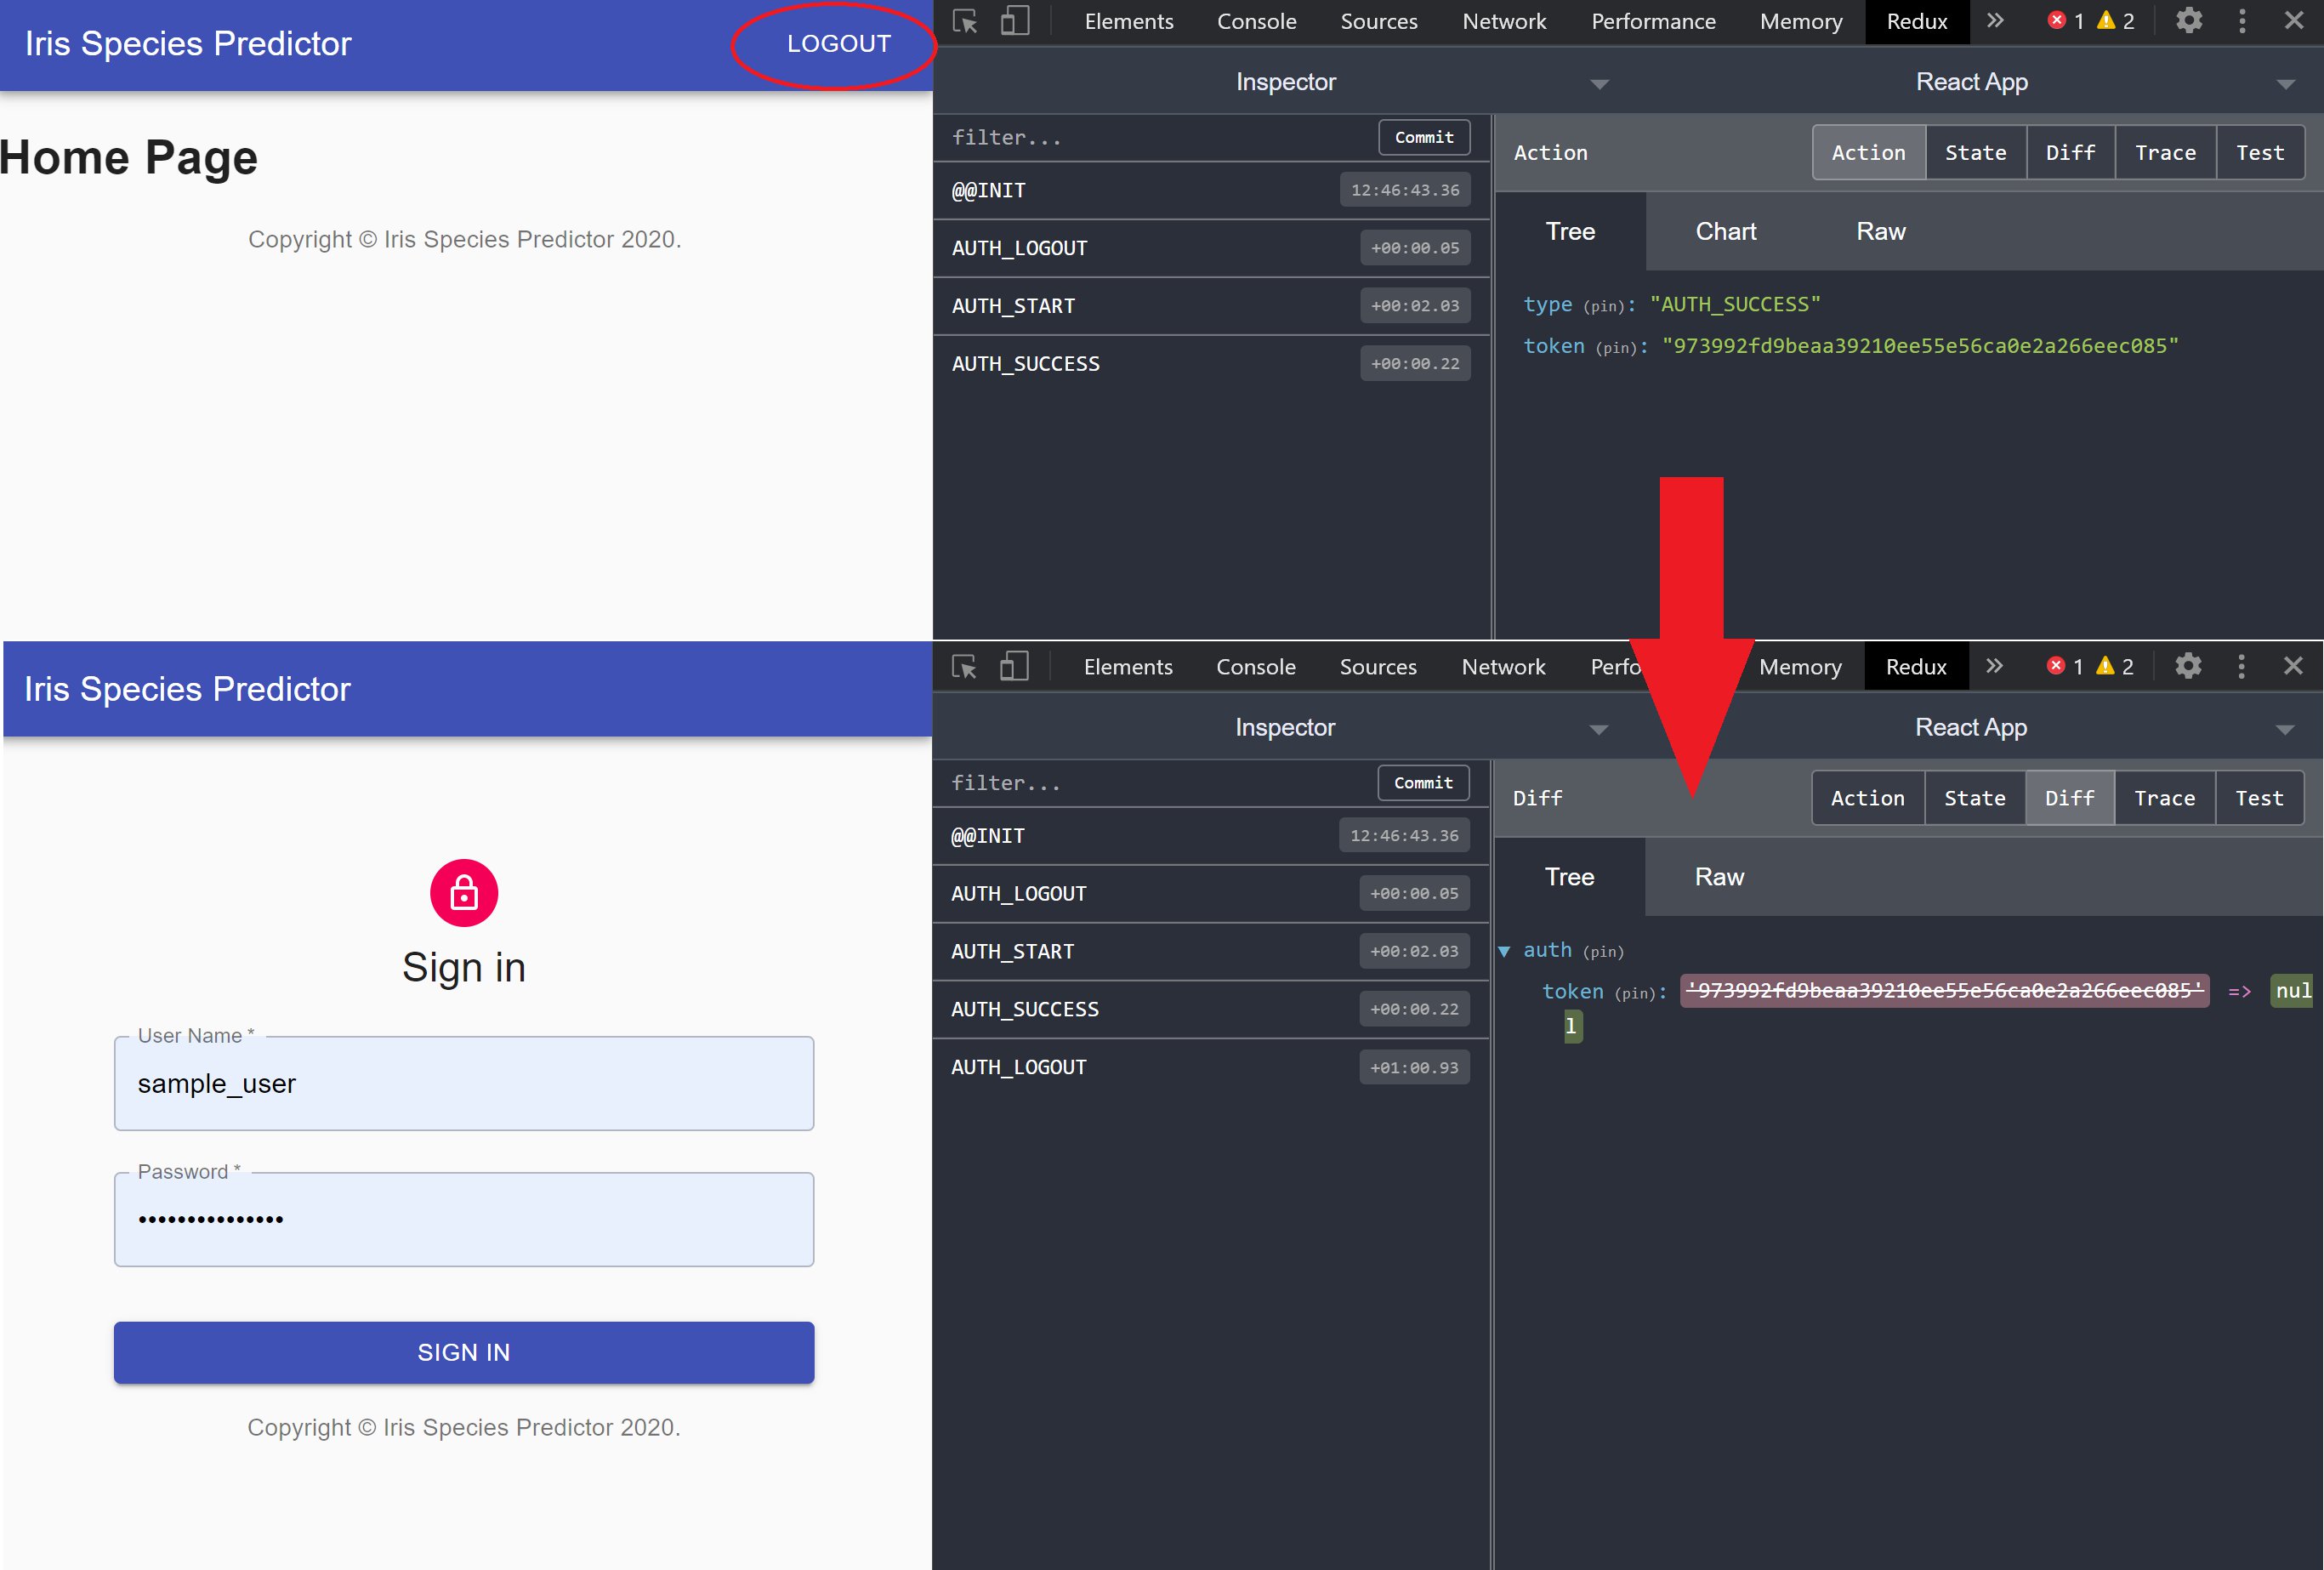
To verify whether our login functionality is working with the Redux store, you would need to install the 'Redux DevTools ' extension for Chrome. Open the frontend login page and ensure the Redux DevTools extension is working. Also, ensure that both the Django server and the PostgreSQL service is running on your system. You should now try to login with the superuser or any other user you created with the Django backend. If everything was set up properly you would see the Redux authentication dispatch actions in the Redux DevTools extension similar to the below.
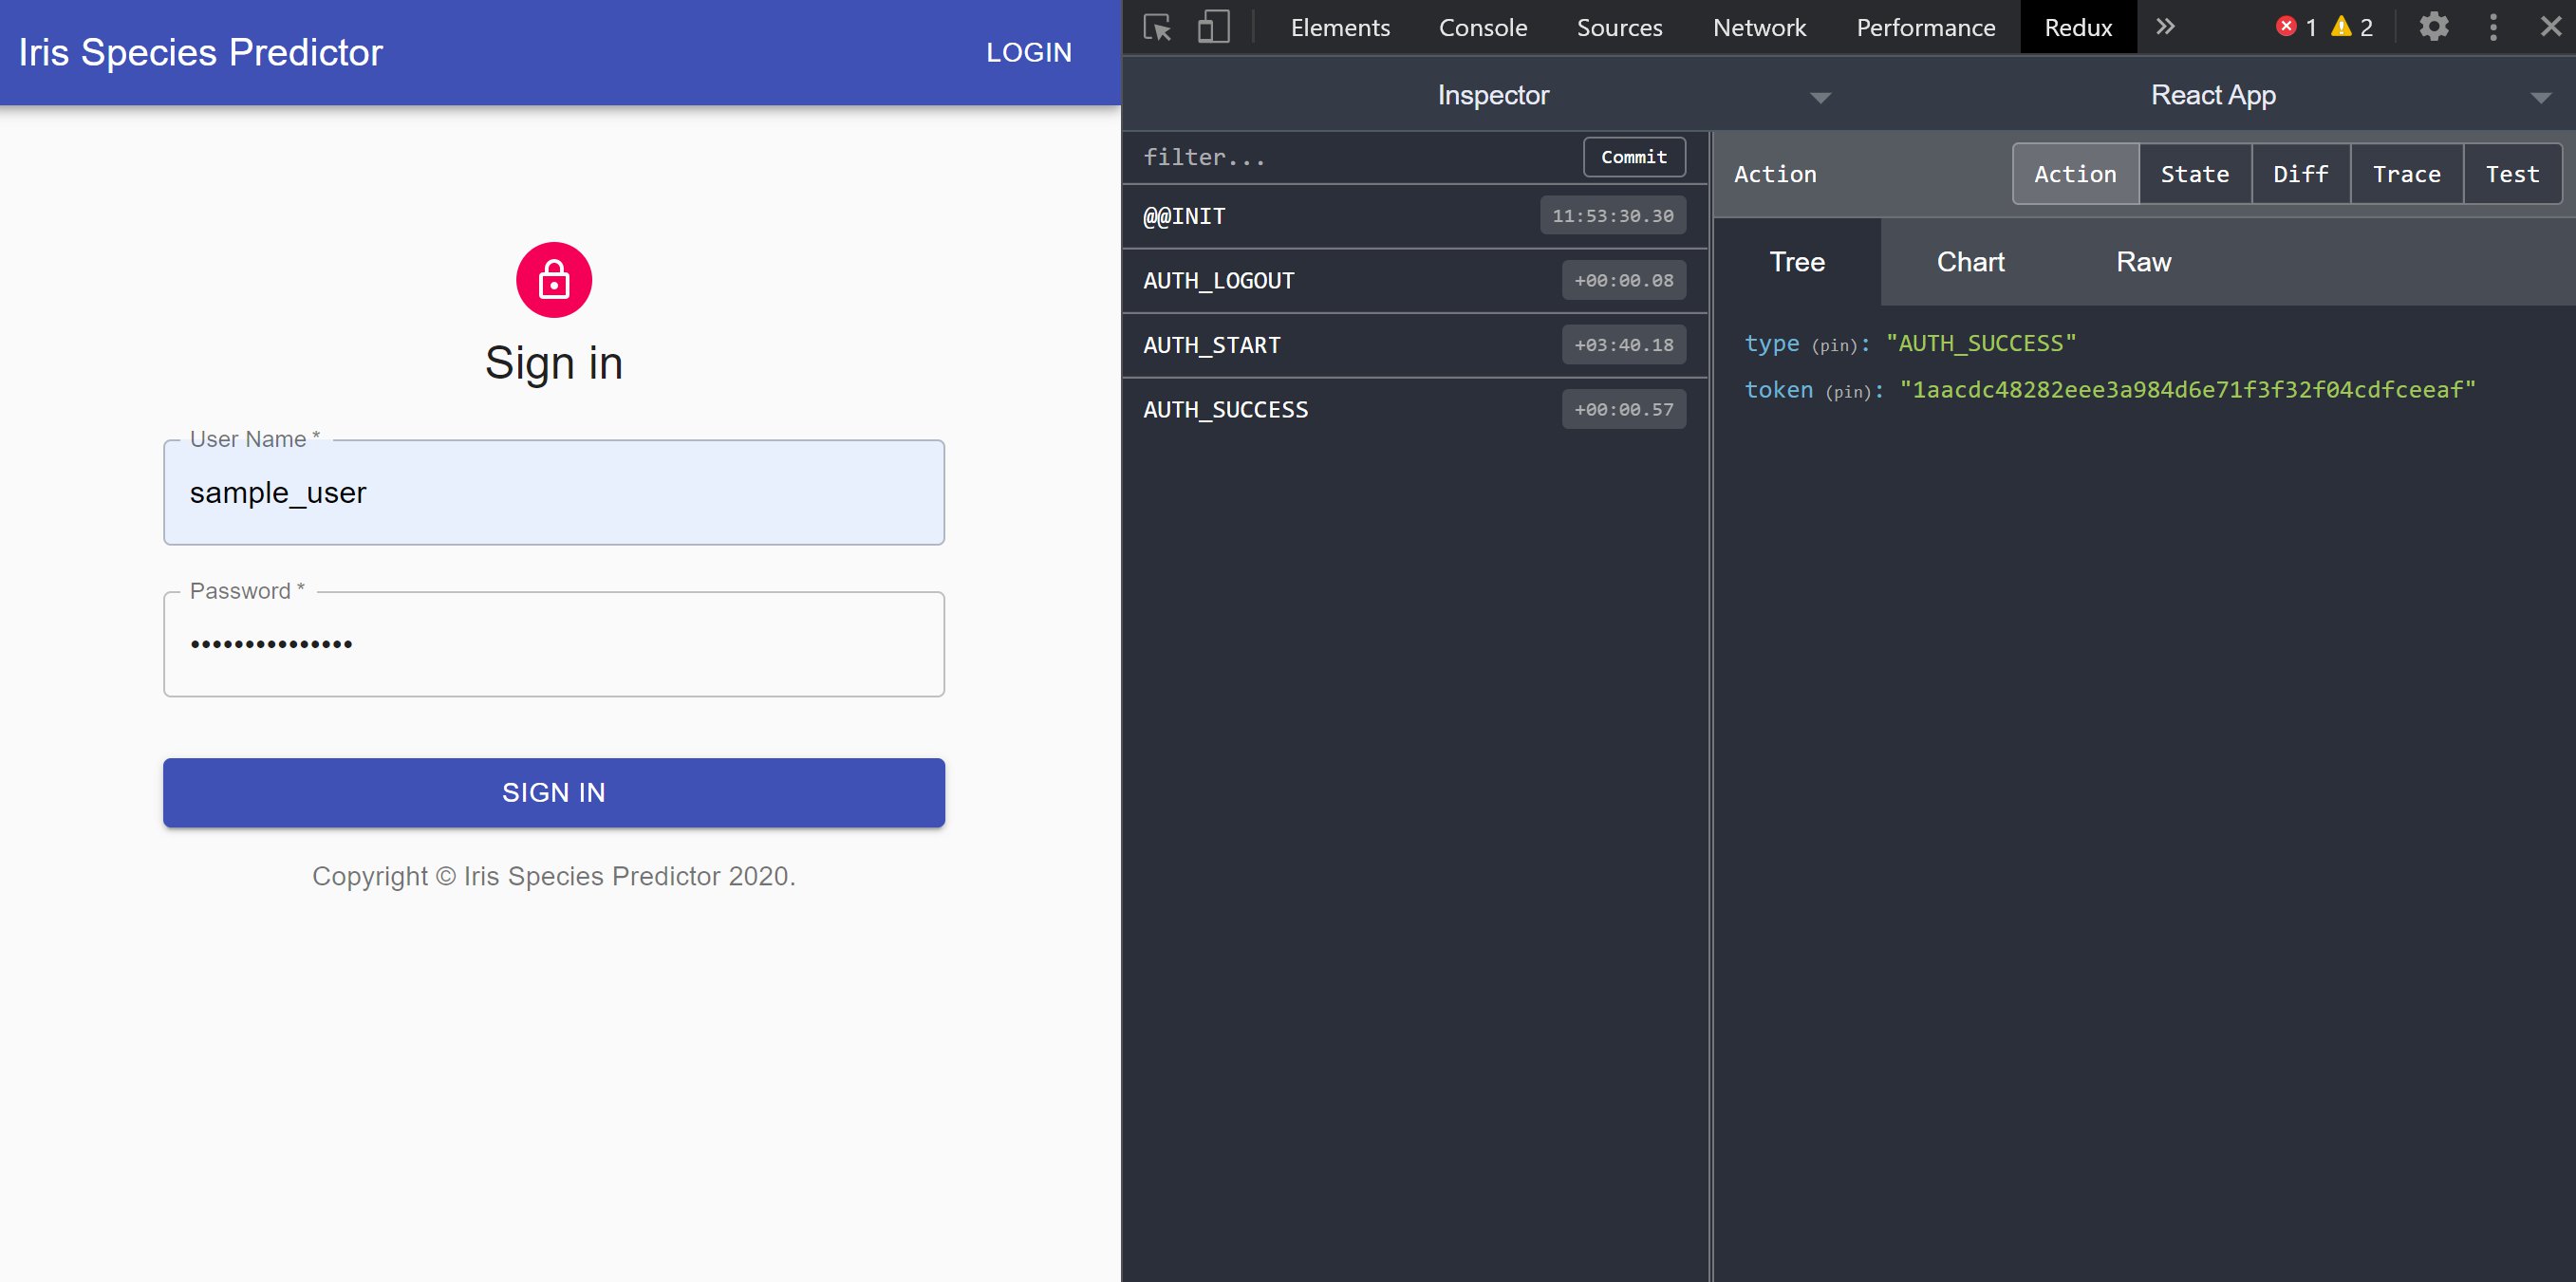
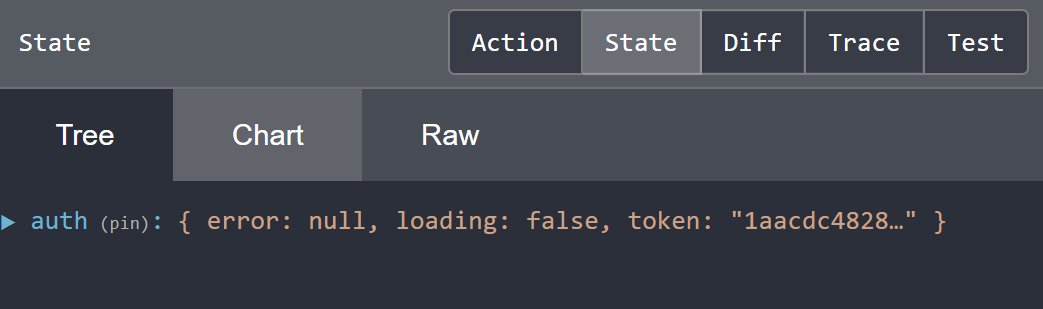
If you click on the state tab, you would also see the global state variables in the auth Redux store as below.
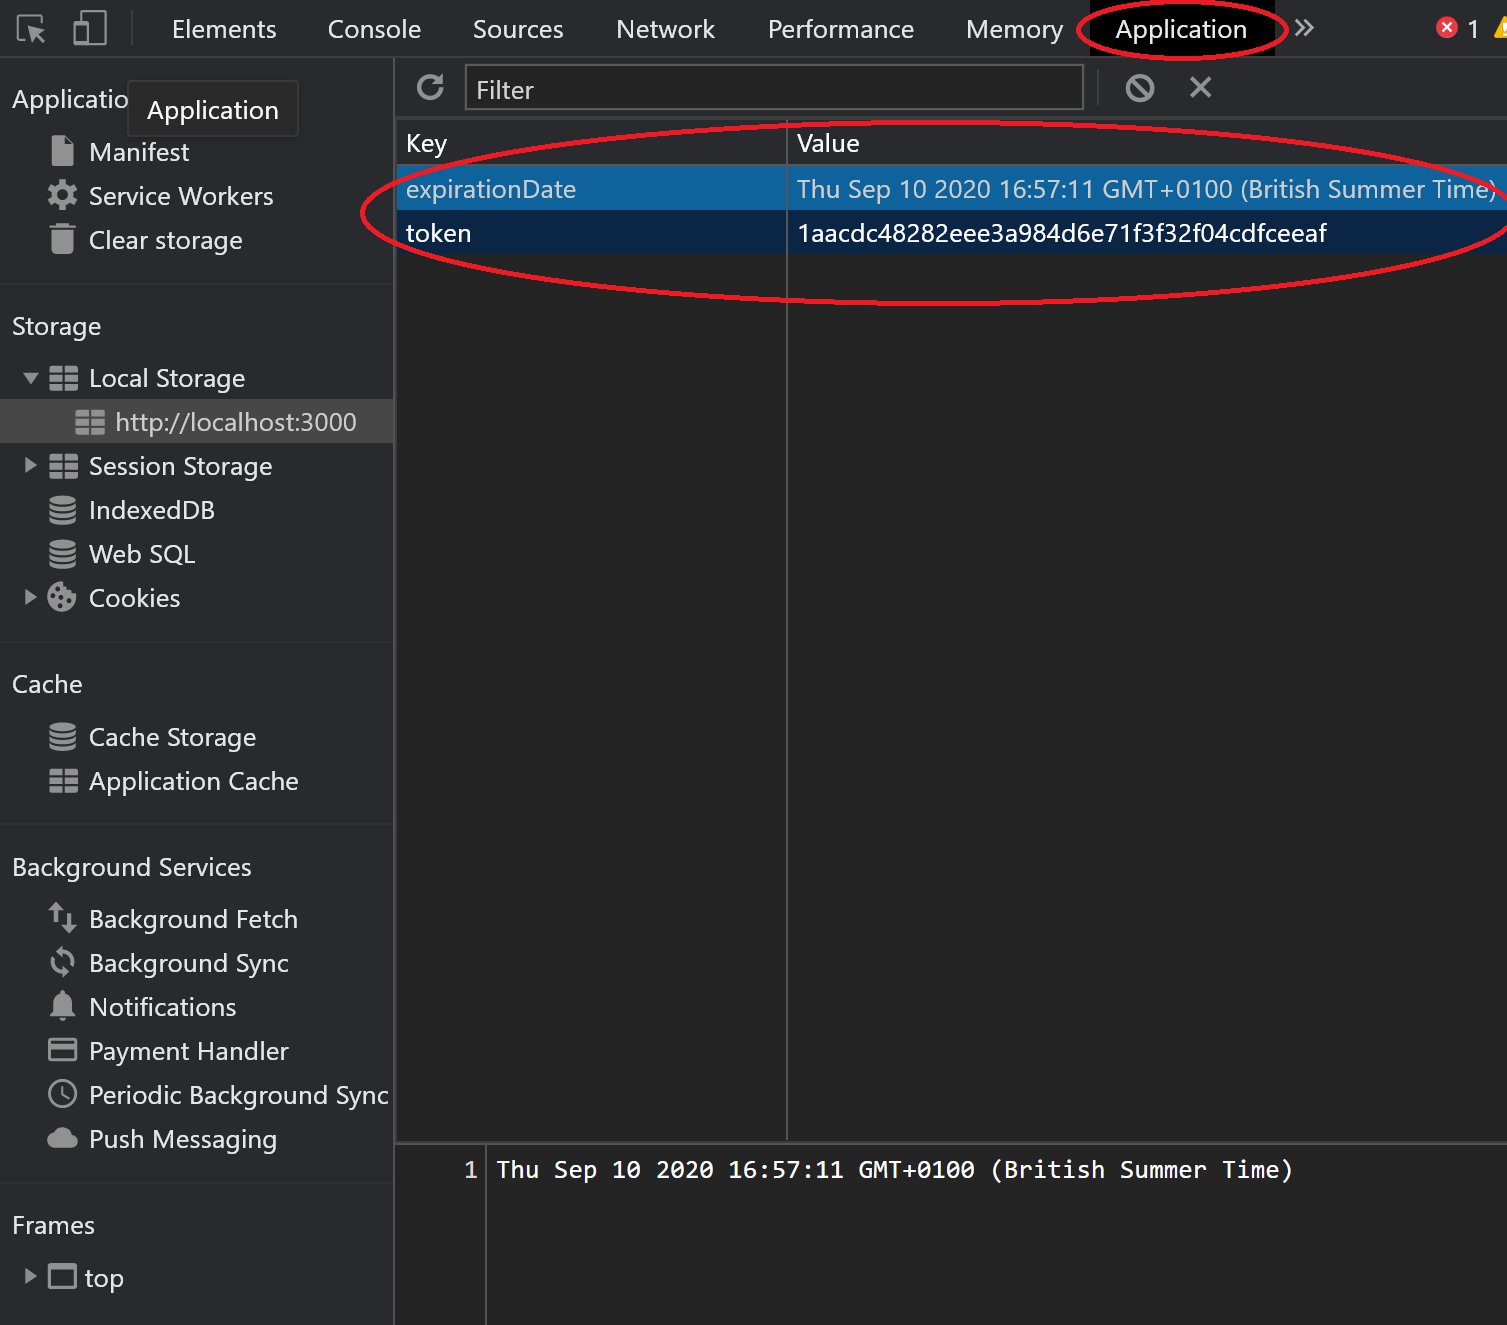
You could also check the local storage in your browser and you would see that our authentication token and the expiration time (+5 hours from login in our case as per the settings.js file) has been set up as well.
Fantastic!! Looks like our Redux store for authentication is working perfectly.
Redirect to the home page on login
To redirect to the home page once authenticated (or actually the previous page as normally happens in most web applications) modify the Login.js component as below. With the useEffect, we ensure that as soon as the user is authenticated they are redirected to the previous page.
...

import { useHistory, useLocation } from "react-router-dom";

....

function Login(props) {
  ....

  let history = useHistory();
  let location = useLocation();
  let { from } = location.state || { from: { pathname: "/" } };

  React.useEffect(() => {
    if (props.isAuthenticated) { history.replace(from) };
  });

 ....
}

....
After making the above page, if you authenticated already as in the previous section and the Login page was left open, you would see that you already have been redirected to your home page.
In addition to the above, there is another functionality that we want. We also want that if a user is not authenticated and tries to open the home page or any other page of our application, the user is redirected to the login page. To accomplish this, the Urls.js file in our src folder should be changed as below.
import React from "react";
import { BrowserRouter, Route, Switch, Redirect } from "react-router-dom";

import Login from "./components/Login";
import Home from "./components/Home";

// A wrapper for <Route> that redirects to the login screen if you're not yet authenticated.
function PrivateRoute({ isAuthenticated, children, ...rest}) {
    return (
      <Route
        {...rest}
        render={({ location }) =>
        isAuthenticated ? (
            children
          ) : (
            <Redirect
              to={{
                pathname: "/login/",
                state: { from: location }
              }}
            />
          )
        }
      />
    );
  }

function Urls(props) {

    return (
        <div>
            <BrowserRouter>
                <Switch>
                    <Route exact path="/login/"> <Login {...props} /></Route>
                    <PrivateRoute exact path="/" isAuthenticated={props.isAuthenticated}><Home {...props}/></PrivateRoute>
                </Switch>
            </BrowserRouter>
        </div>
    )
};

export default Urls;
Add logout functionality
Make the following change in the TopBar.js file. Basically we want to display a logout button if the user is authenticated, else display nothing (because if the user is not authenticated they would already be on the login page as per the second functionality change we made in the last section).
....

export default function TopBar(props) {
  const classes = useStyles();

  return (
    <div className={classes.root}>
      <AppBar position="static">
        <Toolbar>
          <Typography variant="h6" className={classes.title}>
            Iris Species Predictor
          </Typography>
          {props.isAuthenticated ? <Button color="inherit" onClick={()=>props.logout()}>Logout</Button> : null}
        </Toolbar>
      </AppBar>
    </div>
  );
}
Awesome !! You can now hit the logout button and see the logout in action in the Redux DevTools extension.
Create the prediction user interface
Okay so much just to get the authentication working. However, the good thing is that we covered one of the trickiest React concepts, Redux, in a structured manner and hopefully this would help you in a number of other projects.
Without further ado, let's create the user interface to interact with our machine learning model. This user interface would appear on the home page. So, as soon as the user is redirected to the home page after login, they would see this interface. Modify the Home.js file to look like below.
import React from 'react'
import axios from 'axios';
import * as settings from '../settings';
import CssBaseline from '@material-ui/core/CssBaseline';
import { withStyles, makeStyles } from '@material-ui/core/styles';
import { Container, Grid, Paper, Typography, Slider, Button } from '@material-ui/core';
// ########################################################
// Material UI inline styles
// ########################################################
const useStyles = makeStyles((theme) => ({
container: {
maxWidth: "75%",
marginTop: "15vh",
marginBottom: "10vh",
borderRadius: '6px',
backgroundColor: theme.palette.action.disabledBackground,
},
title: {
marginTop: theme.spacing(2),
marginBottom: theme.spacing(2),
padding: theme.spacing(2), paddingLeft: theme.spacing(4),
color: theme.palette.primary.main,
},
sliders: {
paddingTop: theme.spacing(2),
paddingBottom: theme.spacing(2),
paddingLeft: theme.spacing(4),
paddingRight: theme.spacing(4),
marginBottom: theme.spacing(2),
},
slidertop: {
marginTop: theme.spacing(4),
}
}));
// ########################################################
// Our Custom IRIS slider. You may use the default slider instead of this
// ########################################################
const IrisSlider = withStyles({
root: {
color: '#751E66',
},
valueLabel: {
left: 'calc(-50% -2)',
top: -22,
'& *': {
background: 'transparent',
color: '#000',
},
},
mark: {
height: 8,
width: 1,
marginTop: -3,
},
markActive: {
opacity: 1,
backgroundColor: 'currentColor',
},
})(Slider);
// Marks on the slider track
const marks = [{ value: 0 }, { value: 10 }];
// ########################################################
// The main Home component returned by this Module
// ########################################################
function Home(props) {
// Material UI Classes
const classes = useStyles();
// React hook state variable - Dimensions
const [dimensions, setDimensions] = React.useState({
sepal_length: 6,
sepal_width: 6,
petal_length: 6,
petal_width: 6,
});
// React hook state variable - Prediction
const [prediction, setPrediction] = React.useState(null)
// Function to update the Dimensions state upon slider value change
const handleSliderChange = name => (event, newValue) => {
setDimensions(
{
...dimensions,
...{ [name]: newValue }
}
);
};
// Function to make the predict API call and update the state variable - Prediction
const handlePredict = event => {
// Submit Iris Flower measured dimensions as form data
let irisFormData = new FormData();
irisFormData.append("sepal length (cm)", dimensions.sepal_length);
irisFormData.append("sepal width (cm)", dimensions.sepal_width);
irisFormData.append("petal length (cm)", dimensions.petal_length);
irisFormData.append("petal width (cm)", dimensions.petal_width);
//Axios variables required to call the predict API
let headers = { 'Authorization': `Token ${props.token}` };
let url = settings.API_SERVER + '/api/predict/';
let method = 'post';
let config = { headers, method, url, data: irisFormData };
//Axios predict API call
axios(config).then(
res => {setPrediction(res.data["Predicted Iris Species"])
}).catch(
error => {alert(error)})
}
function valuetext(value) {
return `${value} cm`;
}
return (
<React.Fragment>
<CssBaseline />
<Container fixed className={classes.container}>
<Grid container alignItems="center" spacing={3}>
<Grid item xs={6}>
<Paper className={classes.title} elevation={0}>
<Typography variant="h5">
Iris Flower Dimensions
</Typography>
</Paper>
<Paper className={classes.sliders}>
<Typography id="sepal_length" variant="caption" >
Sepal Length (cm)
</Typography>
<IrisSlider
defaultValue={6}
getAriaValueText={valuetext}
aria-labelledby="sepal_length"
step={0.1}
min={0}
max={10}
valueLabelDisplay="on"
marks={marks}
className={classes.slidertop}
onChange={handleSliderChange("sepal_length")}
/>
<Typography id="sepal_width" variant="caption" gutterBottom>
Sepal Width (cm)
</Typography>
<IrisSlider
defaultValue={6}
getAriaValueText={valuetext}
aria-labelledby="sepal_width"
step={0.1}
min={0}
max={10}
valueLabelDisplay="on"
marks={marks}
className={classes.slidertop}
onChange={handleSliderChange("sepal_width")}
/>
<Typography id="petal_length" variant="caption" gutterBottom>
Petal Length (cm)
</Typography>
<IrisSlider
defaultValue={6}
getAriaValueText={valuetext}
aria-labelledby="petal_length"
step={0.1}
min={0}
max={10}
valueLabelDisplay="on"
marks={marks}
className={classes.slidertop}
onChange={handleSliderChange("petal_length")}
/>
<Typography id="petal_width" variant="caption" gutterBottom>
Petal Width (cm)
</Typography>
<IrisSlider
defaultValue={6}
getAriaValueText={valuetext}
aria-labelledby="petal_width"
step={0.1}
min={0}
max={10}
valueLabelDisplay="on"
marks={marks}
className={classes.slidertop}
onChange={handleSliderChange("petal_width")}
/>
</Paper>
</Grid>
<Grid item xs={2}>
<Button variant="contained" color="primary" onClick={handlePredict}>
Predict
</Button>
</Grid>
<Grid item xs={4}>
<Paper className={classes.title} elevation={0}>
<Typography variant="caption" display="inline">
Predicted Iris Species: <span> </span>
</Typography>
<Typography variant="body1" display="inline">
{prediction}
</Typography>
</Paper>
</Grid>
</Grid>
</Container>
</React.Fragment>
)
}
export default Home
The code is pretty much self-explanatory. We have created four sliders using a custom slider created using the Material UI theme. This may appear complicated but actually is not. As all of this has been taken from the official Slider examples from material-ui.com. You may refer to these examples. We have created two functional component state variables with the React hook, useState. The 'dimension' state variable is an object while the 'prediction' is just a string. When the user changes the sliders the dimension state variable is updated using the spread operator. When the user hits the 'PREDICT' button, a post API call is made to the predict REST API we created earlier. If the API call is made successfully the predicted IRIS species is displayed to the user. If an error occurs, that is displayed as an alert. The prediction user interface would look like below in the browser.
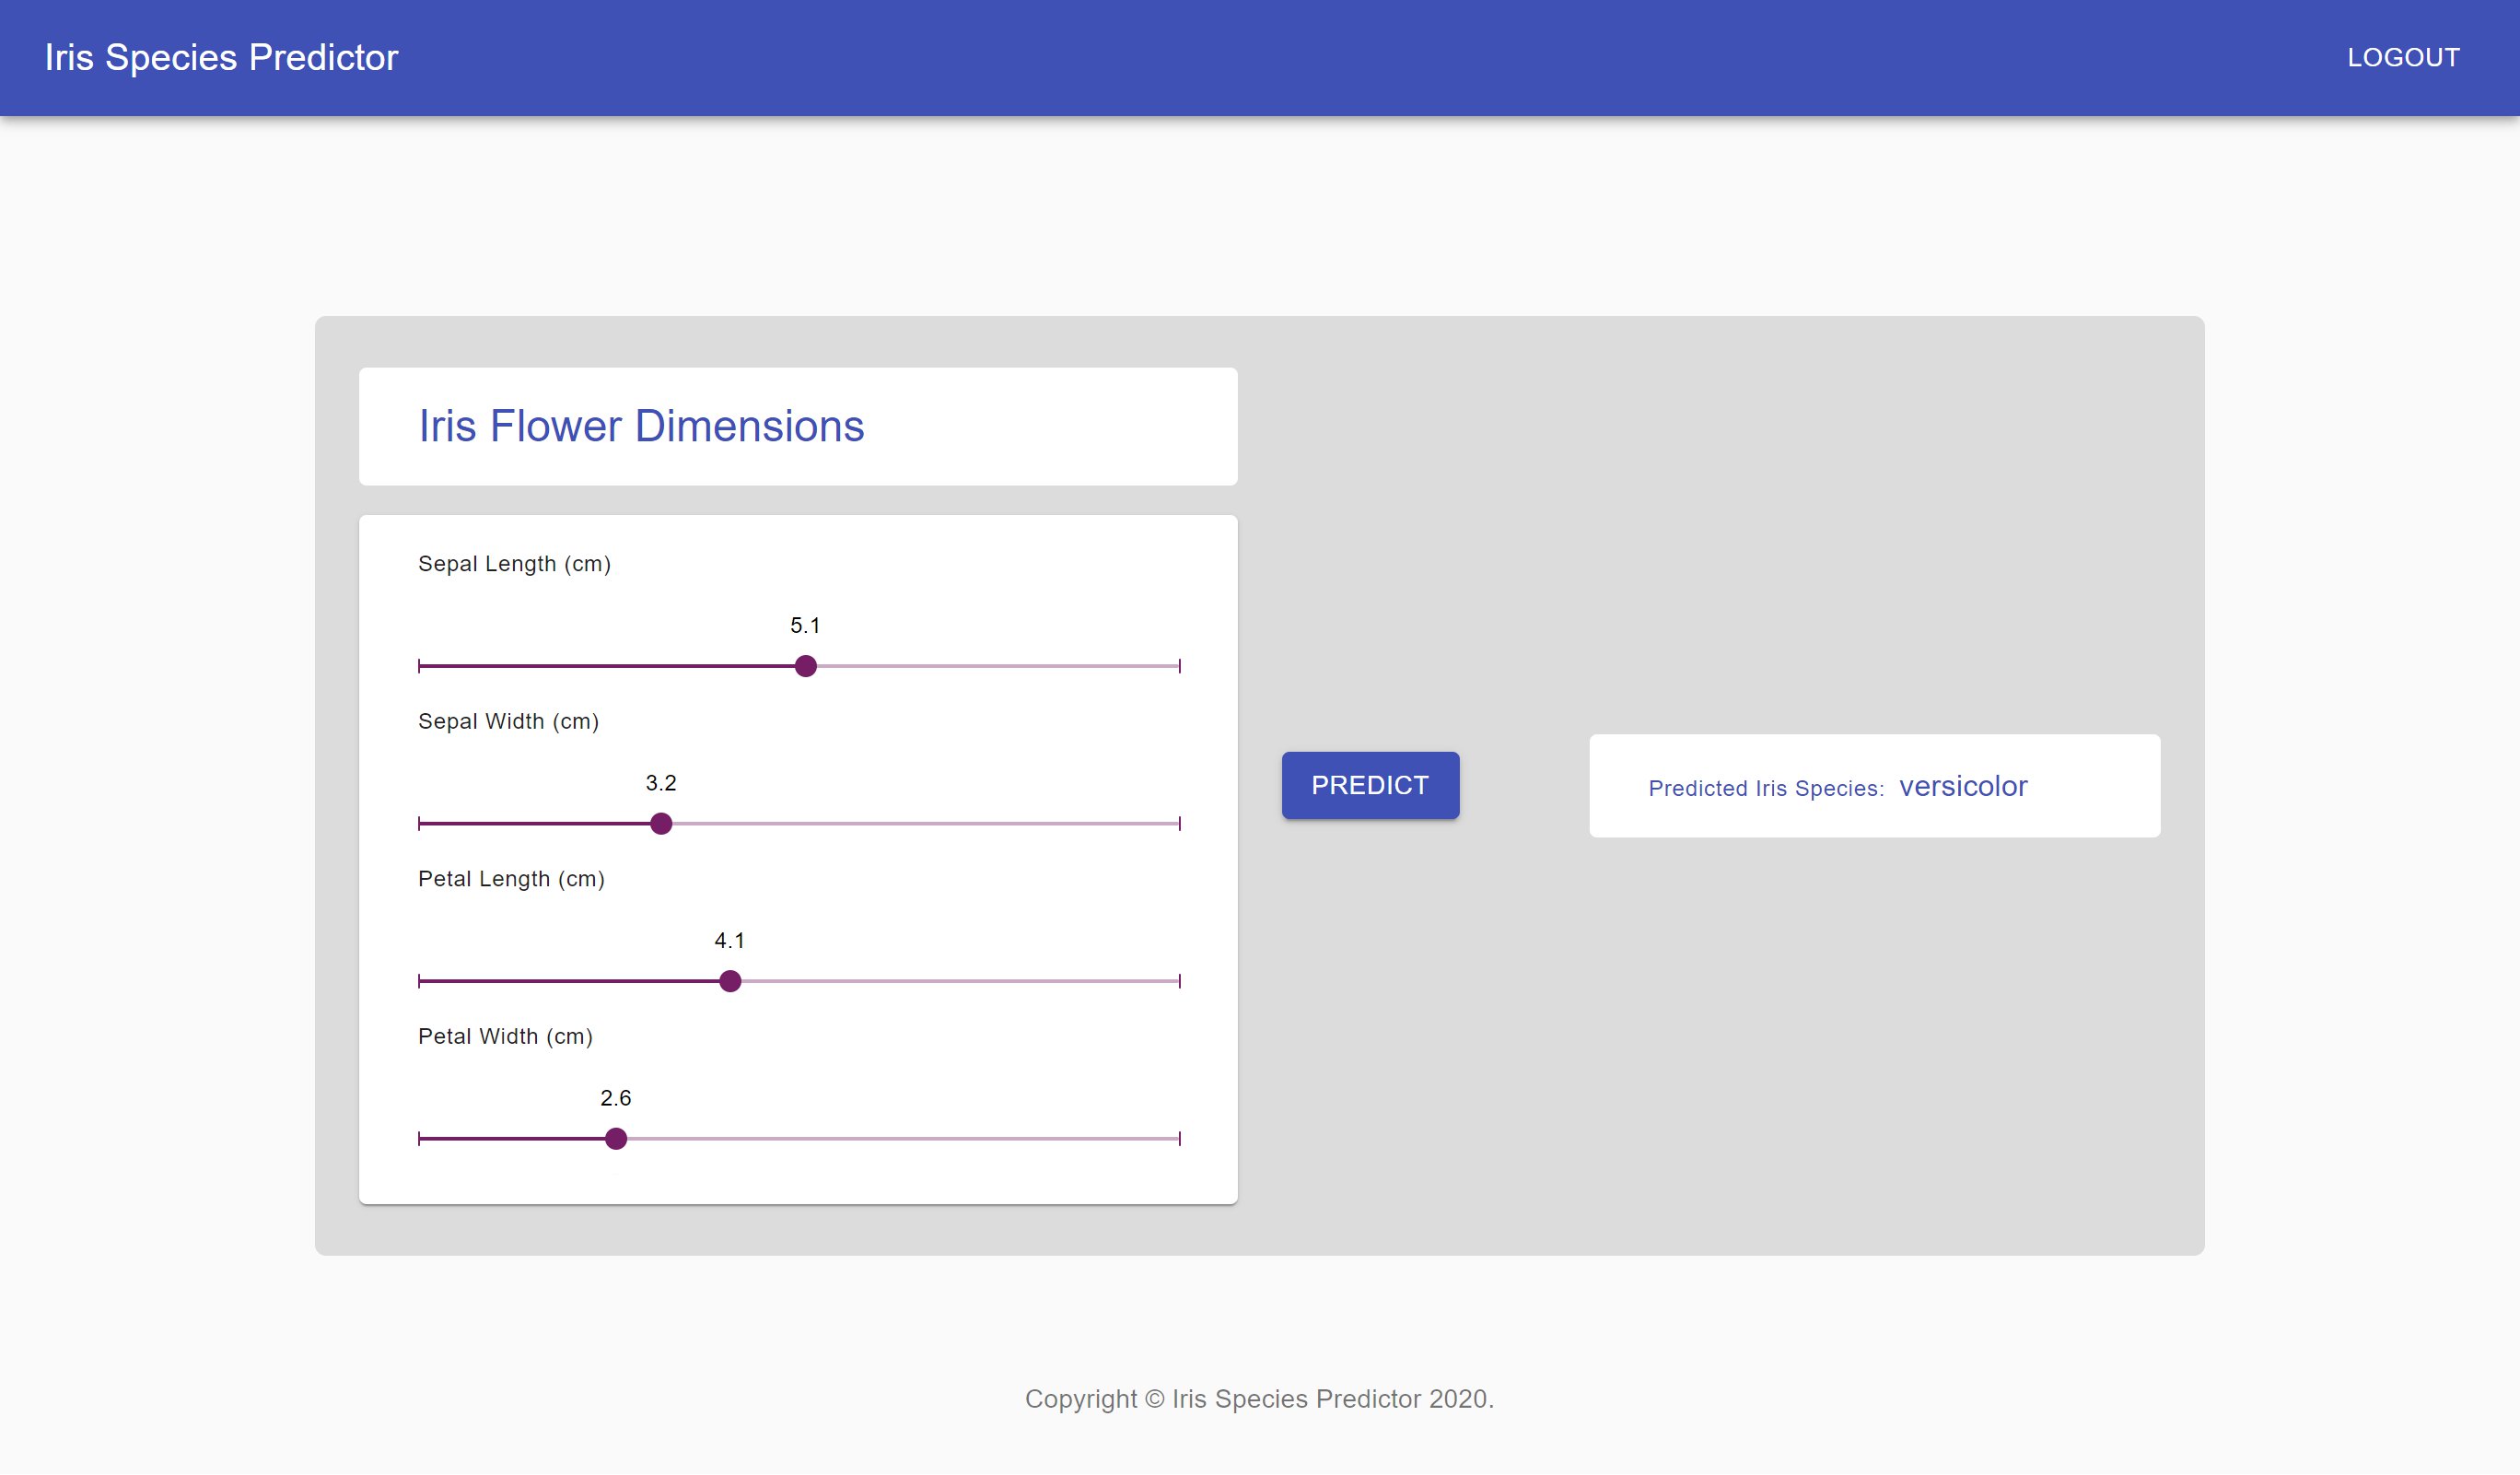
After entering the flower dimensions using the sliders, you can press the 'PREDICT' button and see the prediction in action!
Add password update functionality
Before we go to the Docker section, we need to do one last thing – add the password update functionality. First, we need to create the PasswordUpdate view. Create a new file called 'PasswordUpdate.js' in the components folder. I just copied the Login.js file, renamed it to PasswordUpdate.js and made some changes to create this view. The content of this file is shown below.
import React from 'react';
import axios from 'axios';
import * as settings from '../settings';

import { makeStyles } from '@material-ui/core/styles';
import { Avatar, Button, Container, CssBaseline, TextField, Typography } from '@material-ui/core';
import VpnKeyIcon from '@material-ui/icons/VpnKey';


const useStyles = makeStyles((theme) => ({
  paper: {
    marginTop: theme.spacing(8),
    display: 'flex',
    flexDirection: 'column',
    alignItems: 'center',
  },
  avatar: {
    margin: theme.spacing(1),
    backgroundColor: theme.palette.success.main,
  },
  form: {
    width: '100%', // Fix IE 11 issue.
    marginTop: theme.spacing(1),
  },
  submit: {
    margin: theme.spacing(3, 0, 2),
  },
  success: {
    color: theme.palette.success.main,
  }
}));

function PasswordUpdate(props) {
  const classes = useStyles();
  const [new_password1, setNewPassword1] = React.useState(null);
  const [new_password2, setNewPassword2] = React.useState(null);
  const [success, setSuccess] = React.useState(false);

  const handleFormFieldChange = (event) => {
    setSuccess(false);
    switch (event.target.id) {
      case 'new_password1': setNewPassword1(event.target.value); break;
      case 'new_password2': setNewPassword2(event.target.value); break;
      default: return null;
    }

  };

  const handleSubmit = (e) => {
    e.preventDefault();
    if (new_password1 !== new_password2) {
      alert("Passwords don't match")
    } else {
      let headers = { 'Authorization': `Token ${props.token}` };
      let method = 'post';
      let url = settings.API_SERVER + '/api/auth/update_password/';
      let passwordFormData = new FormData();
      passwordFormData.append("new_password1", new_password1);
      passwordFormData.append("new_password2", new_password2);
      let config = { headers, method, url, data: passwordFormData};
      //Axios update_password API call
      axios(config).then(res => {
        setSuccess(true);
      }).catch(
        error => {
          alert(error)
        })
    }

  }

  return (
    <Container component="main" maxWidth="xs">
      <CssBaseline />
      <div className={classes.paper}>
        {success ? <Typography variant="button" className={classes.success} gutterBottom>Password update successful!</Typography> : null}
        <Avatar className={classes.avatar}>
          <VpnKeyIcon />
        </Avatar>
        <Typography component="h1" variant="h5">
          Update Password
        </Typography>
        <form className={classes.form} noValidate onSubmit={handleSubmit}>
          <TextField
            variant="outlined"
            margin="normal"
            required
            fullWidth
            name="new_password1"
            label="Enter New Password"
            type="password"
            id="new_password1"
            onChange={handleFormFieldChange}
            error={new_password1 !== new_password2}
            helperText={new_password1 !== new_password2 ? "Passwords don't match" : null}
          />
          <TextField
            variant="outlined"
            margin="normal"
            required
            fullWidth
            name="new_password2"
            label="Enter Your Password Again"
            type="password"
            id="new_password2"
            onChange={handleFormFieldChange}
            error={new_password1 !== new_password2}
            helperText={new_password1 !== new_password2 ? "Passwords don't match" : null}
          />
          <Button
            type="submit"
            fullWidth
            variant="contained"
            color="primary"
            className={classes.submit}
          >
            Update Password
          </Button>
        </form>
      </div>
    </Container>
  );
}


export default PasswordUpdate;
So in this view, there are two password text fields. As before the state variables have been added using useState for these fields. Once the user makes changes to any of these fields, if the fields don't match the error attribute of the fields would become active. Also, the helper text below the field would show that the passwords didn't match in red. When the user hits submit, in the handleSubmit function, if the passwords are still not matching this would display an alert to the user. If the passwords are the same, then the handleSubmit function would make a post API call to the REST API password update URL. If the server sends an OK response, then the success state variable, also created using useState, would become true. If the success state is true, our PasswordUpdate component would display a message, 'Password update successful!' at the top.
To see all of this in action let's create the URL route which would take us to the view. In the Urls.js file make the below changes.
....
import PasswordUpdate from "./components/PasswordUpdate";
.....

// A wrapper for <Route> that redirects to the login screen if you're not yet authenticated.
....

function Urls(props) {
        ....
            <BrowserRouter>
                <Switch>
                    ....
                    <PrivateRoute exact path="/update_password/" isAuthenticated={props.isAuthenticated}><PasswordUpdate {...props}/></PrivateRoute>
                </Switch>
            </BrowserRouter>
      ....
};

export default Urls;
Also, change the TopBar.js file so that we can see two more buttons at the top right, one of which would take us to the PasswordUpdate view and the other one to our home page. We are also adding the home page button because, after the password update, the user can then click this button to return to the home page. The TopBar.js would have the following changes.
import React from 'react';
import { makeStyles } from '@material-ui/core/styles';
import { AppBar, Toolbar, Typography, Button, IconButton } from '@material-ui/core';
import HomeIcon from '@material-ui/icons/Home';

....

export default function TopBar(props) {
  ....

  return (
       ...
        <Toolbar>
          ....
          <IconButton aria-label="home page" color="inherit" href="/">
            <HomeIcon />
          </IconButton>
          {props.isAuthenticated ? <Button color="inherit" href="/update_password">Update Password</Button> : null}
          {props.isAuthenticated ? <Button color="inherit" onClick={() => props.logout()}>Logout</Button> : null}
       </Toolbar>
       ...
  );
}
Now time to see our Password Update in action. Click the 'Update Password' button from the Top Bar which would now appear following the above changes. 
On the password update page, if your passwords don't match you would see the error similar to below.
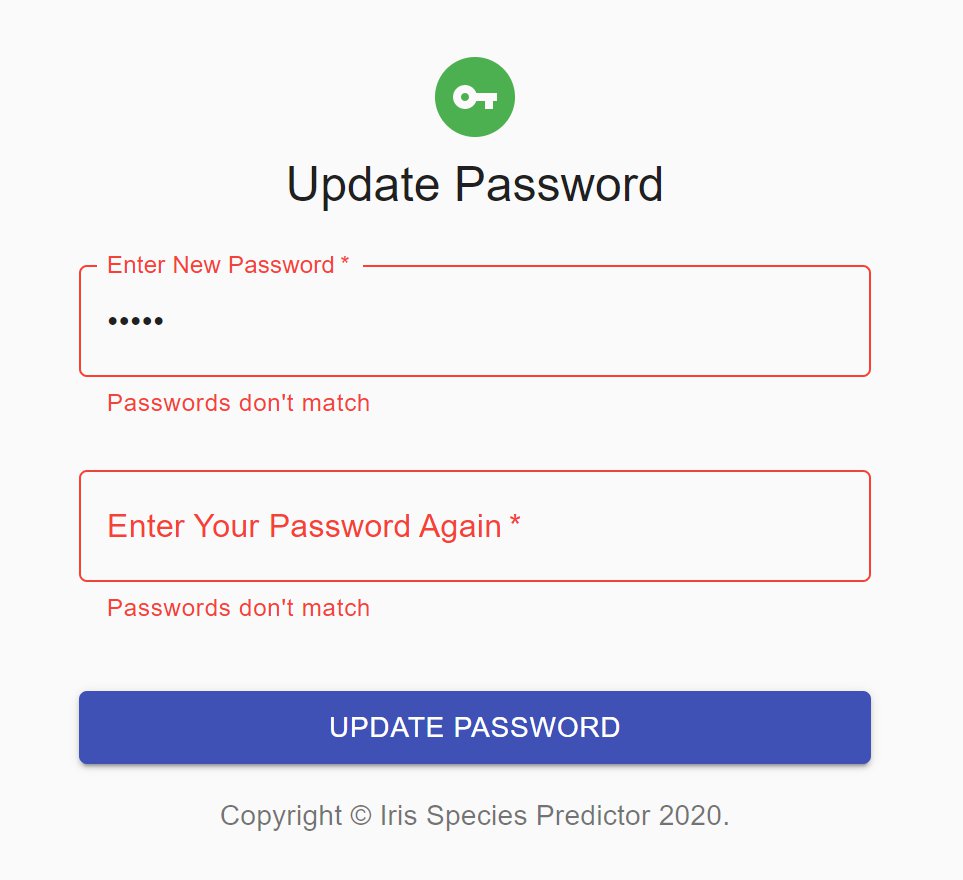
If you entered both the passwords as same and the server returned a status code of 200 (OK) upon pressing the 'UPDATE PASSWORD' button, you would see something like below.
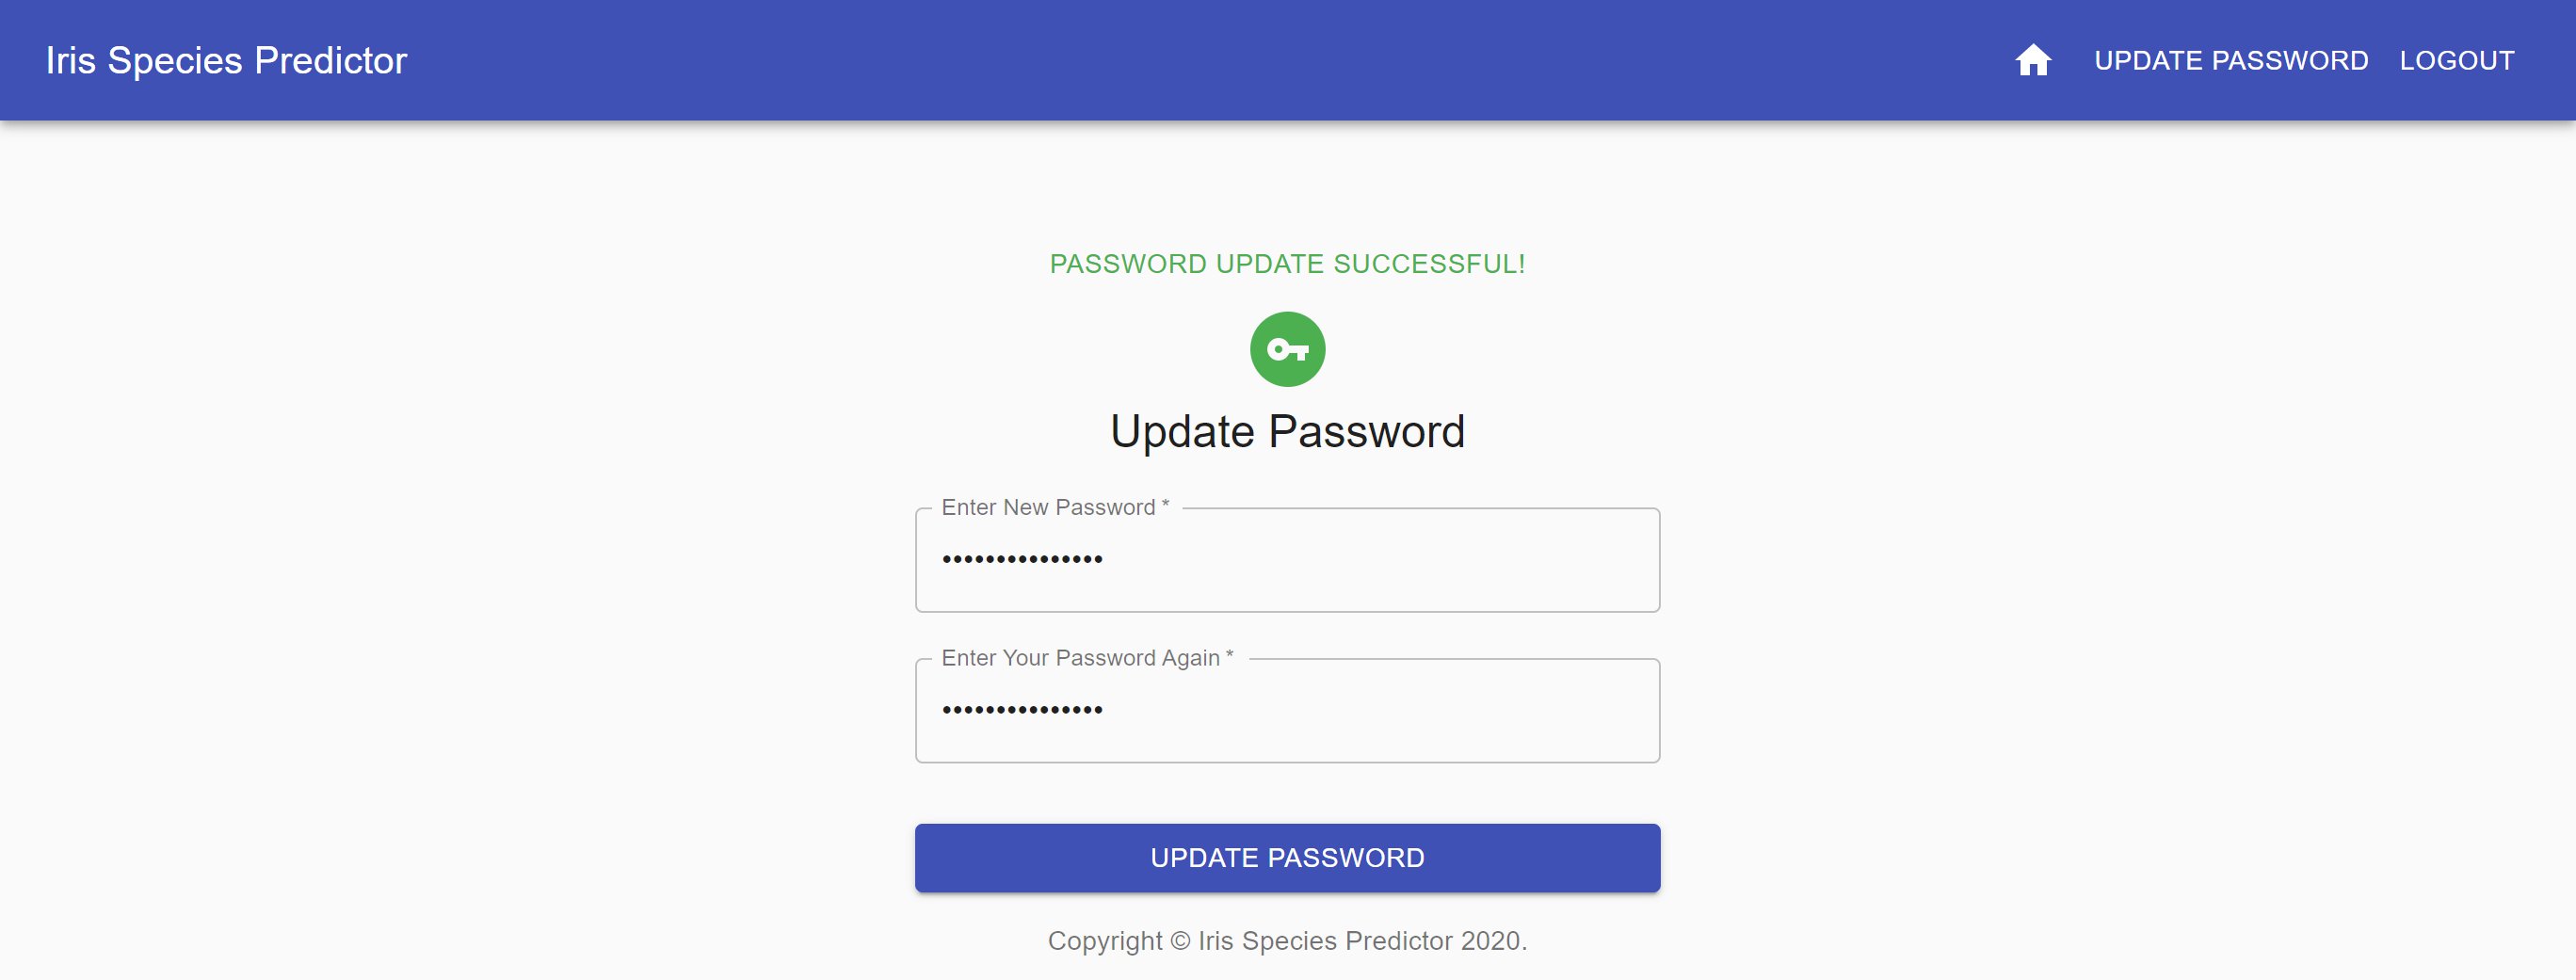
You may now click the home button on the Top Bar to return to your home page and do any more predictions you wanted.
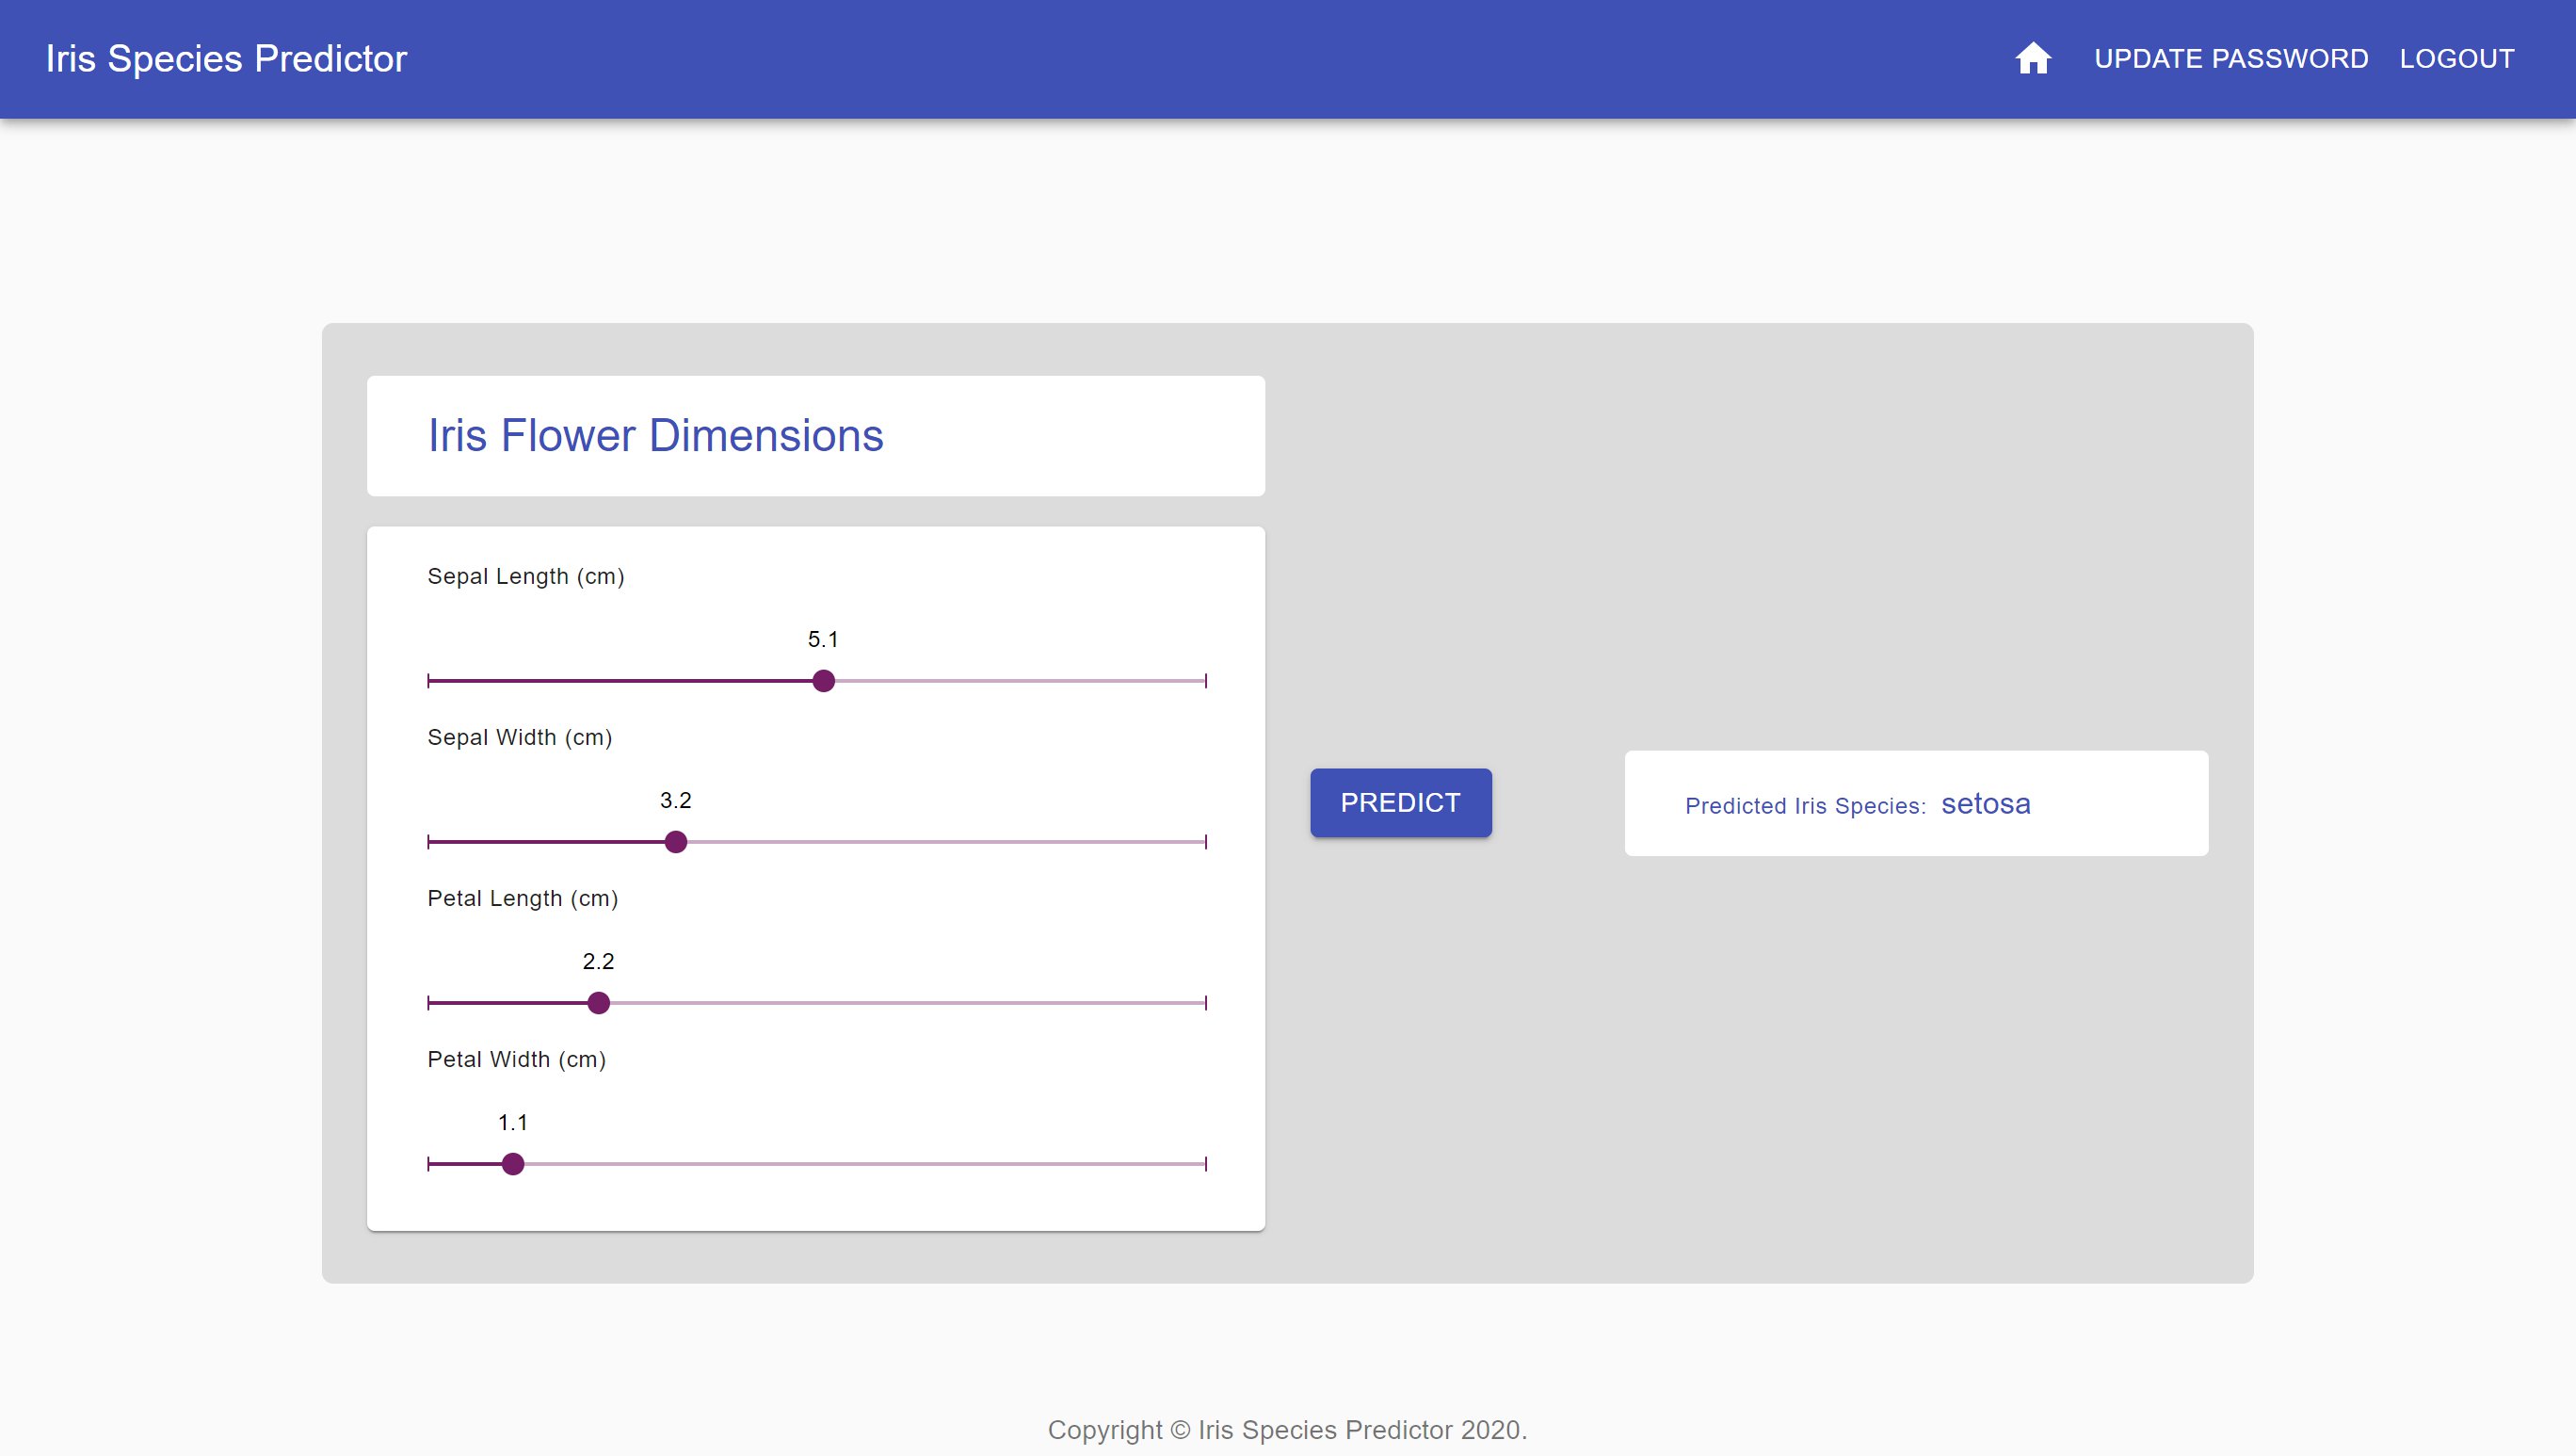
So there you go. We have created a simple and elegant machine-learning prediction interface for our end-users using React 🍺! Now onwards to wrapping our machine learning application in Docker 🍺🍺!!
Docker – create a docker platform for our application
Docker is a tool designed to make it easier to create, deploy, and run applications by using containers. Containers allow a developer to package up an application with all of the parts it needs, such as libraries and other dependencies, and deploy it as one package – Opensource.com.
We would be using docker-compose to connect all our services, which we created before, running on different Docker containers. We begin by creating the required Docker files for our backend. Then we would cover the frontend and also would need to create a separate Docker service for Nginx, the webserver which would be running on our production cloud server which would accept all web requests directed to the web address of our machine-learning application.
Dockerfiles – Django Service
In the backend folder (within our main project folder DockerDjangoReactProject) create four new files called 'Dockerfile', '.env', 'entrypoint.sh' and '.dockerignore'. Move the 'requirements.txt' file within the backend folder. Note that the Dockerfile does not have a file extension in its name. The backend folder should now look like the below.
D:\PROJECTS\DOCKERDJANGOREACTPROJECT\BACKEND
│   Dockerfile
│   entrypoint.sh
│   .env
│   requirements.txt
│   .dockerignore
│
└───django_app
    ├───mainapp
    ├───prediction
    └───users
The Dockerfile contains the below.
###########
# BUILDER #
###########

# pull official base image
FROM python:3.7.9-slim-stretch as builder

# set work directory
WORKDIR /usr/src/app

# set environment variables
ENV PYTHONDONTWRITEBYTECODE 1
ENV PYTHONUNBUFFERED 1

# install dependencies
COPY ./requirements.txt .
RUN pip wheel --no-cache-dir --no-deps --wheel-dir /usr/src/app/wheels -r requirements.txt


#########
# FINAL #
#########

# pull official base image
FROM python:3.7.9-slim-stretch

# installing netcat (nc) since we are using that to listen to postgres server in entrypoint.sh
RUN apt-get update && apt-get install -y --no-install-recommends netcat && \
    apt-get autoremove -y && \
    apt-get clean && \
    rm -rf /var/lib/apt/lists/*

# install dependencies
COPY --from=builder /usr/src/app/wheels /wheels
COPY --from=builder /usr/src/app/requirements.txt .
RUN pip install --no-cache /wheels/*

# set work directory
WORKDIR /usr/src/app

# copy entrypoint.sh
COPY ./entrypoint.sh /usr/src/app/entrypoint.sh

# copy our django project
COPY ./django_app .

# run entrypoint.sh
RUN chmod +x /usr/src/app/entrypoint.sh
ENTRYPOINT ["/usr/src/app/entrypoint.sh"]
We would use this Dockerfile to prepare our container before it is up and running our django_app as one of the services for docker-compose. Since a container is nothing but a stripped-down version of Linux, we would need to prepare it before it is ready to run our django_app. This is what all the steps in the Dockerfile define. Some other parameters would be defined in the docker-compose file which we would create later on. So, for now, let's focus on this Dockerfile.
As you could see from the comments that Docker container would be built in 2 stages – the Builder stage and the Final stage. In the Builder stage, we use one of the official Python images supporting Python 3.7+ as the base image, define the working directory to be used within the container for the Builder stage, set some environment variables to create Python byte cache to speed up Python a little bit (optional), copy the requirements.txt from our drive to the container, and collect the wheels files of the various packages defined in our requirements.txt file. In the 'Final' stage, we would again use the official Python image to use as a base for our container, install Netcat within the Linux environment of the container, copy over the wheel files from the Builder container, install all our required packages in the default Python environment of our Final stage container, set the working directory as 'app' within the container, copy over a file called 'entrypoint.sh' which is the file which would be run before any other command is run in our django_app service, copy over the contents of our django_app into the working directory of the container and then finally run the 'entrypoint.sh' file with the default user credentials within the container.
The 'entrypoint.sh' to be used by the Dockerfile, as discussed above, should look like below.
#!/bin/sh
if [ "$DATABASE" = "postgres" ]
then
    echo "Waiting for postgres..."

    while ! nc -z $DB_HOST $DB_PORT; do
      sleep 0.1
    done

    echo "PostgreSQL started"
fi

python manage.py collectstatic --noinput
python manage.py migrate --noinput
echo "from django.contrib.auth.models import User;
User.objects.filter(email='$DJANGO_ADMIN_EMAIL').delete();
User.objects.create_superuser('$DJANGO_ADMIN_USER', '$DJANGO_ADMIN_EMAIL', '$DJANGO_ADMIN_PASSWORD')" | python manage.py shell

exec "$@"
Basically, in the above script, our container would wait until our PostgreSQL service (to be run on another container within docker-compose) is up and running, and as soon as it is running, it would perform the 'python manage.py collectstatic' command to create the static files to be used by the Django admin portal, perform the 'python manage.py migrate' command to migrate our current django_app schema to the PostgreSQL database, and create a superuser defined by the environment variables. These environment variables are defined in the .env file as below. Note that we would provide the actual command to run our django_app, 'python manage.py runserver' from docker-compose instead of the Dockerfile using a package called 'gunicorn'. This package should be automatically installed from the requirements.txt file we created earlier.
Note: If you are running Docker on Windows, please ensure that this file has EOF (End of file) endings in 'LF' format instead of the windows default 'CRLF', otherwise this would create problems in the Linux containers of Docker. One way to change this is to install notepad++, open the below 'entrypoint.sh' file and go to edit -> EOL conversion -> change from CRLF to LF. Then save the file. The other way is to change this setting from within VS code from the bottom right corner as shown below.
The '.env' file would be used by docker-compose to create the environment variables, accessible within the django_app service container.
DJANGO_ENV=production
DEBUG=0
SECRET_KEY=secretsecretsecretsecretsecret
DJANGO_ALLOWED_HOSTS=www.example.com localhost 127.0.0.1 [::1]

DJANGO_ADMIN_USER=admin
DJANGO_ADMIN_EMAIL=admin@example.com
DJANGO_ADMIN_PASSWORD=admin_password

DATABASE=postgres

DB_ENGINE=django.db.backends.postgresql
DB_DATABASE=predictiondb
DB_USER=postgres_user
DB_PASSWORD=postgres_password
DB_HOST=db
DB_PORT=5432
In a production environment, debug should be set to false/0. Also, we need to provide our hosts such as 'www.example.com' or the public IP address of the cloud server which would host our application, as one of the settings of our django_app. The remaining environment variables define the admin portal user details and the PostgreSQL service connection details. So that our django_app could use these environment variables in settings when the django_app service is running, we need to modify the local_settings.py file (within the mainapp folder in the django_app folder) as below.
import os
BASE_DIR = os.path.dirname(os.path.dirname(os.path.abspath(__file__)))

#################################################################
    ##  Get Django environment set by docker (i.e either development or production), or else set it to local ##
#################################################################
try:
    DJANGO_ENV = os.environ.get("DJANGO_ENV")
except:
    DJANGO_ENV = 'local'

#################################################################
    ##  If Django environement has been set by docker it would be either development or production otherwise it would be undefined or local ##
#################################################################
if DJANGO_ENV == 'development' or DJANGO_ENV == 'production':

    try:
        SECRET_KEY = os.environ.get("SECRET_KEY")
    except:
        SECRET_KEY = 'localsecret'

    try:
        DEBUG = int(os.environ.get("DEBUG", default=0))
    except:
        DEBUG = False

    try:
        ALLOWED_HOSTS = os.environ.get("DJANGO_ALLOWED_HOSTS").split(" ")
    except:
        ALLOWED_HOSTS = ['127.0.0.1', '0.0.0.0', 'localhost']

    DATABASES = {
        "default": {
            "ENGINE": os.environ.get("DB_ENGINE", "django.db.backends.sqlite3"),
            "NAME": os.environ.get("DB_DATABASE", os.path.join(BASE_DIR, "db.sqlite3")),
            "USER": os.environ.get("DB_USER", "user"),
            "PASSWORD": os.environ.get("DB_PASSWORD", "password"),
            "HOST": os.environ.get("DB_HOST", "localhost"),
            "PORT": os.environ.get("DB_PORT", "5432"),
        }
    }
else:
    SECRET_KEY = 'localsecret'
    DEBUG = True
    ALLOWED_HOSTS = ['127.0.0.1', '0.0.0.0', 'localhost']
    DATABASES = {
        'default': {
            'ENGINE': 'django.db.backends.postgresql_psycopg2',
            'NAME': 'predictiondb',
            'USER': 'postgres_user',
            'PASSWORD': 'postgres_password',
            'HOST': '127.0.0.1',
            'PORT': '5432',
        }
    }

#################################################################
    ##  (CORS) Cross-Origin Resource Sharing Settings ##
#################################################################
CORS_ORIGIN_ALLOW_ALL = True

#################################################################
    ##  STATIC FILES ROOT AND URL ##
#################################################################
STATIC_ROOT = os.path.join(BASE_DIR, 'static')
STATIC_URL = '/static/'
Note that in the above settings we have also added the variable STATIC_ROOT which defines where the static files are collected in the production build when the command 'python manage.py collectstatic --noinput' is run from the 'entrypoint.sh' file, otherwise this command would not run.
The .dockerignore file should look like below. This file just tells Docker which files to ignore while creating or running our docker containers. This is because we want our containers to be as small in size as possible.
.vscode
*.log
*.pot
*.pyc
__pycache__/
**/static/*
Dockerfiles – Postgres Service
We won't be using a Dockerfile to modify a Linux base image to install PostgreSQL. Instead, we would just use one of the official Postgres images to build our Postgres container service. Therefore we just would require just a few parameters from the user to build and run our docker Postgres service.
In our main project folder, DockerDjangoReactProject, create a new folder called 'postgres' and create a file called '.env' within it. Our main project folder would look like below.
D:\PROJECTS\DOCKERDJANGOREACTPROJECT
└───backend
└───frontend
└───postgres
        .env
Edit the .env file to contain the below.
POSTGRES_USER=postgres_user
POSTGRES_PASSWORD=postgres_password
POSTGRES_DB=predictiondb
Dockerfiles – React Service
Like before, in the frontend folder (within our main project folder DockerDjangoReactProject) create two new files called 'Dockerfile' and '.dockerignore'. The frontend folder should now look like the below.
D:\PROJECTS\DOCKERDJANGOREACTPROJECT\FRONTEND
│   Dockerfile
│   .dockerignore
│
└───react_app
    ├───node_modules
    ├───public
    └───src
Edit the Dockerfile with the below content.
###########
# BUILDER #
###########

# pull official base image
FROM node:12.18.3-alpine3.9 as builder

# set work directory
WORKDIR /usr/src/app

# install dependencies and avoid `node-gyp rebuild` errors
COPY ./react_app/package.json .
RUN apk add --no-cache --virtual .gyp \
        python \
        make \
        g++ \
    && npm install \
    && apk del .gyp

# copy our react project
COPY ./react_app .

# perform npm build
ARG API_SERVER
ENV REACT_APP_API_SERVER=${API_SERVER}
RUN REACT_APP_API_SERVER=${API_SERVER} \
  npm run build

#########
# FINAL #
#########

# pull official base image
FROM node:12.18.3-alpine3.9

# set work directory
WORKDIR /usr/src/app

# install serve - deployment static server suggested by official create-react-app
RUN npm install -g serve

# copy our build files from our builder stage
COPY --from=builder /usr/src/app/build ./build
What the docker file does, should be self-explanatory by now. The one thing to notice here is that we would create a production version of our react_app with the npm build command. This would create a build folder to be served later by the npm 'serve' server. You could read more about this here. But if you remember from the react_app settings.js file, we need to specify the API_SERVER for the production environment. This API_SERVER is the backend server to which we would make our REST API calls. So if our application is running at 'www.example.com', then the API_SERVER would be 'www.example.com', such that the REST API calls would be made at something like 'www.example.com/api/'. We would pass the value of this API_SERVER from docker-compose. This variable would be received as an argument with the same name. Then before the 'npm run build' command is run, we create an environment variable called 'REACT_APP_API_SERVER' for the build process. Note that this environment variable would only exist during the 'npm run build' and is different from all other environment variables used in docker-compose which are available only after an image has been created in the containers running with that image. Also, you should note that we are appending our environment variable name with 'REACT_APP'. This is because of how the applications built with create-react-app handle environment variables. You may read more about it here.
The .dockerignore file should look like below.
.vscode
.log
npm-debug.log*
yarn-debug.log*
yarn-error.log*
/react_app/node_modules
/react_app/.pnp
.pnp.js
Dockerfiles – Nginx Service
In our main project folder, DockerDjangoReactProject, create a new folder called 'nginx' and create two files called 'Dockerfile' and 'nginx.conf' within it. Our main project folder would look like below.
D:\PROJECTS\DOCKERDJANGOREACTPROJECT
└───backend
└───frontend
└───postgres
└───nginx
        Dockerfile
        nginx.conf
Edit the Dockerfile to look like below.
FROM nginx:1.19.0-alpine

RUN rm /etc/nginx/conf.d/default.conf
COPY nginx.conf /etc/nginx/conf.d

WORKDIR /usr/src/app
What this Dockerfile does is quite simple. We are just using one of the official Nginx docker images, removing the default configuration file, and copying our nginx.conf file created above so that Nginx could use the nginx.conf file as its settings. So the important thing here is the nginx.conf file, which would describe how Nginx would route requests to our Django and React services.
Let's look at the nginx.conf file. Modify the file to look like below.
upstream django_backend {
    server django:8000;
}

upstream react_frontend {
    server react:3000;
}

server {

    listen 80;

    ###########
    # URL ROUTING #
    ###########

    location /admin {
        proxy_pass http://django_backend;
        proxy_set_header X-Forwarded-For $proxy_add_x_forwarded_for;
        proxy_set_header Host $host;
        proxy_redirect off;
    }

    location /api {
        proxy_pass http://django_backend;
        proxy_set_header X-Forwarded-For $proxy_add_x_forwarded_for;
        proxy_set_header Host $host;
        proxy_redirect off;
    }

    ###########
    # STATIC FOLDER ROUTING #
    ###########

    location /static/admin/ {
        alias /usr/src/app/django_files/static/admin/;
    }

    location /static/rest_framework/ {
        alias /usr/src/app/django_files/static/rest_framework/;
    }

    location /static/ {
        alias /usr/src/app/react_files/static/;
    }

    location https://datagraphi.s3.amazonaws.com/media/ {
        alias /usr/src/apphttps://datagraphi.s3.amazonaws.com/media/;
    }

    ###########
    # URL ROUTING #
    ###########

    location / {
        proxy_pass http://react_frontend;
        proxy_set_header X-Forwarded-For $proxy_add_x_forwarded_for;
        proxy_set_header Host $host;
        proxy_redirect off;
    }


}
Again if you go through this file line by line, most of it should be pretty much self-explanatory. We have created two upstream servers called django_backend and react_frontend, which would be running at django:8000 and react:3000. Note the words 'django' and 'react' in these servers are the names of the respective services which would later be run by docker-compose. Thereafter in the server block, it is saying that Nginx would be listening at port 80. Port 80 is the normal HTTP port for most websites and we don't actually specify this port when we open a website in a browser. That is 'www.github.com' is the same as 'www.githhub.com:80'. Thereafter it is the routing configuration.
Any URL with /admin or /api in it would take us to the django_backend. The static folder routing specifies the mapping of the routes to the correct static asset folders for both the django and react applications. These folders would be located at specific directories in the nginx container, while it is running. These static folders would appear at specific directories within the nginx container, using volumes mapping defined in the docker-compose file later. Any routes which don't point to either the admin, API or static assets would be sent to the react_frontend service.
Docker-Compose
Now with the individual Docker and settings files set up for the different services, we are ready to write the docker-compose.yml file which is the final piece of this puzzle.
In our main project folder, DockerDjangoReactProject, create two new files – 'docker-compose.yml' and '.env'.
This .env file contains a variable called 'ENV_API_SERVER', which would be passed as an argument to our Dockerfile in the frontend folder. This is just the API_SERVER on which our backend django_app would be running. Although we are going to create a production-ready docker-compose service for our application, we would only test it locally. Therefore, at this time the 'ENV_API_SERVER' should be either left blank or set as 'http://127.0.0.1'. When the application is running from a cloud service then this field cannot be blank; it should refer to the actual URL of the API service such as 'www.example.com'.
The .env file should look like below.
#ENV_API_SERVER=www.example.com Note: for running locally this should be either left blank or set as http://127.0.0.1

ENV_API_SERVER=http://127.0.0.1
The docker-compose file should look like below.
version: "3.7"

services:
  django:
    build:
      context: ./backend
      dockerfile: Dockerfile
    volumes:
      - django_static_volume:/usr/src/app/static
    expose:
      - 8000
    env_file:
      - ./backend/.env
    command: gunicorn mainapp.wsgi:application --bind 0.0.0.0:8000
    depends_on:
      - db
  db:
    image: postgres:12.0-alpine
    volumes:
      - postgres_data:/var/lib/postgresql/data/
    env_file:
      - ./postgres/.env
  react:
    build:
      context: ./frontend
      dockerfile: Dockerfile
      args:
        - API_SERVER=${ENV_API_SERVER}
    volumes:
      - react_static_volume:/usr/src/app/build/static
    expose:
      - 3000
    env_file:
      - .env
    command: serve -s build -l 3000
    depends_on:
      - django

  nginx:
    restart: always
    build: ./nginx
    volumes:
      - django_static_volume:/usr/src/app/django_files/static
      - react_static_volume:/usr/src/app/react_files/static
    ports:
      - 80:80
    depends_on:
      - react

volumes:
  postgres_data:
  django_static_volume:
  react_static_volume:
As you can see that docker-compose defines four services – django, db, react and nginx. The docker-compose also defines three volumes – postgres_data, django_static_volume and react_static_volume.
As explained before the django service would use the Dockerfile to build the container, then map the static folder within this container to the corresponding volume in the volumes (django_static_volume). The same volume is mapped to one of the nginx static directories served by nginx as defined in the nginx.conf file. This ensures that static files from our django service are served on the nginx service. Also as already discussed before, the django service would be started with a python package called gunicorn. This is because gunicorn is actually a production server for python applications with multithreading support. We expose the port 8000 as this would be used by gunicorn to serve our Django application. Further, the environment variables defined in the .env file in the backend service are available in the django service container. This ensures that our django_app can is running with debug set as false, is allowing the right hosts, and can connect to the postgres service with the right credentials. The django service depends on the db service.
The Postgres service called 'db', is the simplest as it just needs the environment variables to create our database and serve it to the django service.
The react service sends the API_SERVER variable to the production build version of our react application, maps the build folder to the corresponding folder on the nginx service and serves the react application with the create-react-app suggested 'serve' server on port 3000. The react service is dependent on the django service.
The nginx service as already discussed in the previous Dockerfile section serves both our django and react services.
Now from your command line go our main project folder 'DockerDjangoReactProject' and run the command 'docker-compose up' or 'docker-compose up --build'.
D:\Projects\DockerDjangoReactProject>docker-compose up
This would start building our docker-compose service, in a step by step manner by first creating the individual images for our different services and then starting the individual containers for our services. If you are performing docker-compose up for the first time this may take a couple of minutes. Once all is done you would see messages such as below in your terminal.
You may check the health of your services in the Docker Desktop Dashboard.
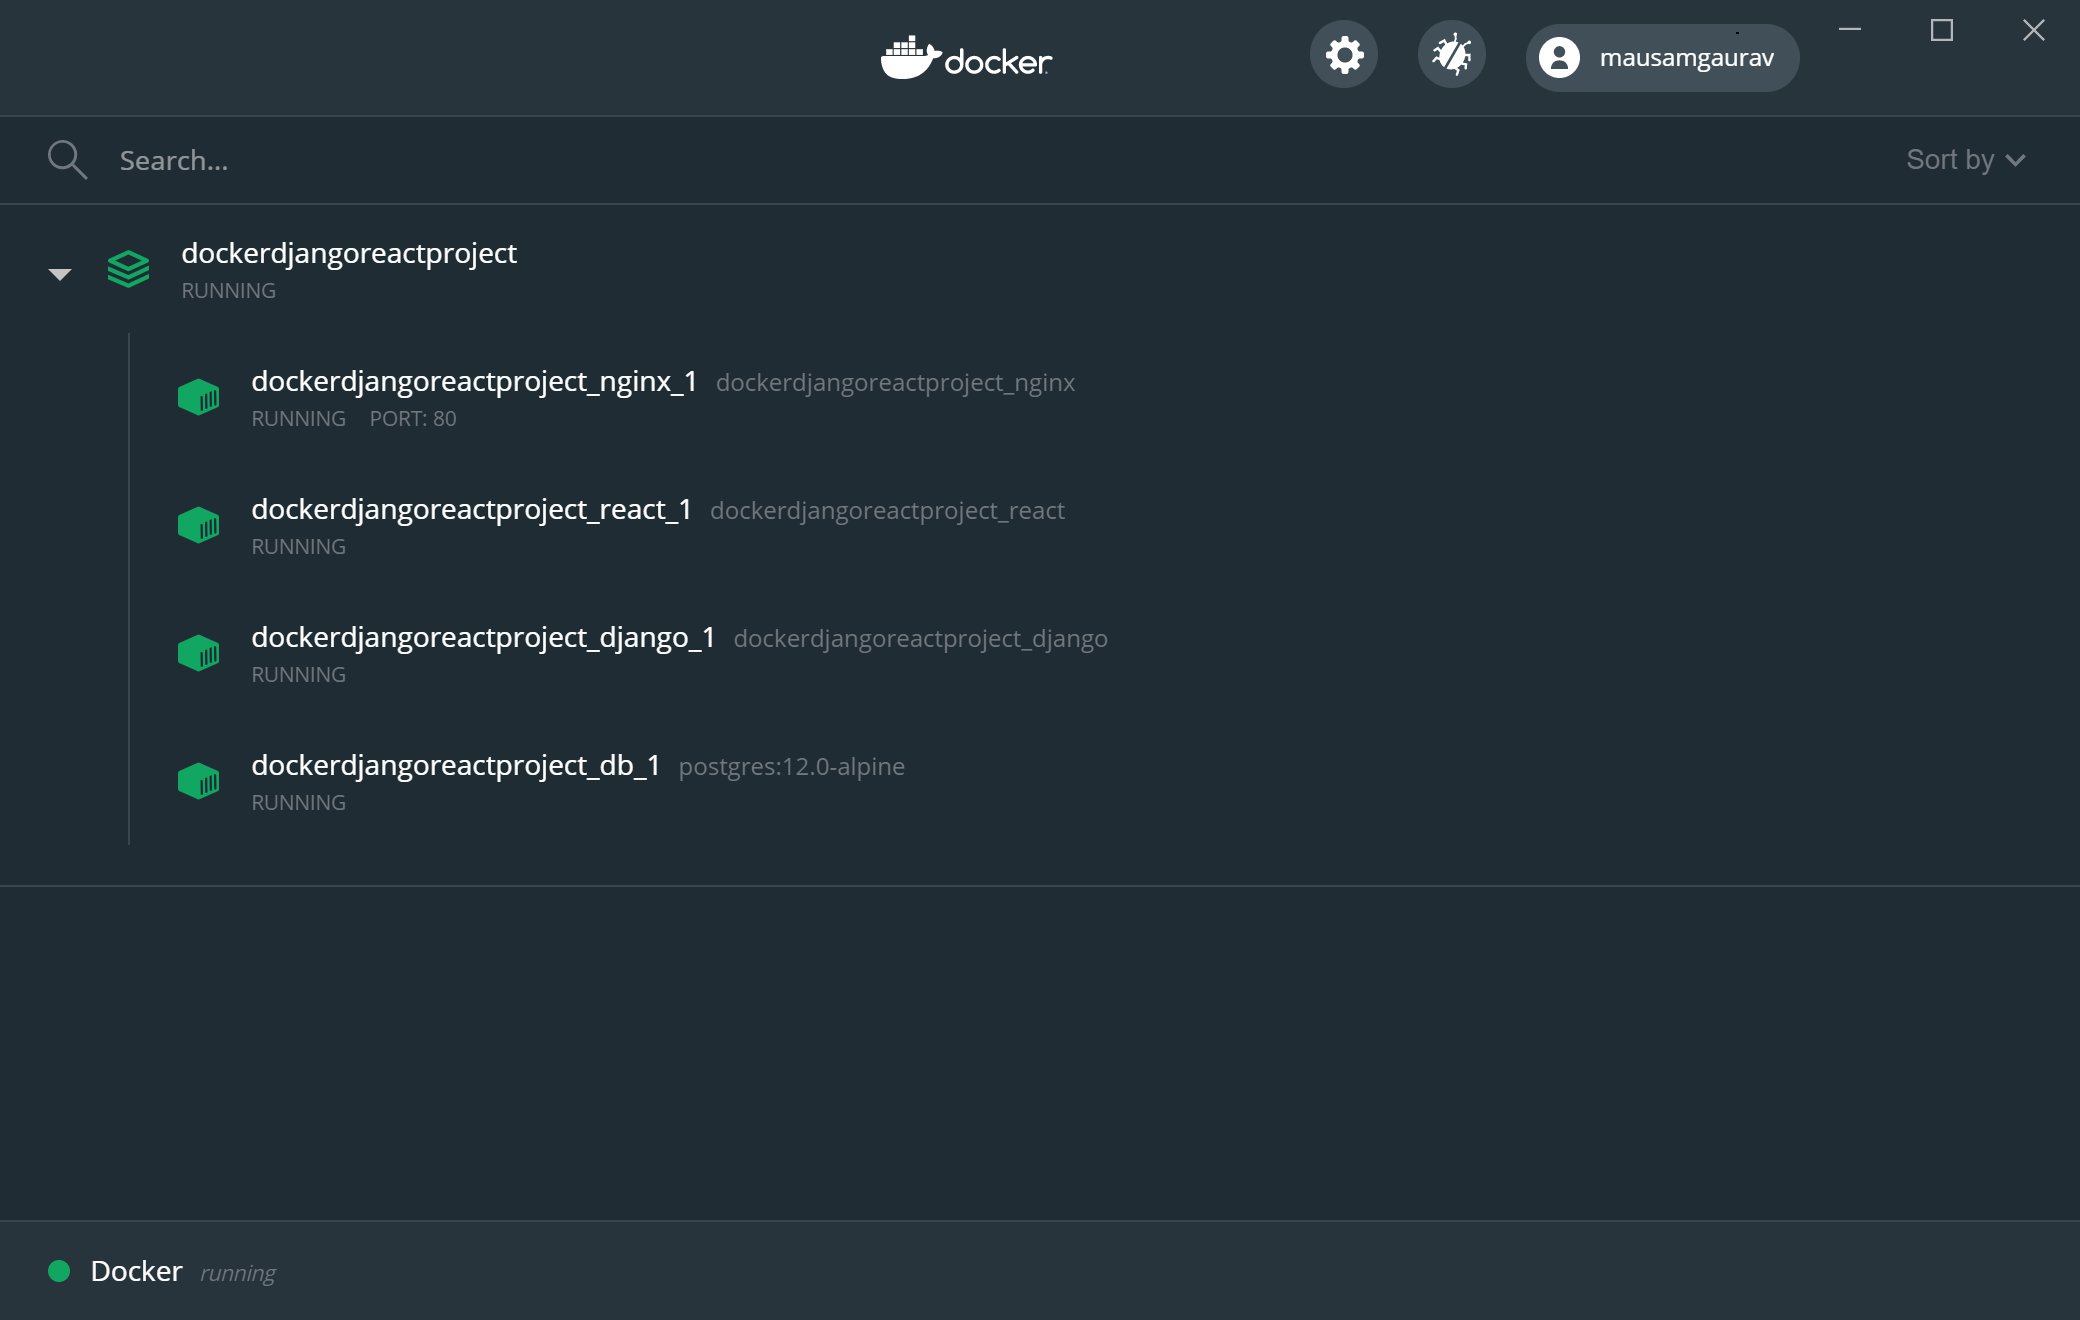
If all is working fine you should be able to go to 'http://127.0.0.1' from your browser and see our application in action !!!
Okay, so this concludes this article 🍺🍺. This is by far the longest article I have written. However, the code used for building this application is pretty robust and you could either use this article as a reference or use the code as a starting point/ framework for your future projects.
The git repository for this project is located here. You may simply clone the project, and run 'docker-compose up' in your terminal from the project folder to see the application in action. You just need a single command in your terminal – docker-compose up – that's it! How cool is that!😎 (PS: If you are on windows, be sure to change the end-of-line (EOL) format of the 'entrypoint.sh' file from CRLF to LF after cloning the project.)
Happy coding and dockerizing 🐳 !
Post your comment