
Once you have successfully built a machine learning model, one of the first challenges is putting the model into production so that it can be used for realistic purposes. One of the best ways to achieve this is to create a REST API for your model so that the model can be used from any platform which is capable of interacting with REST APIs. REST APIs allow cross-platform integration, which means your model could be used by a variety of applications such as mobile apps, web-browsers, sales-force apps etc. To create REST APIs in Python there are a number of frameworks available such as Flask and Django. We are going to use the Django Framework and the Django REST API framework. The reason for choosing Django is that both the core Django framework and the REST API framework are continually updated, have good documentation and community, and are expected to remain popular in the future.
Django can be very intimidating at first. So it is suggested that you first get accustomed to it by trying out a few examples from the official documentation. There are also few good tutorials on Udemy and YouTube. Once you have some acclimatizing with Django you would realize that this framework is easier and much more efficient than many other tools out there for creating REST APIs. I would try to be as descriptive as possible, but if you have trouble understanding please refer to the official documentation as required.
In this article we are going to create and test our APIs locally on a local server. To fully productionize the API you could easily transfer the created Django app below (code) to a remote server. I would provide links to some very simple and easy to follow articles in the end which describe how to transfer a Django app to a remote server from your local system.
Create New Python Environment
Install Python on your system if you don't yet have it. Open your command line terminal. First create a new python environment on your system. There is a good guide I wrote on creating a new environment in Python. You may refer to this article. The virtual environment can be created in any location or directory on your system. Once the virtual environment has been created you need to activate it.
# Example of creating a Python Virtual Environment

#First install virtual environment package using pip
python -m pip install virtualenv

# Create the Environment directory
mkdir MachineLearning
cd MachineLearning

# Create a virtual environment to isolate our package dependencies locally
python -m virtualenv Env64

#Activate the virtual environment
source Env64/bin/activate  # On Windows use `Env64\Scripts\activate`
Install Django
Activate your new environment and install Django in your environment by the following command. I am installing the version 2.2.0 as this is the stable version at the time of writing:
python -m pip install Django==2.2.0
Check if Django has installed correctly by checking its installed version with below:
python -m django --version
That should give you an output:
2.2
Install Django REST Framework
python -m pip install djangorestframework
Create New Django Project
Once Django has installed properly, navigate to a folder of your choice in the command line. In our example we navigate to a folder called 'DjangoRestAPIDemo'.
(Env64) Z:\MachineLearning> cd Z:\MachineLearning\Projects\DjangoRestAPIDemo
We are going to create a new Django project in the above folder with the command as shown below. In our example, the new Django project is called 'APIProject'.
(Env64) Z:\MachineLearning\Projects\DjangoRestAPIDemo> django-admin startproject APIProject
By default Django creates a project with name specified and also creates a main app for the project with the same name inside the folder.
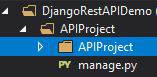
Rename the top 'APIProject' folder to 'APIProjectFolder'.

This is so that it's extra clear that the main app is called APIProject within the APIProjectFolder. Note here that the __init__.py inside any folder means that it is a Django app. In this case the APIProject is the main Django app and hence contains the __init__.py file. We can create more apps in the APIProjectFolder.
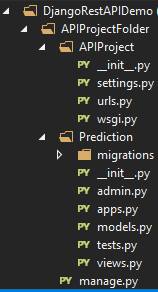
Create a new app (not the default main app as before)
We are going to call our app Prediction. To create this app, first navigate inside the APIProjectFolder in the command line, and then run the command as below.
(Env64) Z:\MachineLearning\Projects\DjangoRestAPIDemo>cd APIProjectFolder
(Env64) Z:\MachineLearning\Projects\DjangoRestAPIDemo\APIProjectFolder>django-admin startapp Prediction
You would see that a new app call 'Prediction' has been created inside the project folder with the signature __init__.py file inside it.
Add our newly created app to project settings
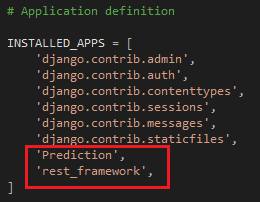
Open the settings.py file in the APIProject folder. Add our new app 'Prediction' in the installed apps section. You also need to add 'rest_framework' as an installed app. See below:
Migrate initial schema
At this point we need to migrate our existing schema to a database. This is because normally within Django, we create models to interact with databases. So that our project schema(models) are consistent with the database we need to migrate first. By default the database is a sqlite database. You could see the name of the default database in the settings.py file in the main APIProject app.
DATABASES = {
    'default': {
        'ENGINE': 'django.db.backends.sqlite3',
        'NAME': os.path.join(BASE_DIR, 'db.sqlite3'),
    }
}
We can change this to some other database but this is not required now for this small tutorial. To migrate existing data to the database, ensure that you are inside the main project app folder and then run the command 'python manage.py migrate' from your command line terminal as shown.
(Env64) Z:\MachineLearning\Projects\DjangoRestAPIDemo\APIProjectFolder>python manage.py migrate
You would see messages such as below:
Operations to perform:
Apply all migrations: admin, auth, contenttypes, sessions
Running migrations:
Applying contenttypes.0001_initial... OK
Applying auth.0001_initial... OK
Applying admin.0001_initial... OK
Applying admin.0002_logentry_remove_auto_add... OK
Applying admin.0003_logentry_add_action_flag_choices... OK
Applying contenttypes.0002_remove_content_type_name... OK
Applying auth.0002_alter_permission_name_max_length... OK
Applying auth.0003_alter_user_email_max_length... OK
Applying auth.0004_alter_user_username_opts... OK
Applying auth.0005_alter_user_last_login_null... OK
Applying auth.0006_require_contenttypes_0002... OK
Applying auth.0007_alter_validators_add_error_messages... OK
Applying auth.0008_alter_user_username_max_length... OK
Applying auth.0009_alter_user_last_name_max_length... OK
Applying auth.0010_alter_group_name_max_length... OK
Applying auth.0011_update_proxy_permissions... OK
Applying sessions.0001_initial... OK
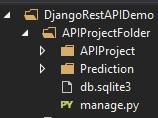
You can see that the sqlite database file has been created in the project folder.
Create Super User
Next we are going to create a superuser for our project. This is so that the superuser can login to an admin dashboard and monitor the project as we would see later on. Run the command 'python manage.py createsuperuser'. This would ask you for user details and password. Provide them and press enter every time.
(Env64) Z:\MachineLearning\Projects\DjangoRestAPIDemo\APIProjectFolder>python manage.py createsuperuser
Once the superuser has been created, the terminal would display 'Superuser created successfully. ' in the end.
Check Django is running successfully.
Type the following in the command line.
(Env64) Z:\MachineLearning\Projects\DjangoRestAPIDemo\APIProjectFolder>python manage.py runserver
If you followed the above steps correctly, you would see the following message in the command line.
System check identified no issues (0 silenced).
December 19, 2019 - 15:45:55
Django version 2.2, using settings 'ModelAPI.settings'
Starting development server at http://127.0.0.1:8000/
Quit the server with CTRL-BREAK.
Open your web browser and go to the url 'http://127.0.0.1:8000/'. You should see the following in your browser:

Views in Django.
We would first create a test API function view, to create a basic API end point, which performs basic operations such as addition on the data sent to it. This is just to demonstrate how a basic API end point can be created in Django. Later on we would embed functionality to perform predictions in the same API end point.
From here on we are going to edit and create python files (with .py extension) in the Django APIProjectFolder. I am using Microsoft Visual Studio Community Edition (Preview version) to write the Python commands. However, you may use another editor such as Sublime Text or Atom as per your preference. If you want to debug your Django application while it is running my recommendation would be Microsoft VS Code, which is very similar to Visual Studio Community Edition. However, VS Code is much lighter, free and arguably one of the most popular editors on the planet. To learn how to setup debugging in VS Code, follow this guide here. For our demo, you would not require debugging, but the mentioned guide would be very useful for your other Django Projects for debugging. If you are just starting out with Django, just use a simple code editor like Sublime Text. What matters most is that you choose an editor your are most comfortable with.
To create API views in the Django REST Framework, there are three ways this could be done - Function based views, Class based views and using Viewsets. While function based and class based views are almost the same as in core Django, Viewsets are only found in the Django REST Framework. I would show the basic example with both Function based and Class Based views.
Create Urls
Before creating a view we need to understand how Django works with views. Since the Django app is a web app it only takes user commands in the form of urls or requests. That is, to perform a specific task in Django, the user sends a url, or in other words a request, to the server. Depending on the content of the request, the server then performs some specific calculations and sends responses back to the user. The responses could be http responses containing html code or it could return specific strings, json or other web format responses. Also depending on the task to be performed, broadly speaking the user either sends a GET request or a POST request to the server. The GET request is normally used when the user sends certain parameters to the server and expects to 'GET' something back from the server pertaining to the parameters sent. A POST request is normally used when a user is 'POST'ing some data to the server. Normally such data is sent in the form of data from a user FORM or in formats such as JSON.
Therefore the first thing we need to do is to define what urls perform what functions. These urls need to be defined in the main Django Project app's urls.py folder. This is because requests made to the server are first processed by the main app (the project app). So, we open the urls.py file in the APIProject directory.

Add the line as shown below:
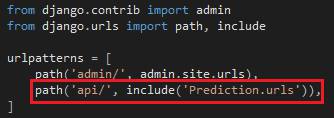
What this means is that when the user makes a request with a url starting with http://127.0.0.1:8000/api... look for the remaining part of the url in the file of the same name - urls.py file located in the folder for our app Prediction. This would be more clear from the explanation afterwards. Note that the http://127.0.0.1:8000 would be replaced by the website address/domain name of your site once you have fully productionized your application.
We next open the urls.py file in the Prediction folder. If the file doesn't exist create a file with the name urls.py in the Prediction folder. Add the following lines of code:
from django.urls import path
import Prediction.views as views

urlpatterns = [
    path('add/', views.api_add, name = 'api_add')
]
This is essentially the extension of the urls from the main project. So basically, what we are trying to achieve is that when a user sends a request starting with url http://127.0.0.1:8000/api/add/, run the function 'api_add' in the views.py inside the Prediction app.
Create API with API View Function
Since we have created the url required to make an API request, now lets create the API function. To define an API function in Django, we need to add a decorator '@api_view' before the function definition. The decorator converts a python function to an API function. We also need to tell what kind of requests can be made to the server with this function. In our case we need to be able to make a POST request. However, I have also added a GET to the api_view decorator just to demonstrate. Our function is called 'api_add'. The function with the decorator would look like below:
from rest_framework import status
from rest_framework.decorators import api_view
from rest_framework.response import Response

# Create your views here.
@api_view(['GET', 'POST'])
def api_add(request):
    sum = 0
    response_dict = {}
    if request.method == 'GET':
        # Do nothing
        pass
    elif request.method == 'POST':
        # Add the numbers
        data = request.data
        for key in data:
            sum += data[key]
        response_dict = {"sum": sum}
    return Response(response_dict, status=status.HTTP_201_CREATED)
If you look at the function above, you would see what it is supposed to be doing. If the request.method is GET, the function does nothing. If the request method is POST, we would pass JSON data along with the POST request to the function. The function would take JSON inputs such as below.
{
	"x": 1,
	"y":2
}
Next, the function would receive this request data in a Python dictionary variable called data. Next, for every key in the dictionary, the function would iterate to calculate the sum. Next we create a dictionary output for our sum. This response dictionary is then sent back with the Response function (imported from the Response module of the django rest framework). The Response function is a highly versatile function and it determines the rendered output type of the response data on the fly. This is determined by a content negotiation with the client application (i.e. web browser, mobile app etc.). So, if the client application requires output in the form of a JSON, the Response function would convert the data to JSON in the output. This is why we are able to send a Python dictionary as output with the Response. You can read more about the Response function from the official documentation.
Save the views.py file. And restart the server with
python manage.py runserver
Test API
If you have followed the instructions well, the API should be ready. You can test the API in your browser by going to http://127.0.0.1:8000/api/add/, but this is not a recommended method to test the API. The reason for this is that the moment you visit http://127.0.0.1:8000/api/add/ with your browser, you have basically already made an API request to the server but without any data. However, since the Django REST Framework allows testing the API with the browser so I would also cover that as well but after the recommended test method below.
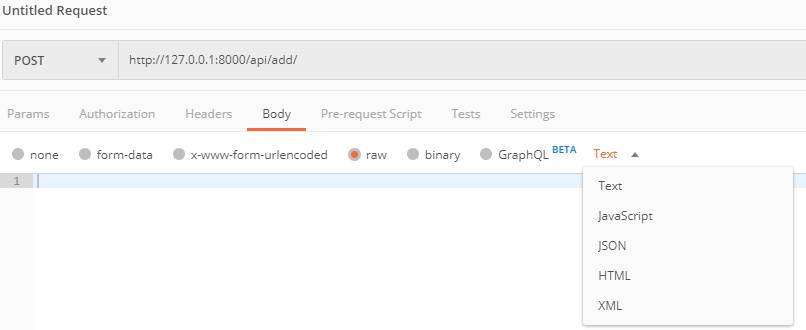
To test our API we first need to use an application called Postman. You can download it from here, and install on your system. For testing you may also try command line tools such as httpie. There are alternative GUI softwares too. After opening postman, register and login. Choose Create a request. Below 'Untitled Request', choose POST from the dropdown. Enter 'http://127.0.0.1:8000/api/add/' in the request url.

Select Body, raw and JSON from the dropdown as shown.
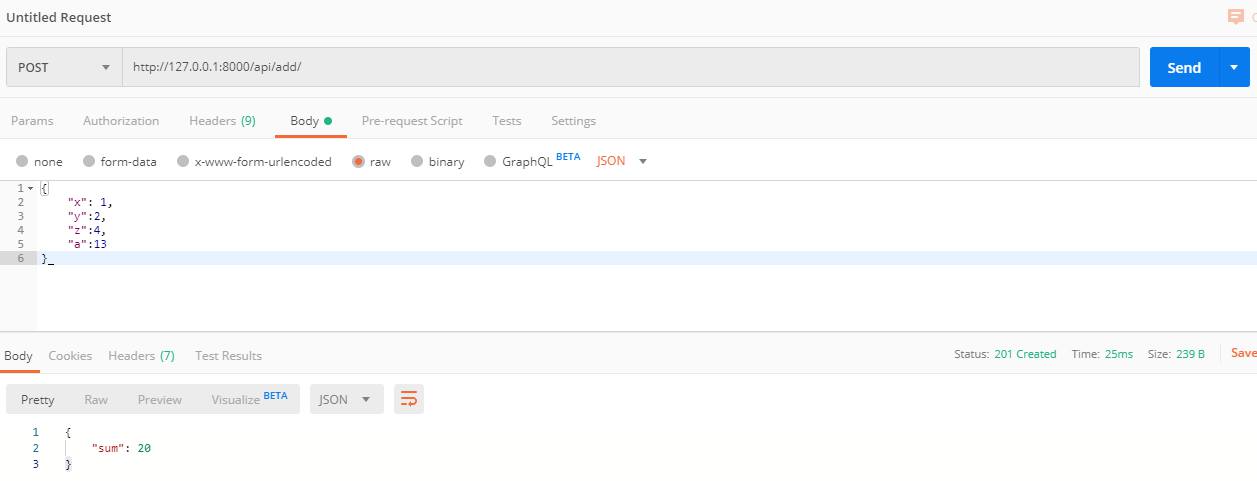
Enter the JSON input data and press send. If the api worked correctly you should receive a response in the form of JSON at the bottom of the screen.
Now as promised, I would also show how to test the above in the browser. Go to http://127.0.0.1:8000/api/add/ from your browser. You would see a form with an input called 'Content' and a button called POST below. In the content enter your JSON data and press the POST button.
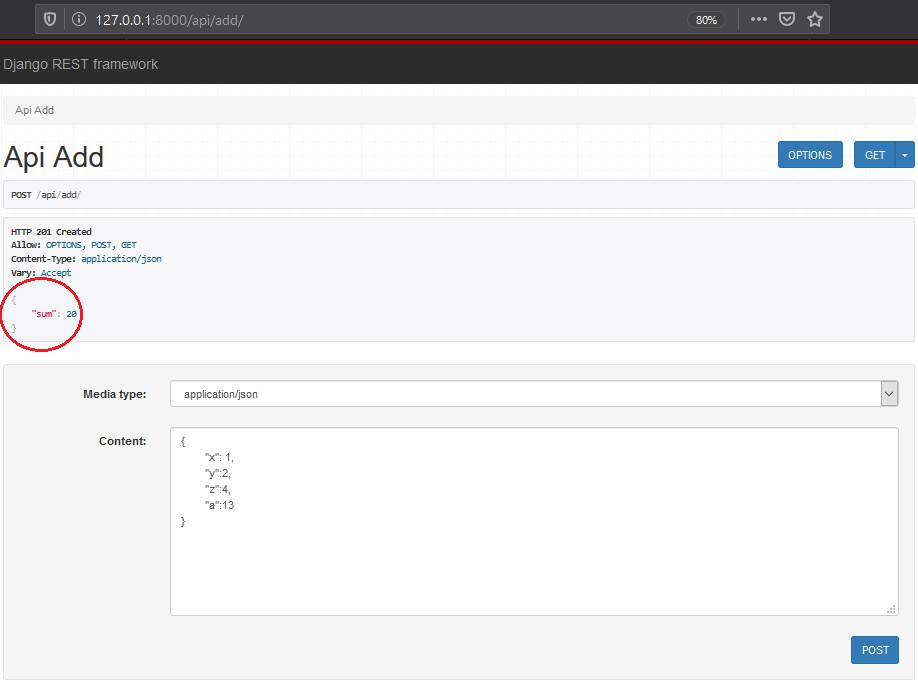
You would receive the output as before in JSON format at the top.
So there you go. You have created your very first REST API in Django.
Create API with Class Based Views
Next we are going to create the same API functionality as before but with a Class based view. Class based views are recommended in Django, as class allows benefits such as inheriting properties from other classes and mixing properties (such as mixing authentication and permissions) which allow a lot more flexibility than function based views. To create a class based view we first import the standard APIView class from the rest_framework module.
from rest_framework.views import APIView
The class based view would look like below. Note that this has been added in the same views.py file as before in the Prediction app. In the class we can change the class function, post, which handles POST requests.
# Class based view to add numbers
class Add_Values(APIView):
    def post(self, request, format=None):
        sum = 0
        # Add the numbers
        data = request.data
        for key in data:
            sum += data[key]
        response_dict = {"sum": sum}
        return Response(response_dict, status=status.HTTP_201_CREATED)
Next we need to add a urlpattern in a similar way as before so that requests made with that url take us to the Add_Values class. We add a url pattern 'add_values/'. The difference here is that the class Add_Values needs to be added with a .as_view() suffix.
from django.urls import path
import Prediction.views as views

urlpatterns = [
    path('add/', views.api_add, name = 'api_add'),
    path('add_values/', views.Add_Values.as_view(), name = 'api_add_values'),
]
That's it. You just need to restart the django server with 'python manage.py runserver' in the command prompt and make POST requests as before, with the url http://127.0.0.1:8000/api/add_values/ and this would give you the same results as before.
Creating our Prediction Model
We would create our prediction models in Jupyter notebook. If you don't have Jupyter Notebook installed on your system use this guide to install it. For the purpose of demonstration we are just going to create a simple Random Forest Model in Python on the famous Iris Flower dataset. The dataset can be download from here. However, since this is a small dataset, it is available straightaway from the scikit-learn library as shown below.
from sklearn.datasets import load_iris
iris = load_iris()
You can inspect the type of the dataset and you would find that scikit-learn has a special dataset type called 'sklearn.utils.Bunch' for it.
type(iris)
#Output:
#sklearn.utils.Bunch
We can inspect dataset features as below.
print(iris.feature_names)
#Output
#['sepal length (cm)', 'sepal width (cm)', 'petal length (cm)', 'petal width (cm)']
We can also inspect what we need to predict as below.
print(iris.target_names)
#Output
#['setosa' 'versicolor' 'virginica']
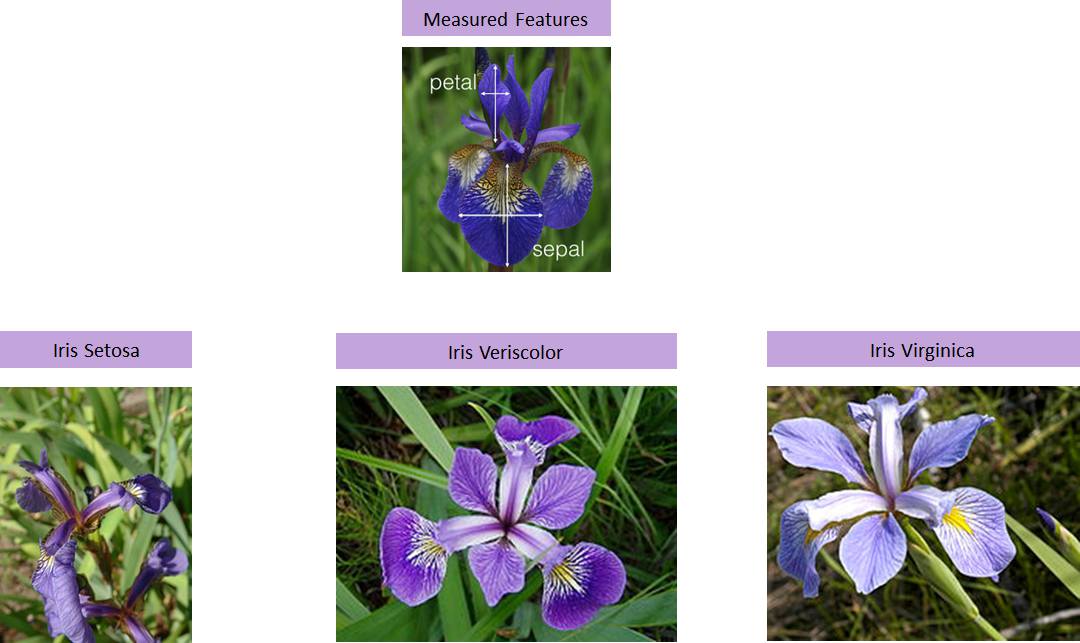
So, the measured features we have are sepal length, sepal width, petal length, and petal width. Based on these measurements we need to predict which species the iris flower is - setosa, versicolor or virginica.
To train the model we create the feature matrix and target response variable as below.
# Define feature matrix in "X"
X = iris.data

# Define target response vector in "y"
y = iris.target
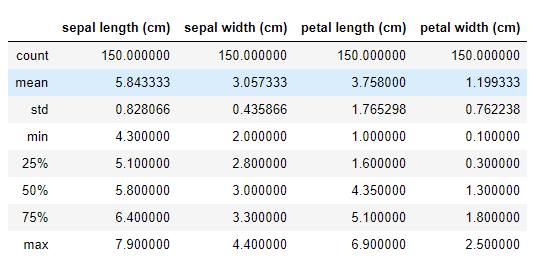
We create a pandas dataframe object from the feature matrix, to get an idea of the minimum and maximum values of the various features.
import pandas as pd
X_df = pd.DataFrame(data=X, columns = iris.feature_names)
X_df.describe()
We see that there are 150 observations and the sepal length is in the range 4.3-7.9 cm, the sepal width is in the range 2-4.4 cm, the petal width is in the range 1-6.9 cm and the petal width is in the range 0.1 - 2.5 cm.
We next split our data into training and testing splits as below.
from sklearn.model_selection import train_test_split
X_train, X_test, y_train, y_test = train_test_split(X, y, test_size=0.20, random_state=1, stratify=y)
Next we train a Random Forest Classifier with the data above.
from sklearn.ensemble import RandomForestClassifier
clf_rf = RandomForestClassifier(random_state = 1, n_estimators = 10, n_jobs = -1)
estimator_rf = clf_rf
estimator_rf.fit(X=X_train, y=y_train)
We see that our Random Forest Classifier achieved a testing accuracy of 96.7 % as below.
estimator_rf.score(X_test,y_test)
#Output
#0.9666666666666667
We also find that the accuracy of our model is expected to be pretty consistent at 96.7% by estimating a cross-validated accuracy as below.
from sklearn.model_selection import cross_val_score
estimator_cv = clf_rf
scores = cross_val_score(estimator_cv, X, y, cv = 5, scoring = 'accuracy')
scores.mean()
#Output
#0.9666666666666668
Serializing our Prediction Model
There are several methods of serializing python objects. The most recommended solution is pickling objects. As per Python's official documentation, “ Pickling” is the process whereby a Python object hierarchy is converted into a byte stream, and “unpickling” is the inverse operation, whereby a byte stream (from a binary file or bytes-like object) is converted back into an object hierarchy.
Serialization is a method of converting python in-memory objects to a storage format that allows recovery of the python object's original structure from the stored format.
We need to serialize our trained model so that it can be used from our Prediction API. For this demonstration, we won't use the pickle method. Instead we would use the joblib library. With the dump method of joblib, save our model to disk as below.
from joblib import dump, load
dump(estimator_rf, 'IRISRandomForestClassifier.joblib')
Now, we load this model back from disk into memory, with the load method. We next test accuracy with this loaded model as before. We find that the saved model has loaded back correctly as we are getting the same testing accuracy as before.
loaded_classifier = load('IRISRandomForestClassifier.joblib')
loaded_classifier.score(X_test,y_test)
#Output
#0.9666666666666667
Creating our Prediction API View in Django
Since we have created our trained model, now it is time to create the API. First copy paste the serialized model we saved before into a new folder called classifier in our Prediction app folder.
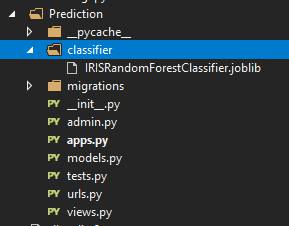
The serialised Random Forest Classifier we saved before to disk is loaded back into memory with a variable called classifier of the class PredictionConfig which is defined in the apps.py file in the Prediction app folder. Open the apps.py file. The contents of the file are as below.
from django.apps import AppConfig
import pandas as pd
from joblib import load
import os

class PredictionConfig(AppConfig):
    name = 'Prediction'
    #CLASSIFIER_FOLDER = Path("classifier")
    BASE_DIR = os.path.dirname(os.path.dirname(os.path.abspath(__file__)))
    CLASSIFIER_FOLDER = os.path.join(BASE_DIR, 'Prediction/classifier/')
    #CLASSIFIER_FILE = CLASSIFIER_FOLDER / "IRISRandomForestClassifier.joblib"
    CLASSIFIER_FILE = os.path.join(CLASSIFIER_FOLDER, "IRISRandomForestClassifier.joblib")
    classifier = load(CLASSIFIER_FILE)
The reason we are loading the model in our apps.py file is because, in this manner the classifier is loaded only once, when a session connection is made to our Django application, reducing overhead. We are loading the saved classifier back into memory with the joblib load method as discussed before.
In the views.py file of our app, Prediction, create a new class called IRIS_Model_Predicton which inherits from the rest framework standard class APIView.
The class based view looks like below:
from .apps import PredictionConfig
import pandas as pd

# Class based view to predict based on IRIS model
class IRIS_Model_Predict(APIView):
    #permission_classes = [IsAuthenticated]
    def post(self, request, format=None):
        data = request.data
        keys = []
        values = []
        for key in data:
            keys.append(key)
            values.append(data[key])
        X = pd.Series(values).to_numpy().reshape(1, -1)
        loaded_classifier = PredictionConfig.classifier
        y_pred = loaded_classifier.predict(X)
        y_pred = pd.Series(y_pred)
        target_map = {0: 'setosa', 1: 'versicolor', 2: 'virginica'}
        y_pred = y_pred.map(target_map).to_numpy()
        response_dict = {"Prediced Iris Species": y_pred[0]}
        return Response(response_dict, status=200)
As you could see, just like before we are using a post method. We would send iris measurement data, one observation at a time in the form of JSON data, to this API view. Here is an example of how the iris observation data would like in JSON.
{
	"sepal length (cm)": 7.9,
	"sepal width (cm)":2.9,
	"petal length (cm)":6.3,
	"petal width (cm)":1.8
}
This input JSON observation data is first received into a Python dictionary called data. All values of this dictionary are then stored in a list called values. The values list is then converted to numpy object, X, by first converting it to a pandas series and then using the .to_numpy() method of pandas series. Note that you would need to import pandas as pd. So ensure that you add this line at the top in the views.py file. We get the classifier from the classifier variable of the PredictionConfig class our app Prediction which has been loaded before. We predict the species of the iris flower for which we have observation data, with this classifier. The prediction is in numpy format. We first convert this numpy to a pandas series object. Also, the predicted class would be one of 0,1 or 2. To convert our predicted class label to its corresponding species we would map these values to their species names. We use the dictionary target_map to achieve this.
target_map = {0: 'setosa', 1: 'versicolor', 2: 'virginica'}
Finally we return the predicted species in the form of a dictionary response with a status of 200.
Creating our Prediction API Url in Django
As discussed before, we need to create a urlpattern for our API. Add the following line in the urls.py file in our Prediction app and save it.
path('predict/', views.IRIS_Model_Predict.as_view(), name = 'predict'),
This means we can send JSON observation data request to our API, http://127.0.0.1:8000/api/predict/, and we would receive our API predicted iris species for this observed data. Restart your Django server with the command 'python manage.py runserver' in the command line.
Testing our Machine Learning REST API
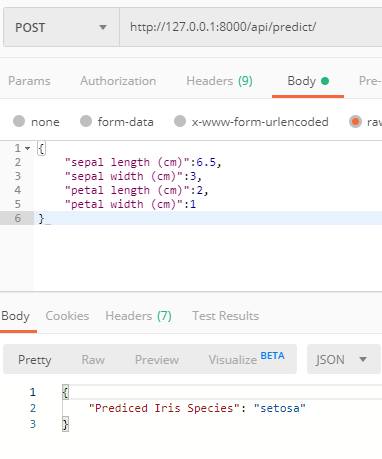
Let's test our prediction API with sample observation data. Open Postman and send some sample JSON observation data to the API created.
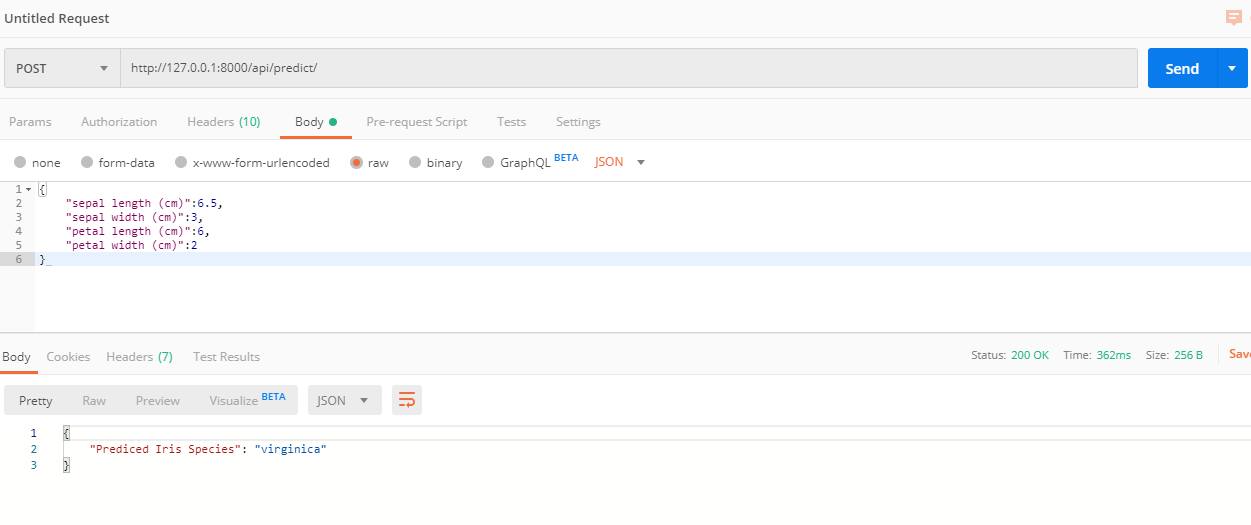
With the above sepal and petal data the predicted species is virginica. If we make the petal size smaller i.e. petal length = 2 cm and petal width = 1 cm, we would see that API now predicts a different species 'setosa'.
Voila! Our API appears to be predicting the species of the iris flower well. You can further customize the API to make predictions for a set of observations and return the predictions as JSON to cross validate the model with real data, provided you have more data. However, given the cross validated accuracy of our model, it appears that our API is performing well.
Adding Authentication to our REST API
The Django REST framework allows many types of built-in authentication methods. It also allows several other kinds of authentication such as API Key authentication from 3rd party packages. You can read about all supported types from the official documentation here. Here, I would show you the simplest kind of authentication called basic authentication which requires a user login and password. Note that for basic authentication the recommended settings is that your app server allows encrypted connections through https. You may set this up when you finally upload your API app to a remote server. I would provide link for an extremely simple guide for the same in the end.
Adding basic authentication is extremely simple. You may achieve this by adding a global default settings in the main project's setting.py file. To achieve this add the following lines in your settings.py file in the APIProject folder.
REST_FRAMEWORK = {
    'DEFAULT_AUTHENTICATION_CLASSES': [
        'rest_framework.authentication.BasicAuthentication',
        'rest_framework.authentication.SessionAuthentication',
    ]
}
Since the above is only a default setting, there is a better approach. As per the official docs, we need to import the permission class,
from rest_framework.permissions import IsAuthenticated
and then add the line below in our API View Class.
permission_classes = [IsAuthenticated]
Our final Prediction API Class would look like below
class IRIS_Model_Predict(APIView):
    permission_classes = [IsAuthenticated]
    def post(self, request, format=None):
        data = request.data
        keys = []
        values = []
        for key in data:
            keys.append(key)
            values.append(data[key])
        X = pd.Series(values).to_numpy().reshape(1, -1)
        loaded_classifier = PredictionConfig.classifier
        y_pred = loaded_classifier.predict(X)
        y_pred = pd.Series(y_pred)
        target_map = {0: 'setosa', 1: 'versicolor', 2: 'virginica'}
        y_pred = y_pred.map(target_map).to_numpy()
        response_dict = {"Prediced Iris Species": y_pred[0]}
        return Response(response_dict, status=200)
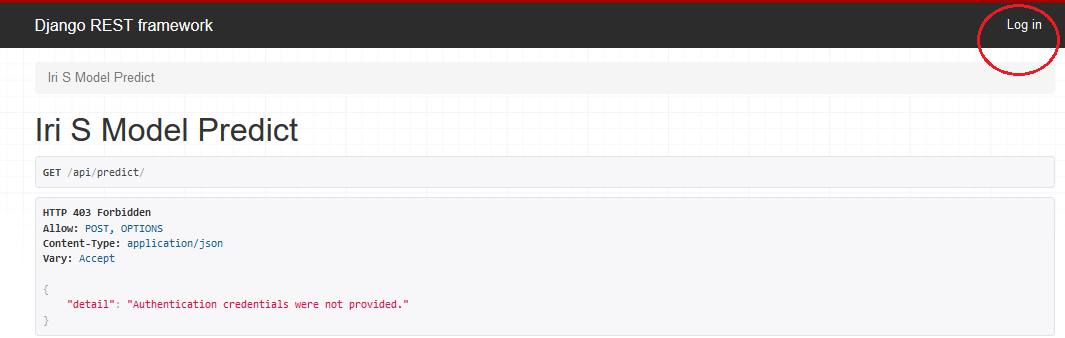
Save the views.py file and restart the Django server. If you then try to use the prediction API without user login information you would get the error below.
{
    "detail": "Authentication credentials were not provided."
}
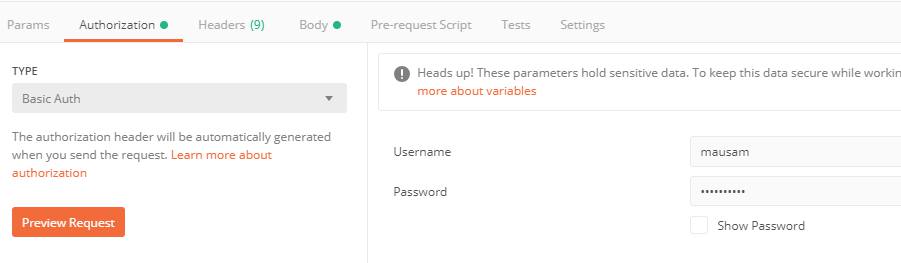
If you are testing using Postman, you would need to provide login details in the Authorization section with Basic Auth as below .
If you are testing with your browser. You need an additional step in Django. For browsable API, you need to add the following url pattern to the main project's urls.py file.
urlpatterns += [
    path('api-auth/', include('rest_framework.urls', namespace='rest_framework')),
]
This is so that you can press login urls from the top right of the browser, which land you to a login page. You can either add the above line of code or modify the existing global urls.py file such that our urls.py looks like below.
from django.contrib import admin
from django.urls import path, include

urlpatterns = [
    path('admin/', admin.site.urls),
    path('api-auth/', include('rest_framework.urls', namespace='rest_framework')),
    path('api/', include('Prediction.urls')),
]
If you now go to 'http://127.0.0.1:8000/api/predict/' through your browser you would see a login button appear in the top right corner.
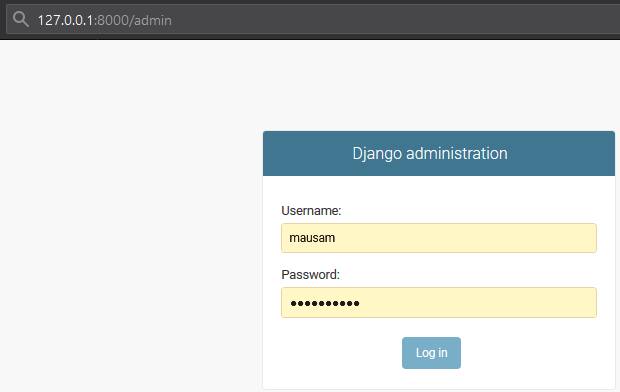
You may login with the superuser credentials you created earlier. Once you have logged in, you can test the API as before.
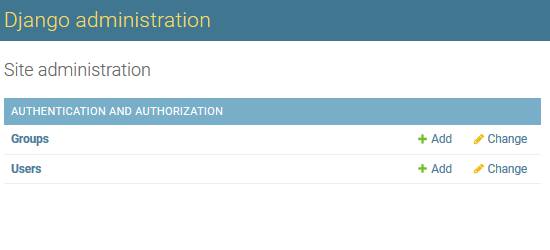
You can add more users for your API by going to Django's admin portal with the url '127.0.0.1:8000/admin'.
Login and press the add button on the Users line.
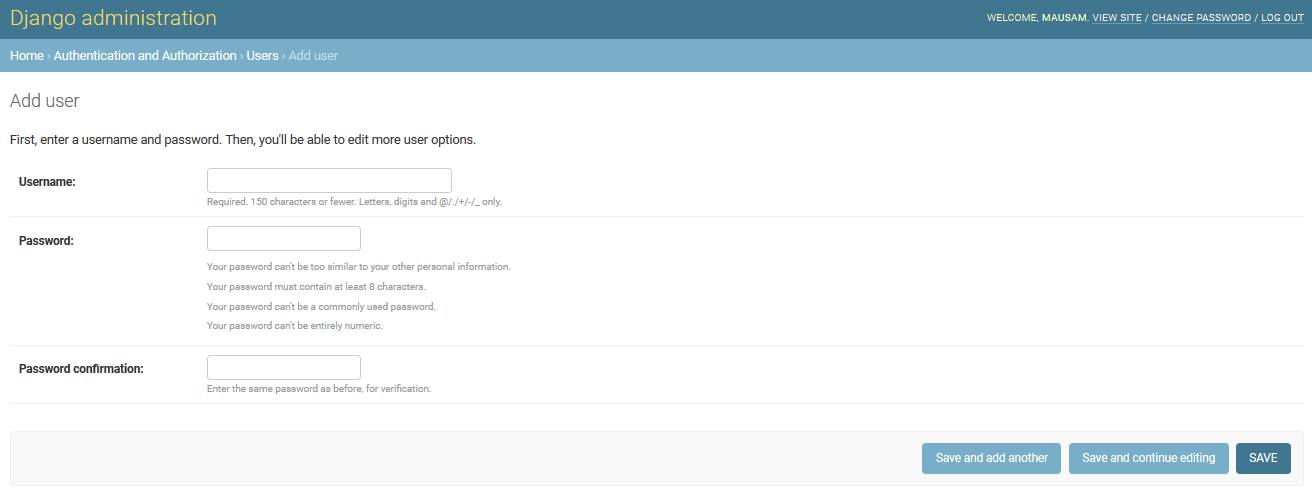
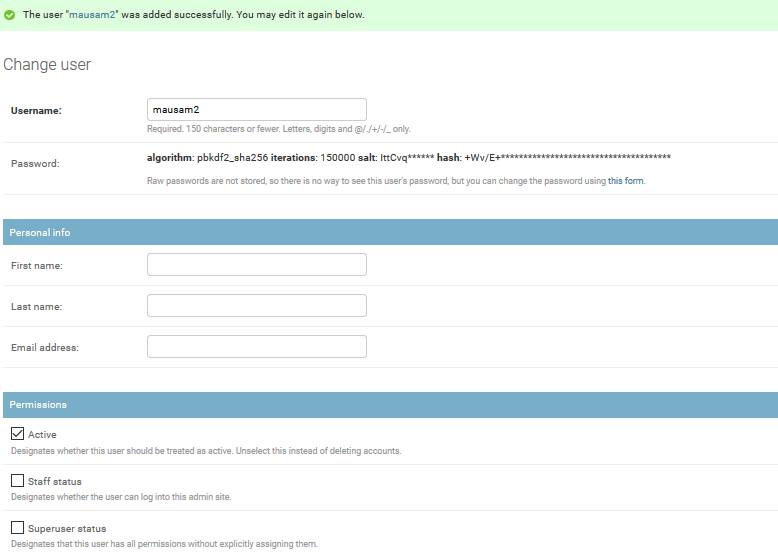
From the admin portal you can manually add other users for your API as below.
There are lots of options and customizations possible for your users from the admin dashboard.
Also, if you are using some other authentication methods or even 3rd party authentication packages such as API Key Authentication, they provide additional functionalities such as re-generating API Keys from the dashboard.
Throttling our REST API
Running a prediction model from an API can be resource intensive (depending on the model) so if the number of requests per user within a given time-frame are not throttled then it may put too much load on the server which may cause it to run into issues. There are various methods to customize throttling for your users. However, since we used the basic authentication above, I would show how to customise throttling for users in one of the simplest ways. For other methods and options please refer to the official documentation here.
Create a new file called 'throttles.py' inside your Prediction app. Open the file and put the below code. Just for demonstration we are creating two throttling classes which inherit from the UserRateThrottle class.
from rest_framework.throttling import UserRateThrottle

# Custom Throttle classes
class LimitedRateThrottle(UserRateThrottle):
    scope = 'limited'

class BurstRateThrottle(UserRateThrottle):
    scope = 'burst'
We set the cope to be 'limited' and 'burst' within these classes.
Now open the global settings.py file in the main project folder (APIProjectFolder). Add the following lines of code. Basically we define our default throttle classes as the ones created above. Next we provide the throttling rate for these classes. The unit shown below is minute(s) but it can also be hour or day.
REST_FRAMEWORK = {
    'DEFAULT_THROTTLE_CLASSES': [
        'Prediction.throttles.LimitedRateThrottle',
        'Prediction.throttles.BurstRateThrottle'
    ],
    'DEFAULT_THROTTLE_RATES': {
        'limited': '2/min',
        'burst': '10/min'
    }
}
Open the views.py file in our Prediction app. Add the below import line at the top as we want to use our newly created throttling classes in our APIView.
from .throttles import LimitedRateThrottle, BurstRateThrottle
Add the line into our IRIS_Model_Predict APIView class at the top below the permission classes variable.
throttle_classes = [LimitedRateThrottle]
So our final APIView class would look like below.
# Class based view to predict based on IRIS model
class IRIS_Model_Predict(APIView):
    permission_classes = [IsAuthenticated]
    throttle_classes = [LimitedRateThrottle]
    def post(self, request, format=None):
        data = request.data
        keys = []
        values = []
        for key in data:
            keys.append(key)
            values.append(data[key])
        X = pd.Series(values).to_numpy().reshape(1, -1)
        loaded_classifier = PredictionConfig.classifier
        y_pred = loaded_classifier.predict(X)
        y_pred = pd.Series(y_pred)
        target_map = {0: 'setosa', 1: 'versicolor', 2: 'virginica'}
        y_pred = y_pred.map(target_map).to_numpy()
        response_dict = {"Prediced Iris Species": y_pred[0]}
        return Response(response_dict, status=200)
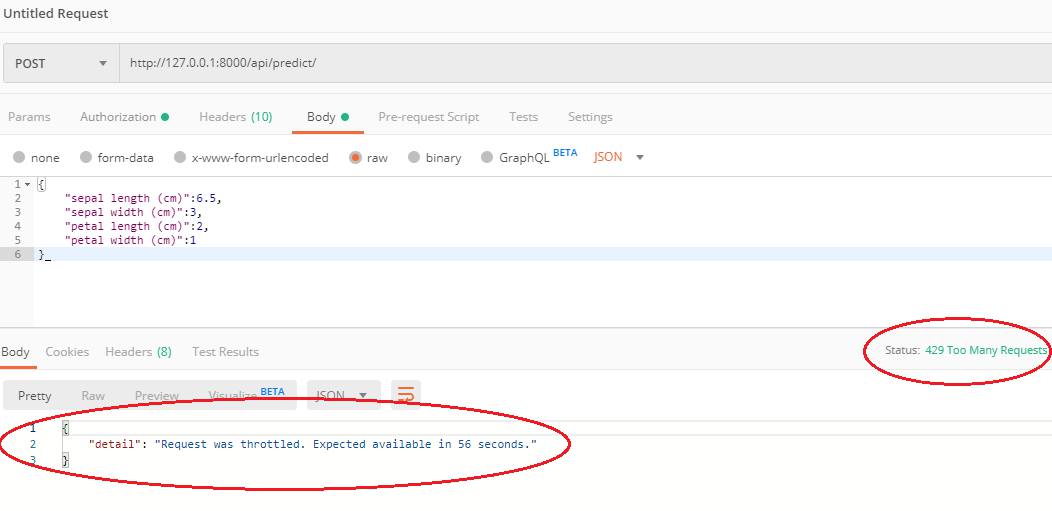
Restart the Django server and we are ready to test our API. Since, we have set the throttling rate at 2 requests per user per minute, we should not be able to make more than 2 request per minute. Open Postman and try to make 3 requests within 1 minute. On the 3rd attempt you would see the following message. You would also see the status response code of 429, too many requests from the server.
To increase your throttling rate per user you may use the BurstRateThrottle class in your APIView or increase the rate in the settings.py file.
At this point you are ready to fully productionize your Machine Learning Model API. To productionize your API you would need to run your server from a remote machine such as cloud Linux servers from AWS. There are many options available from other vendors such as DigitalOcean, Azure etc. However, the best one in my opinion is the AWS EC2 free tier which allows you to host your Django app for free for almost a year. Try to use the Ubuntu servers from AWS EC2. Once you are set up with the AWS EC2 free tier, the next thing which you need to do is to transfer your project files to the EC2 Ubuntu instance through Git Hub. Next you need to set up a NGINX server to host you Django Web App from a cloud server. You can use the following guide from DigitalOcean which explains in a very clear and concise manner how to host your Django App from Linux Ubuntu with NGINX. The guide is here.
Also as suggested before, if you need to encrypt connections to you Django application with https for free, this is the guide to follow.
If you followed the steps above correctly, you should have no issues in creating a machine learning Prediction API and setting it up to production grade.
All code for the above is located here on github.
That's it folks! Hope you enjoyed the article  .
.
Post your comment